Repairing damaged crank keyway & replacing the seal. 
You are here, because of crankshaft snout keyway damage. (see alternate cures)All threads are RHT, right hand threads (lefty loosey!,righty tighty)
Some FWD engines turn backward and have LHT, not this car.
The 17mm (tool-size) crank bolt, torque spec. was changed in 1996 by a Suzuki TSB.
Many service shops fail to read this TSB , and set it wrong, and then the keyway is damaged.
This damage never happens if you read the TSB,
Or using Impact guns on that 17mm bolt head ! Stop and think, will you like $500 repair after that silly act? Those threads can not take that punishment...
SOLUTIONS BELOW: (all) "aftermath"
Or using Impact guns on that 17mm bolt head ! Stop and think, will you like $500 repair after that silly act? Those threads can not take that punishment...
SOLUTIONS BELOW: (all) "aftermath"
- A new crank for $300 + labor. (I just did one,) or find donor short block.
- I
never use Dollar Store, epoxy. (JB-nonweld ,etc) IT HAS NO DATASHEET spec. (FYI) JB-Glue is what it is.
- I use Loctite products. Only, Fully documented, and tested performance, even by the USA Military.
- A Top FIX is using real STRUCTURAL EPOXY By Loctite.
- Some
just welded the key to the old slot, with very hard to do getting
TDC right. (do so, with welds now ground flat, on snout, ) Doing so on
car is near impossible and not melt the front main bearing. I'd not do this.
- Cut a new key slot on backside of Crank snout, and change
timing marks. (my local machine shop does this, crank in hands.
Do not wreck the front seal,
(the Suzuki seal protect tool , is no longer sold )
Use tape or wrap Coke bottle plastic around it or use duct tape (1001 ways to use Duct tape)
Use tape or wrap Coke bottle plastic around it or use duct tape (1001 ways to use Duct tape)
 Bad Crank key |
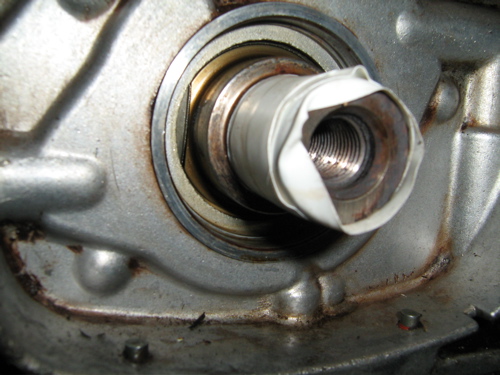 protect seal before insertion |
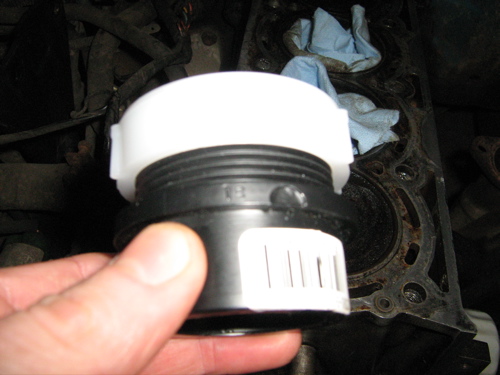 DIY seal driver |
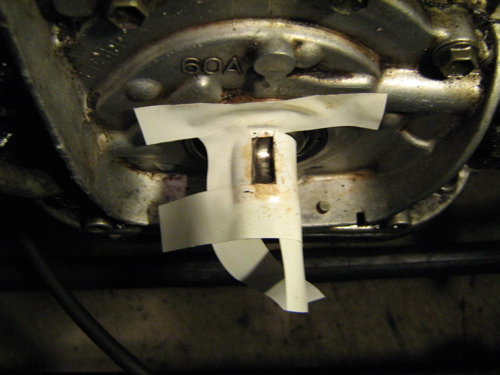 mask before 660 apply |
 key in place |
 done. |
This page assumes the Crank pulley was removed with 17mm Deep wall socket and 1/2" drive Breaker bar.
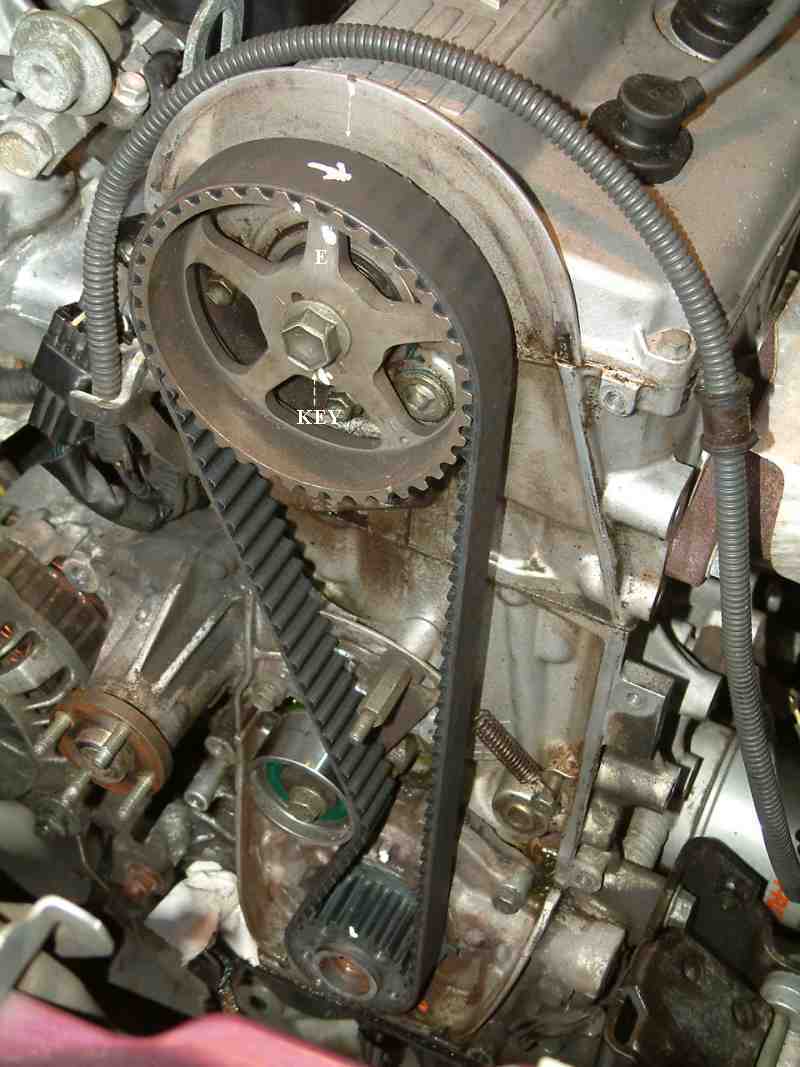
You are here because the Tbelt install failed or failed the sneak-A-peek or acid test failed.
SEE THE SLIDE SHOW IS HERE.
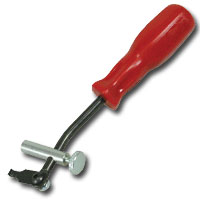
If the cog is hard to take off?, make this tool.
Begin with "Loctite 660 or 271(tm)."
- Gain access to the crank pulley, accessory belts off, and remove the small pulley bolts (with special heads) and then the 17mm huge bolt , turns CCW to remove (lefty loosy) and on most cars, takes over 100ft/lbs after being set correctly for so long, and will need a breaker bar top do that. not some, 3/8 drive weak ratchet handle. If found loose, look for damage, there will be. (not at TSB spec)
- Big Bolt is now off, got damage? Damage happens on 4 places, snout, the crank snout back stop. the cog back side and the cog bore. (most I see are all 4 bad.)
- I replace the cog and bolt even with tiny odd wear, at the drop
of hat. I do that. (after all , I want it to run 300k so... this
is one way to get there)
- Read my Notes section.
- Pull seal, by hammering with a small nail, making a hole in
the seal rim. ( a real seal
puller is by far easier)
- Then
insert a sheet metal screw in tiny hole and use that, to pull seal. The
key point here (no pun) is to never damage the seal soft bore or crank
surfaces.
- Seal is out, make a protector Suzuki J34853 (no longer made or sold),
we had
to use tape. Duct tape can work.
- Slide seal back in , and drive it home with a DIY seal
driver, using plastic water pipe couplings ,etc. Nothing fancy, huh? Or EMT couplings. I use loctite red on the rim.
- Seal is done, now we patch up that loose crank key.
- Some minor damage, at key.?
- I file the top edges of the key, slot to the crank is now perfectly round again. Square up key with file and re-round the
shaft.
- The key way must be cleaned with Carb
cleaner (MEK or Lacquer thinner
, Acetone , not oil based paint thinner) (nothing with residue)
- I use #660
Loctite � or Loctite 271 ,on key and key slot, then side in new
key, (see slides above) In a panic? try
these ?
- Next , this 660 product only dries when all air is removed, so I taped the whole end up with duct tape. I then waited 2 days. (over kill )
- Loctite does sell a 600 fast cure additive, this is the best way to get a fast cure, see video below.
- The only hard step, and not moving the key while
sealing it up from air exposure, like a mummy, is tricky. With no accelerant.
- If I can't see TDC, using my tool at piston top, (spark hole) i
set true TDC then mark the end of my crank to have a TDC true
mark. (after all, key damage is unlimited and no longer valid, so mark ture TDC here.)
- I was careful to center the key center line at TRUE TDC (I have a tool for this), and then used 660
and wrapped it with tape (starving it of air)
and the next day, the key is rigid.
- Let it dry a minimum 24 hours. file/cut it, to clean up any excess loctite. The key only needs to be at TDC unmoved, before and after the 94ft/lbs torque , the key does NOT hold the cog on any running engine.!!!
- One extreme cases, with new cog and worn snout outer surface. I then...
- Apply loctite 271 to the outside circumference. of crank snout. just a little , with finger ( nitrile gloves) " For disassembly, heat parts up to 482�F (250�C) and separate parts while hot." part?
- Slide on new
lower crank
cog. ( I made a puller to pull my cog, next
timing belt
swap, it is easy to make)
- Put in the new crank bolt and 242 onto the threads.
- Lock the
crank (use 5th gear with 5speed) or flywheel locker,etc , or
Suzuki
J23571 pn: 09924-17811
"Suzuki pitstop plus" , no longer lists this part (sadly)
- Tighten 17mm bolt to 94 /lbs/foot. (TSB spec. is a revision to all pre 99 kicks (retroactive.); this applies to all 1989-1998 kicks and tracker G16 anything)
- Let sit 6 hrs. min. (242 at room temp 22C) (24hrs, at 4
deg. C) the data sheet covers time and temperature rules, read it.
- Complete Timing belt re-installation.
- It's a runner.
Shear strength of
#660,
is 2000 PSI and up to 4000 PSI.
for sure there is nothing better than 660, but takes skill to use,
(clean surface and tad rough, use 400 wet/dry grit sand paper go get
there)
The truth is , that if you can get 271 to hold the key until last step 28, you do not need 660. "The key does not hold the cog still , on any running engine."
Suzuki J34853 P/N:09926-18210 , sadly no longer made, 4/29/09 , R.I.P. You must grow your own tools and ways. (duct tape?)
Read other persons post on how to fix this problem. Nice photos.
Why does it fail:?
KEY POINTS:
Keep in mind at all times, the key way has NO other function , other than setting TDC. (initial alignment only)
The key way does not hold anything on , or hold any loads whatsoever. ( a fact )
A fresh new bolt is the most important repair here, as is the 94 lb/ft torque. ( consider 242 on the bolt threads too)
In fact, doing that and aligning the crank cog and crank slot is all that is necessary to be successful ( good news, really)
The pressure of the cog against the crank boss, is top issue here! A fresh new cog is only $25 at Suzuki ! Get ONE !
That first step on the boss below. one can put a tiny amount of 242/243 Loctite(tm) on that boss, leading edge.
Do not use too much, as you don't want loctite, on the seal.
Below photo, is of the Timken Kwk99128 seal ring kit applied.( for new seals that don't seal , this is a solution)
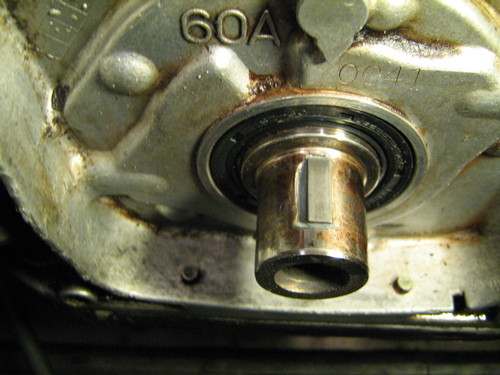
Crank snout ,with out oil pump, cog , or pulley. Photo 1: G16

Warning: that lip seen here , Point of Impingement FACE must not be all torn up, looking like the top of a pizza, or it will never stay tight.
This boss, must be still square and flat and still 90 degree's, not chopped up, or the cog has NO CHANGE of lasting. (some do, 660 the whole thing(radically)and it works ! )
YMMV, or YCMV, your crank may vary?
This top edge is sharp and will destroy all new seals , installed, unless you RTM. (read the manual) It is just like a knife. SEE IT?
This view is OIL PUMP OFF ,for clarity. (and upside down)
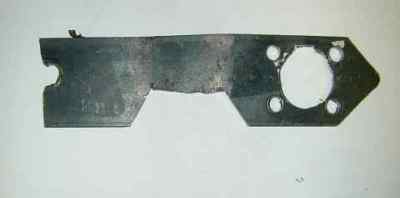
Aluminum plate , click to see tool alone, Photo 2: never need on any 5 speed M/T car. (use 5th gear)!The truth is , that if you can get 271 to hold the key until last step 28, you do not need 660. "The key does not hold the cog still , on any running engine."
Suzuki J34853 P/N:09926-18210 , sadly no longer made, 4/29/09 , R.I.P. You must grow your own tools and ways. (duct tape?)
Read other persons post on how to fix this problem. Nice photos.
Why does it fail:?
- The Nincompoop , or Previous Owner (PO), mechanic never used a torque wrench in their life or could not find a way to lock the flywheel.
- All books published get this wrong, the TSB is the only valid pages. (But real Suzuki books 1997/98 do get it right..)
- The TSB spec.! 94 FOOT POUNDS ! or using the 1989 obsolete torque specs. why?
- A Gorilla, used a powerful impact gun and yielded the main bolt (that means it's not any
good now, even though it looks perfect) Funny, how most cars FSM today, tells you now, not to do this... act.
- The cog is damaged, and has an oval inside hole. (same with crank snout or both !)
- Someone doesn't know, there are 3 cogs used and not to mix
them up. pre 95 (with separate washer), late 95(integral
washer (upgrade) and 96 and newer.(w/ tone wheel,CKP trigger for OBD2 {USA})
- The China made oil pump
is too thick and the COG hits it, seen 3 now. Trash it. (but a
bad cog (rear side worn out from wobbling) can do the same trick, Deity help you.
- Same with crank backstop beat to death (looks like waves not a square wall)
- Someone used a G16 esteem cog, sorry that just won't work. See slide show.
- the nincompoop, used an impact gun to take it off and was very tight (rust and time) and this ripped the treads, out of the shout, in 1 microsecond. (so sad to watch you , most times is not your car.... )
- I heat the big nut to 200f, and then spray penetrating oil on the
juncture, and hope it sucks in some of that spray , then wait an
hour, and use a breaker bar, to crack it loose, if it's too hard to come off, smile and use a TDC tool to make sure the crank is at TDC (marks are correct) and just leave it there, (seal not needing change out) If found way off , that means the snout was HACKED and needs attention.
KEY POINTS:
Keep in mind at all times, the key way has NO other function , other than setting TDC. (initial alignment only)
The key way does not hold anything on , or hold any loads whatsoever. ( a fact )
A fresh new bolt is the most important repair here, as is the 94 lb/ft torque. ( consider 242 on the bolt threads too)
In fact, doing that and aligning the crank cog and crank slot is all that is necessary to be successful ( good news, really)
The pressure of the cog against the crank boss, is top issue here! A fresh new cog is only $25 at Suzuki ! Get ONE !
That first step on the boss below. one can put a tiny amount of 242/243 Loctite(tm) on that boss, leading edge.
Do not use too much, as you don't want loctite, on the seal.
Below photo, is of the Timken Kwk99128 seal ring kit applied.( for new seals that don't seal , this is a solution)
Crank snout ,with out oil pump, cog , or pulley. Photo 1: G16
Warning: that lip seen here , Point of Impingement FACE must not be all torn up, looking like the top of a pizza, or it will never stay tight.
This boss, must be still square and flat and still 90 degree's, not chopped up, or the cog has NO CHANGE of lasting. (some do, 660 the whole thing(radically)and it works ! )
YMMV, or YCMV, your crank may vary?
This top edge is sharp and will destroy all new seals , installed, unless you RTM. (read the manual) It is just like a knife. SEE IT?
This view is OIL PUMP OFF ,for clarity. (and upside down)
Click here to see all tools made for the crank locks (diffr. situations).
The crank has a step in it, this step was designed (sadly) to destroy every seal inserted. ( some have tried 5 times {no protection} and failed)
A plastic coke bottle can be cut up in a cone shape and fitted and used with duct tape.
Do not force the seal over this step with out protection ! Or you will be sad when it leaks , later.
My tool. (not really needed if you use large ViseGrips(tm) on Flywheel ) [but I like a nice tool to do this]
(Here are all my tools for locking the crank /flywheel (besides 5th gear)
This page shows all locks for the crankshaft, 7 ways !, pick one, depending on situation.
If you ever later have to remove the loctite from the parts, use any brand paint-stripper with methylene chloride. Easy way !
Photo 3:

96 motor, Photo #4
Parts: Suzuki parts all below: 1.6L SOHC only:
CRANK Bottom Cog wheel: (96-98) (CKP tone ring integrated "spikes" as seen above)
All the parts you need to fix this, all are Suzuki Part Numbers and are very inexpensive !
The below is my P/N for USA Sidekicks. Please confirm with Suz. before using my numbers, I might have a typo.
2010 prices (typ) SUZUKI Sells these first 5 parts (exclusively)
| Suzuki Part name. 1.6L |
1989 to 95 8v
only. |
1992-95
$ year 2011 |
1996-98 | I.D.# |
| Crank
Cog wheel. Tbelt lower |
12631-86500 all 8v | 12631-53B00 16v only $31 | 12630-57B01 (with tone wheel) | 28 |
| Crank Key. |
08341-31059 all motors | 08341-31059 $1.56 all motors | 08341-31059 | 25 |
| Crank Pulley screws 6-20mm
x5 |
12618-71C00 all 8v |
09103-06185 16v $1.44
each |
09103-06185 | 30 |
| Crank main shoulder
bolt. |
12619-60B00 all 8v |
12619-53B01 16v only
$9 |
12619-53B01 | 31 |
| Spring for tension idler |
12821-60A01 | 12821-71C00 16v only , $3.24 | 12821-71C00 | 6 |
| Front cover. of Tbelt |
11390-60A11 |
11390-71C00 16v only $33.00 |
11390-71C00 | 14 |
| Front cover gasket |
11396-60B00 |
11396-71C00 8/16v
$5.00 |
11396-71C00 | 18 |
| Cam Seal |
09283-32026 (8v) |
09283-32038 (8/16) | 09283-32040 | 32 |
| Crank Seal |
09283-32022 (8v) |
09283-32038 (8/16) | 09283-32040 | 26 |
12610-60A50 (1989/90) 12610-71C00(91) 12610-71C11 (92-95) and 12610-61G00 (96-98) (sometimes the pulley rubber bond, slips and timing marks are all wrong.)
Warning using the wrong screw (6-20mm) screws, that is buying ISO 6mm screws have the wrong heads, and hit the pulley and if you do that a socket drive will never fit it. (warning)
Many shops use Allen screw here, to solve that riddle fast. #3 item above.
THE GM part Numbers are here:
Please allow Suzuki to update these numbers, call them , as some are superseded, in fact the 92-95 cog has the washer deleted and the cog has built in this washer.!
In 1992 the 5 crank pulley bolts (M6x20 changed from 7 ft/lbs to 12 ft/lbs torque , (higher grade is my guess) you might consider upgrading to 92 bolts.
6mm ALLEN BOLTS?, (rumors, are true) none of the bolts above are Allen. (if you buy them from Suzuki) How they got there, nobody knows, nor cares.
Some one said , some are Allen, but if I buy , today, all three, 6x20mm screws above, I get 8mm hex heads ! From Suzuki. (GM just laughs at me.... GEO what's Geo)
How ever Samurai used 2 bolts not used by 1.6L kicks, but are used by 89' only 1.3L kicks/ and all Samurai 1985 to 94 use 01517-06203 (superseded now)
The Samurai 1994-95 V.I.N. R4100576~ used 09103-06185 (same as our 92-95)
My guess is some shops,used the Samurai bolts or 1.3L kick bolt. which may be Allen. ? They rust fast and then strip, the 8mm heads work best.!
If you must use Allens, use SST with anti seize. (you might, if down time is a factor)
ODD fact #2 the heads of the M6 bolts are 8mm hex, not 10mm
so if your hardware store , ISO 10mm heads don't fit (see them hit the pulley radius or cant fit a socket there, BINGO.wrong bolts)
Buy the bolts from SUZUKI THEY ACTUALLY FIT ! A 1/4" drive 8mm socket works so good, it's amazing...
The Crank main bolt 17mm head must be torqued to 94/ft/lbs , or the key will fail again. I always run a new bolt for $9 The cog is $32 ( it will run like this forever)
The cog fits tight , if not , it's wrong. (you be the judge, but any damage is see at all , gets new bolt and new cog, zero tolerance here , cog, key, bolt)
Pull the cog with a 3 inch length of flat bar, and two 1/4" holes drilled on center the cog holes (6mm) then put small socket in the center of crank and remove the cog.
The cog comes off just like a steering wheel. Same home made tool. (hack saw and drill 10min work) A new engine they fit firmly, not and interference fit at all.
I recommend buying a great "Gates Rubber Timing Belt" kit. With discounted Idler !!!
Again, the crank bolt will stretch and loose its elasticity. seal Replace it if it seems original, tired, rusty, weak or iffy.? I would !
NOTES:
Loctite 660 spec page:
test this new tube of loctite first to be sure its good, reports of bad batch,(old stock) put it in a place with no air. see if it hardens.?
EG: take two bits of flat steel, glue them together with 660 and "C"-clamp them for 1-day. in doors warm. it will be near impossible to remove. Other wise it is bad.
DO not fail to read the Loctite engineers post here ! (BLESS HIM !) Mr. "Softop"
CAUSE : Not using the factory TSB mandated 94ft/lbs is the cause. All books written authors, never read the TSB ,so they are ALL wrong. (except Suz, 97+ FSM's)
Before starting rules:
The crank snout must be still Round and intact on the circumference. The COG must not wobble after installation.
The new cog must fit the snout as a perfect slip fit, no wobble or have concentric errors.
The new cog must fit against the crank back stop, perfectly with no crank back stop damage and on 96+ the cog teeth must not dig into the pump housing.
Under these conditions the 660 works like magic. ( this "glue" needs to be starved of oxygen to set , give it 24 hrs cure, see chart on the data sheet above !)
The key way can be really beat out and be ok, but must not be beaten down into the bolt threads. ( no damage allowed there.)
The Key only allows accurate TDC indexing after you are done, the KEY never receives any forces running and is useless after assembly! A Key Point ! No pun.
PLAN B:
If the crank boss (flange or as my photo says, point of impingement ) is mangled then Loctite 660 the whole thing. new cog and new 17mm bolt.
AMAZON now sells 660 too. (2010)
The video. to use 660. note use of accelerant.
All possible solutions: (JB nonweld weld is no good or hot engine parts! )
- The above loctite 660 solution above. (it
cures with lack of AIR)
- Cutting a new key on back side of crank snout, 180 degree's from original key (and moving TDC mark on the crank COG 180 Degrees to match it.)
- Cutting bad key slot forward and then making a long flat Key fit. "the extended key fix" with loctite 660.
- Welding key into old slot. and machining it to nice fit.
- A new or rebuilt crank with matching bearings . $250+ Crank kit 1 Crank kit 2
- New or rebuilt short block. ? (take yours to a good machine shop)
- Newly rebuilt engine $2000 (google that)
- A Used engine ? (YMMV) Beg for one one Craigs List.
- Some "nincompoops" weld the whole cog to the crank snout ( Deity help you , if you get a future bad crank seal) ( this is the last refuge of a scoundrel fix)
- Take out crank, take it to any machine shop , and ask for help. (yes, they can fix it , ask them!) "do not mix up bearing shells or DIRECTION the are color coded"
(do not pass weld current through the babbitt main bearings, attach the welder to the fly wheel, through the BELL inspection cover.
NEVER use the body of car or engine block, as your welding ground.
HOT TIPS ( buy a new cog and bolt and the car will run 100,000 more miles at 94ft/lbs. I'M sure ! (boss damage zero)
Make sure to use a new cog (they are cheap at Suzuki) so the surfaces start virgin fresh fit.
Make sure the new cog don't wobble. Read Loctite engineers notes above, for details....
Make sure the new cog fits perfectly flush with the rear crank boss ( this is all that holds it , the key does nothing for holding.)
Use a new key and bolt from Suzuki.
Use a real torque wrench and set the torque to 94 FOOT Pounds, 95 is ok , and easy to see on the dial. This new read the TSB spec was broadcast world wide in 1996 ! It's not NEWS.
China clone pumps are reported to hit the COG. Stop using them. They are too thick, from the knock off process (jive) Rockauto.com has good pumps. (never buy the cheapest pump)
After the repair, but before adding the belt spin the crank and look for cog wobble or on concentric running. (or it will eat belts)
After new belt is installed. make sure it runs true the belt on both cogs running (or fast cranking). if not the cogs are not square.
A new car to your shop , i actually measure the CCW reverse torque to remove the large crank bolt. See my tests here.
I'd pick 271. ( lacking 660)
Loctite 263,272,262,271 and 277 can all work for the key, only. some heat to remove parts, all are high strength. all take 24 hrs cure for full strength.
"Threadlockers are a single component anaerobic adhesive comprised of unique liquid resins that harden (or cure) to a durable solid when exposed to metal ions in the absence of air."
For the keyway this takes skill to apply and then starve the air to the damaged key section ( I used, lots of duct tape wrapped 10 times over my snout end.)
In a Panic? try 2 part epoxy? I'd not, but it is sold everywhere and does have a spec. sheet. (unlike JB-nonweld)
Use this Loctite epoxy weld if you must use cheap a general purpose epoxy.
The key only needs to be rigid at final assembly, the only Goal here.
I can not see the extent of your damage. the more damage there is, the more you need 660 ! . (Loctite is clear on that fact, "space gap rules, read the spec ") <<< cheap epoxy works best on small gaps.
The back stop at the crank behind the CoG must still be square (90degr) or all bets OFF. not wavy and galled.
The crank back stop must still be square too, or it will fail again.
Finding Fresh 660 or any loctite(tm) product, can be difficult, lots of old stock on shelves, and is pure junk that. (has a short self life) I used the fast hardener option from loctite. 271 products are more fresh and seems to work for many people in this jam.
Loctite brand (tm) has the best products, that work , are consistant, and run on a hot block without degradation, unlike, dollar store epoxy or JB-noweld(sic)
Some damage can not be cured here, with 660 or 271 products, damage can be great. Best is to start with new crank cog, when car was new its a tight fit. When the cog goes loose,it is damage and the crank snout.
A Related page is , TORQUE:
GOOD LUCK!
ALTERNATE CURES: (to glue magic above)
These G16 engines are getting rare to find and worse crank cores. (it's an underdog maker and very old)
Every snout destroyed, is one less core world wide.
- A used short block, (no damage) Off craigs list (all of craigs?) or at car-parts.com wreckers network. (don't forget you can WTB on craigs, !)
- A total rebuild engines for $2000 + $500 core
- A rebuilt crank with all new bearing matching the milled crank. Rockauto.com has them. (doubled in price in 6 years)
- The old crank can not be welded it's IRON (not forged steel) so snout damage is very hard to cure on the extreme cases.
- Cut the key 180 degrees on the back side, a New slot added for new key, with crank removed and taken to machine shop.
- Buy a wrecked donor car, call it the parts store.(or any with a dead a/t transmission, making car near usele$$ , except to you.
- By just crank core and have it locally reground for cheap. See them on car-parts.com (has "engine-blocks" too
Refr: Read the TSB
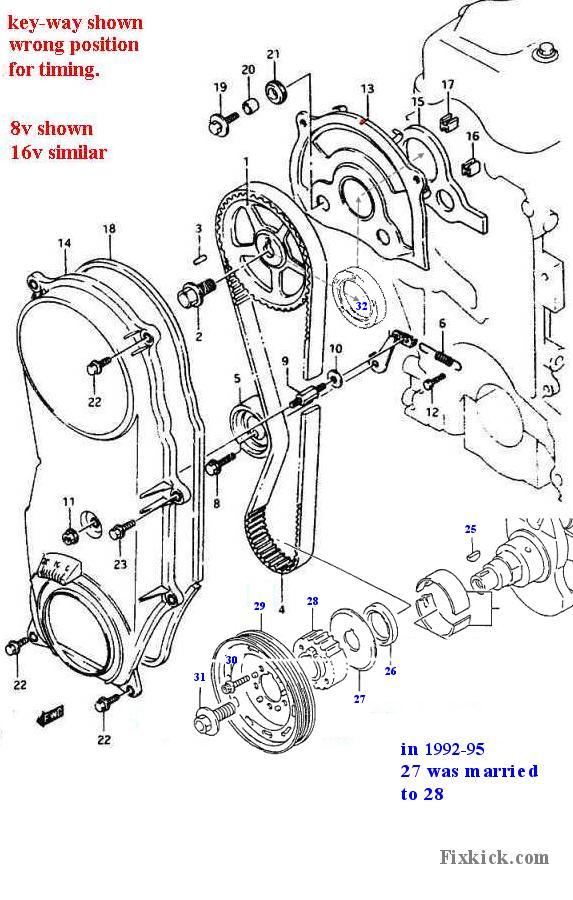
ver 17 4-1-2013 (ver,1 2007) Added parts blowup diagram. and ID # to matrix., added, finding a crank core...