
Rules to save cash ! See tests here.
If the synchro's grind or baulk? Install a new clutch cable, as all cables, now are bad, this old, after 150k miles, they get a groved inside ,where no human can see, and stick. (chaos here is maddening) A $25 easy fix too.... Set free play NOW.
If the trans area, makes noise with light foot on clutch, taking up slack gently pressing clutch pedal? ) , that is a bad throw out (T/O) bearing (assumes free play in cable is at spec at both ends of cable.)
If the trans (clutch really) makes noise with foot on the clutch pedal deep pressed , but never with clutch pedal lifted, (foot) and passes the T/O test above, this is a bad flywheel bearing, (pilot tip bearing)
If the tranny whines in netural, it does have bad bearings. end of story, not above..., but if it makes noise only moving, change out the U-joints first. (use and electronic stethoscope to hear who makes noise, Tranny or Transfer case?.
If all gears balk? that is a bad clutch, it drags. Set cable free play NOW and a new cable NOW. (prove clutch cable is bad now or maladjusted, do not waste 10 hours labor pulling the transmission,etc)
If only one gear grinds (1 of 5), that is usually a bad synchro ring, just on that gear. ( down shifting is worst case test... and 2nd gear usually fails first....)
Never do's ,
Do Use pipes (have lots of sizes on hand, metal, PVC and EMT) to press at the center boss of the bearing.(only)
Even a set of pipes and a rubber mallet can sometimes assemble this box no problems. (but they are interference parts, (bearings) and these can vary in NEED (reality of it).
Removal with just a gear pulller works, if too short?, use chains, (I have a press but found most steps , need no press) Having a bearing wedge plate helps.
See new slide show, with comments.
The 1989 to 1998 box can be interchanged, but not the transfer case (output splines different) do not swap transfer case across the 1996/95' year line or the rear prop shaft will not fit.
See the quite different 2WD box here.
This is Just my crude journal, of my rebuild, day1 ownership back in 2007. (how to stop the endless tide of GL4 leaking.... )
(eg. Suzuki Sidekick or Geo Tracker, 1991 4wd ) Jump to new shifter lever end bushing repair.
The year code is stamped, on the top leading edge of main case. (same code as VIN year and engine year code!) USA rules.
In 1996 they changed spline count !
The Factory shop manual for this tranny /tranfer case box and axle gears, are here. see Mirror.(5mb size pdf)
Cick image to zoom
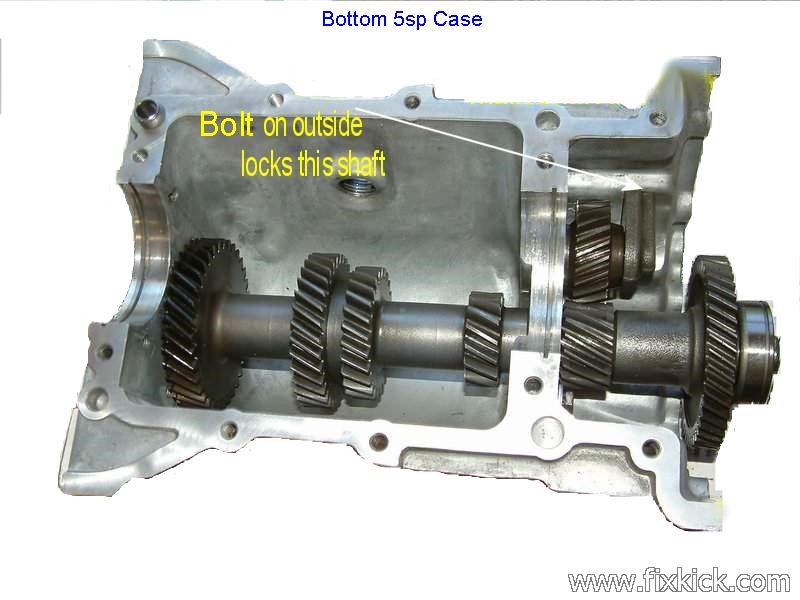
The 4wd car center casing runs dry, and has a bottom drain to warn you of any seal leaks at end of 5sp or front of transfer case (seals bad?). (in my case, were MISSING)
See my transfer case page.
Both cases empty of gear lube GL4. (for sure the transfer case will give you a bath in GL4 (gear lube API grade 4).
(the 2wd 5sp box, is total different deal, it will leak, if it is not drained)
Buy the rebuild kit here.
I Got my bearing -Synro kit here: http://www.drivetrain.com/suzukisidekickgeo5sp.html
Gather tools.
Specs: (from FSM) My page is no subsitutute for any FSM made.
Synco ring side gap: minimum 0.5mm
Syncro , side notches , 1.4mm max.
Torque setting are here.(see tranny section)
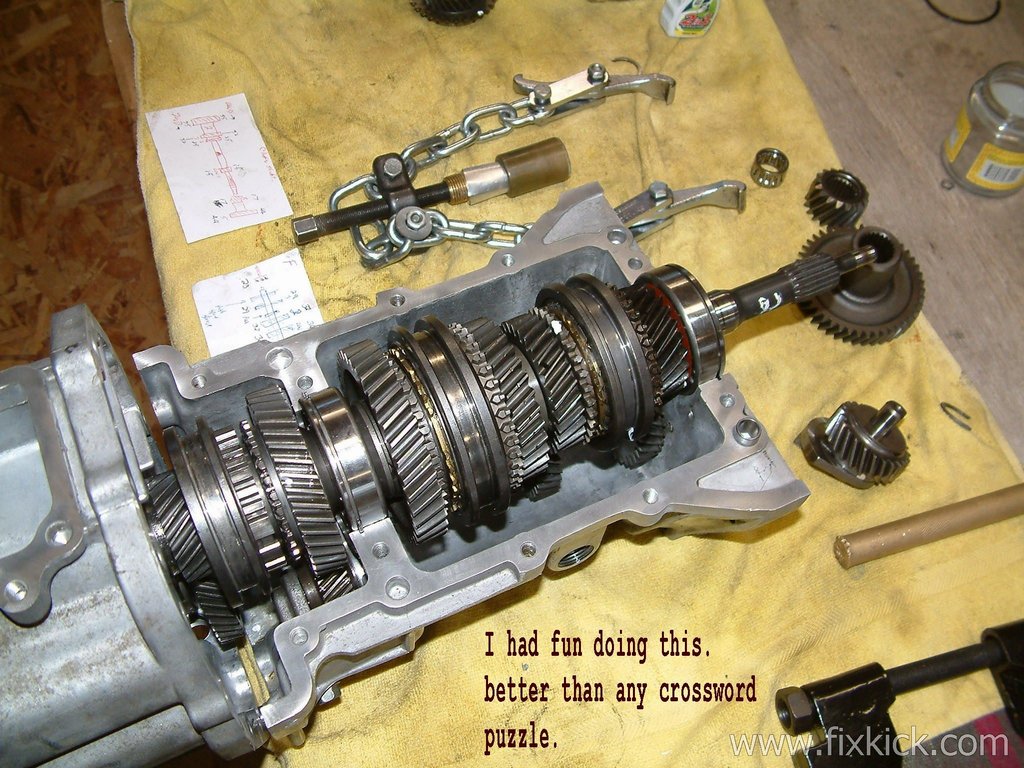
My Journal: (At each step I inspect the parts for damage or gears turned blue is overheated and are no good.) 4wd steps.... See new slide show, with comments.
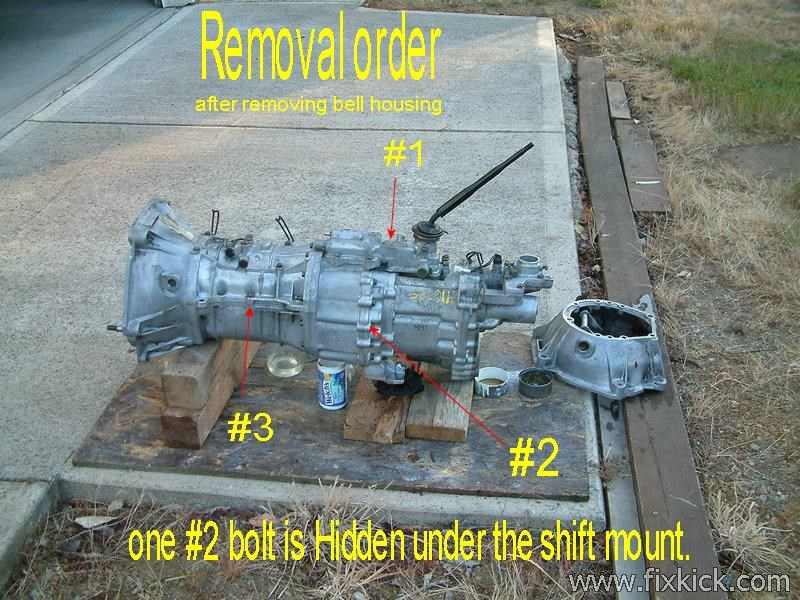
- You must remove the 5sp shifter base extension housing, so
you can find the
hidden bolt for the main case. At #1 above.
- Tranny is on bench now , transfer case is removed by taking off all mount bolts at Xfr case to center dry case.
- Remove
center dry section case, by removing all its bolts. (it has no
gaskets or sealants, 4wd , it's dry here, and has an air vent on the
bottom center.. (is that leaking? if yes, the seals inside are bad.)
- Remove the bell housing and front bearing pinion shaft cover.
- Remove the top
case after removing its bolts. Top is now OFF.
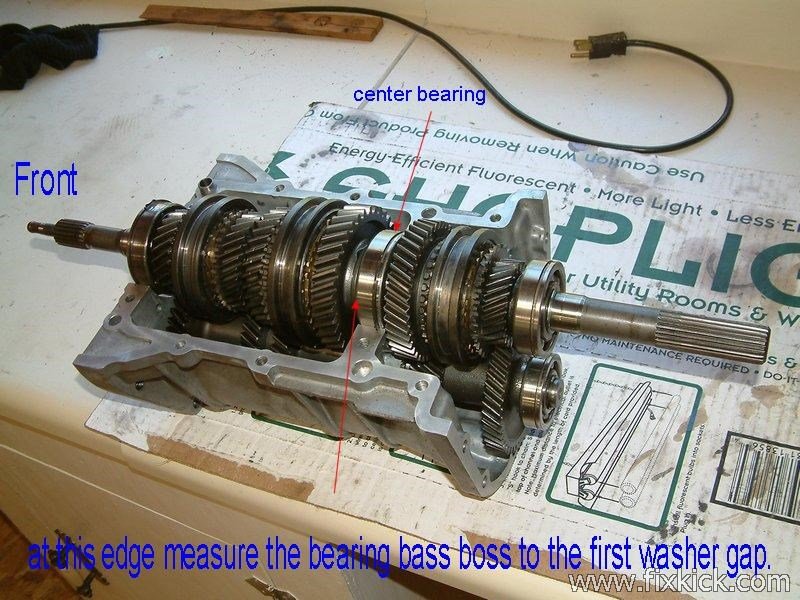
- I would first grab my feeler gauge set and measure the gap on the center bearing forward. Use a pry lever, (plastic) move the gear slack forward and measure the magic gap, (the factory tool is Unobtanium status)
- Write down that magic gap, number on paper.... for later on here.... My gap was 0.005" A.K.A, 5 THOU.
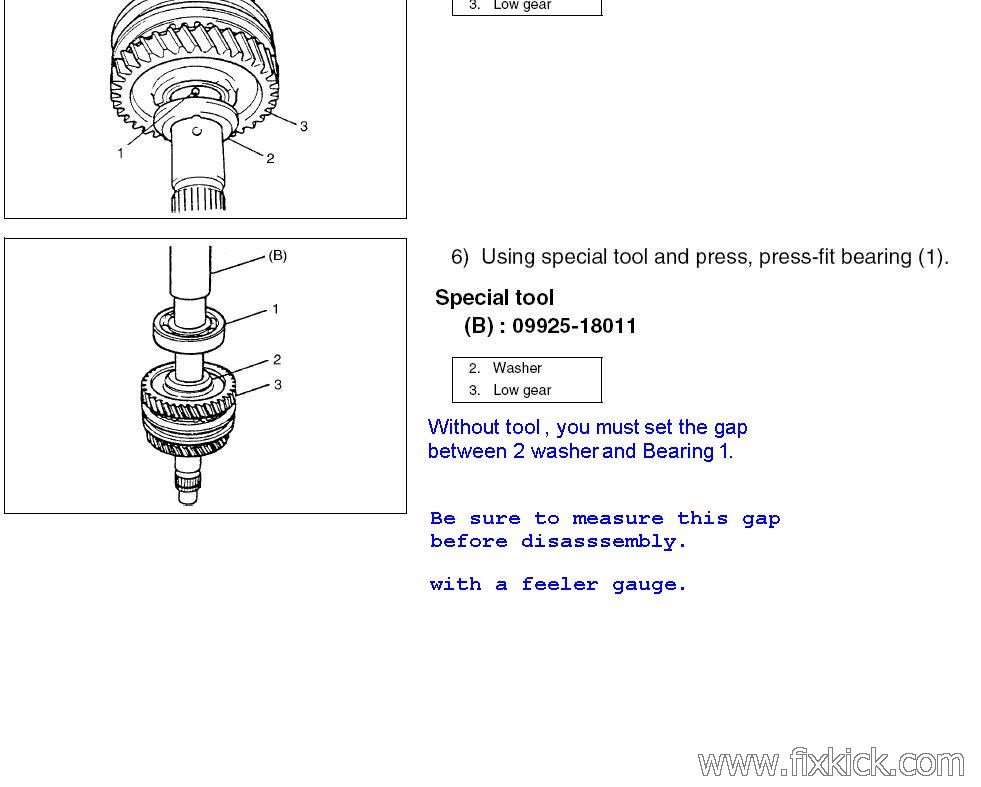
- Check the syncrho gap next. Seen in the factory manual
above, if too narrow the synchro cones are gone , worn to zero.
Buy new synchro cones that are bad.
- Lift out the main shaft, it just lifts out now. (bearing shells are split, it case top off)
- See the cluster, there, we will do that next.
- Remove the reverse gear bolt mount , see it at the right side of case , just behind fill plug.
- Remove the reverse idler gear next, now that the bolt
above is out.
- To remove the cluster, (bottom gear ganged cluster set)
remove the rear gear first, take of bearing after snap ring off #32 end. (see
drawing #1 blow for ID comments, like #32)
- The rear gear just slides off , showing the cluster rear smaller bearing.
- Next , remove the cluster rear bearing retrain clamp #33. ith 2 bolts inside casing.
- Then remove the front cluster bearing, snap.#60 ,
with drive wood dowel , usa soft hammer to hit the front end of
the cluster shaft, and the whole bearing and cluster slides to the
rear.
- Then remove the bearing (29/30) with a gear puller , the cluster now slide further rear and the front can now tilt up and out, removing the whole cluster, replace the front bearing and put back cluster and new rear bearing.
- Reverse the above procedure to assemble the cluster gear
set back in to case but put on new bearings.
- Put the both front and rear (center really) bearings in place and tap the cluster back in place with the same drift or a press.
- Black space.
- Last phase is ,the MAIN shaft. First, get
a wooden dowel rod or old
broom handle to hold the gears as they come off, remove the rear parts
1 by 1
- The front input pilot shaft just falls off , replace bearing 3 how, snap ring off, new bearing and put snap back.
- The other parts on the front of the MAIN, just
slide off, inspect each, and try to keep group 38 together, so it
- Start at the tail end and remove snap ring #12 and pull the bearings 1 at a time and slide each part to the wooden dowel. Do not take apart the synchro bolks, 339 to 45, just slide them off the splines and dowel them.
- When you get this this bearing, I press it on 90% then
using a pipe to the center (PVC or EMT pipe) I hammer on the bearing,
gently to get my magic gap reading from above.
- My feeler gauge in hand I measure the gap on the center bearing forward. Mine was about .005" (uses yours not mine) There is a washer in front of the bearing and 2 locking balls under it.
- The
above gap is done only with pressure applied to the whole set of
forward gears, taking up ALL SLACK! so the gap can be measured
correctly. (using any lever to do that)
- Do not reverse any parts, not even washers, nor change order of parts. (use a broom handle to store parts)
- Do not pull parts cascaded , only pull 1 part, at a time, near this center bearing or you will destroy the main rail lock balls #13.
- There are 1 lock ball on both sides of the center bearing #8, do not lose them or crush them, pulling parts.
- Pull each part 1 at a time ( if possible ) and put each part on the dowel shaft.
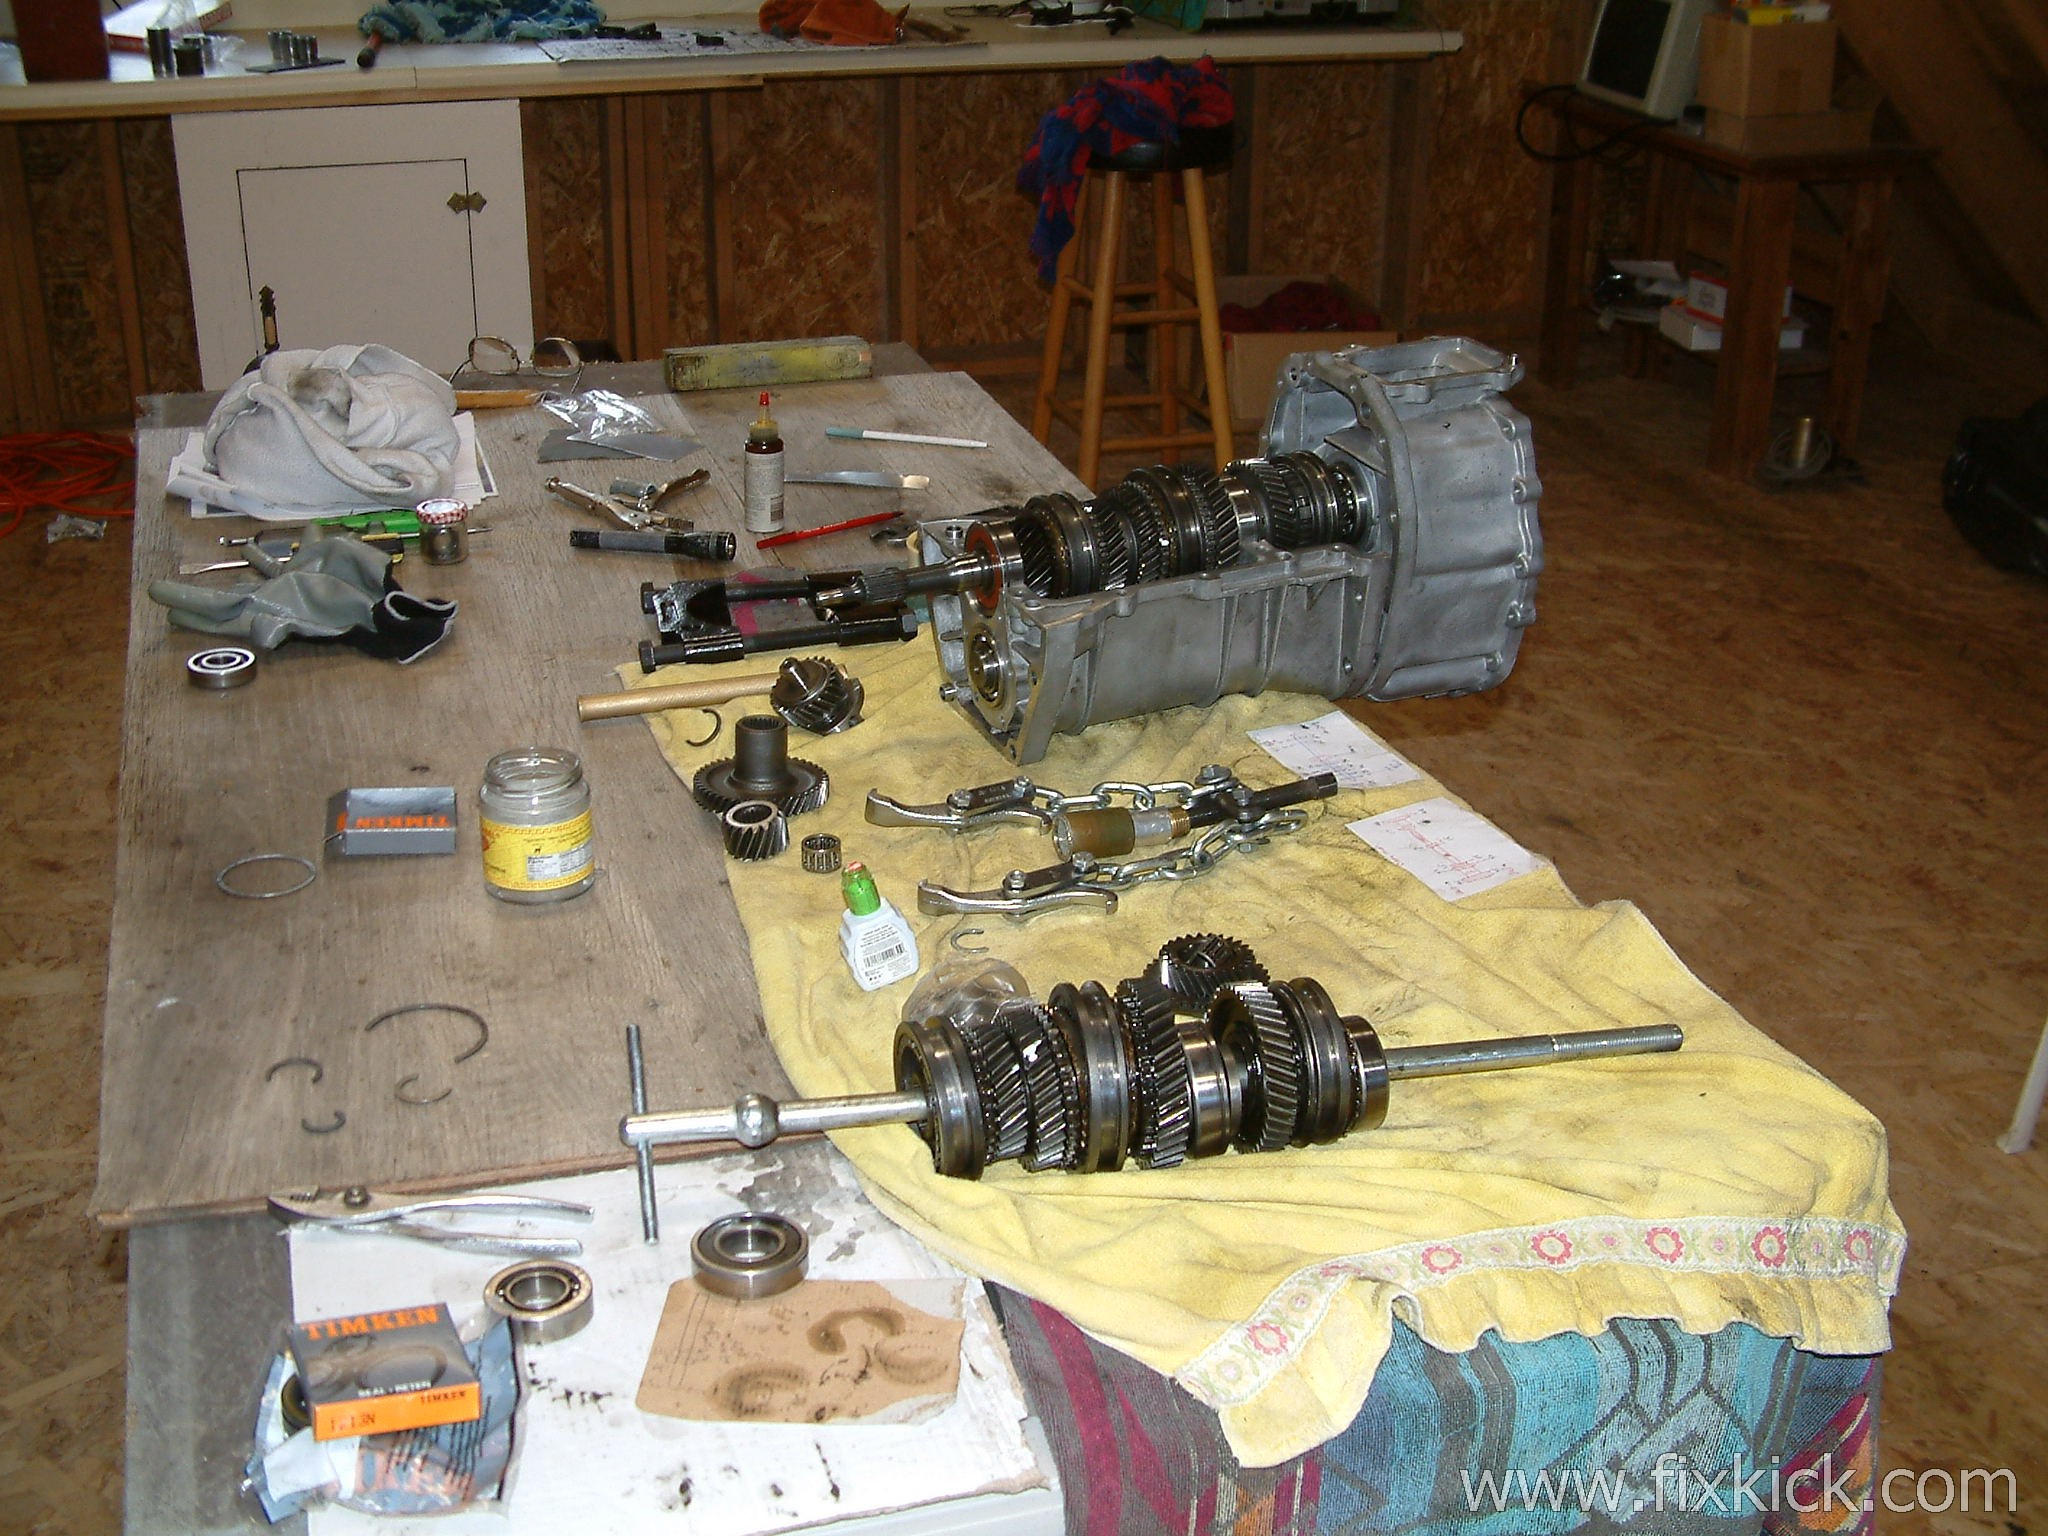
- When done it will look like this.
- Now reverse this process 1 part at a time , lubing (I use assembly lube) as
you
go and setting the front bearing gap, to the amount you
wrote down. (mine was .005")
- The gears can be pulled with a gear puller (and chains) or pressed off using a huge press with appropriate usage of pipes and bearing wedges.
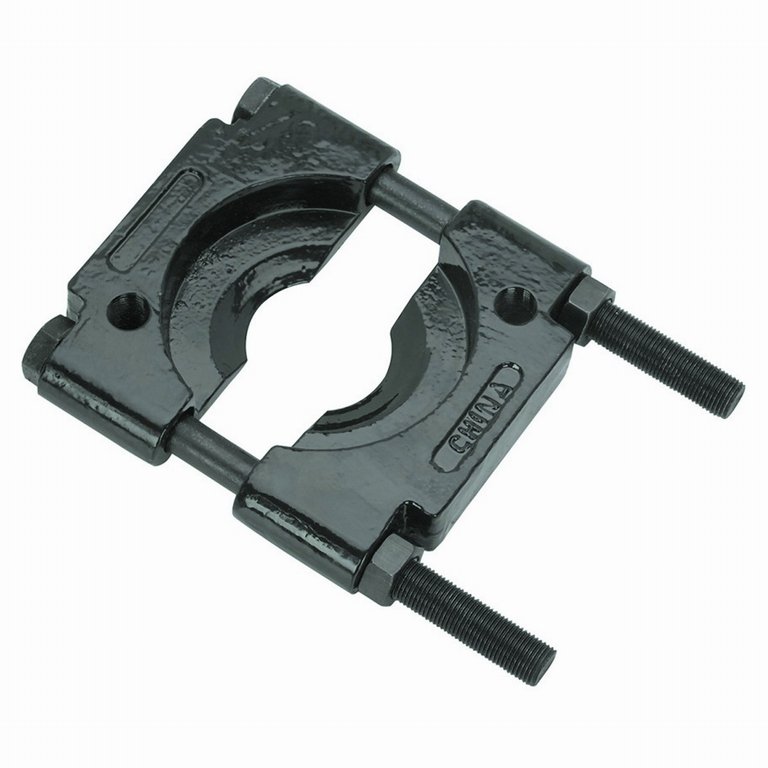
- I used a rear axle bearing puller "spreader
tool"
to great effect, on
the
press any time a gear puller can not pull a bearing. This
spreader works on all bearing that can not be gear puller pulled.
- Reassemble the whole main shaft gear set and set it aside, with all new Syncro's (if needed) and all new bearings from your kit.
- Remove refit and install the cluster (countershaft ) with new bearings.
- Refit all rear gears to rear of cluster and reverse idler.
- Drop in the completed main shaft.
- I now test all gears by hand using the blocking rings
#37/38/39 , 1 by 1, making dang sure it shifts by hand no forks now. I
use my hands as forks. shifing 1,2,3,4,5, and Rev. Ok it shifts easy no
top.....
- Install the lid top per the manual.
- Then do the Torque
setting are here. (see
tranny section)
- Test the tranny on the floor
by hand, shift all gears,
or with a 1/2 drill motor, on pilot shaft and do shift the tranny from here and
with real stick shift before install in car. (I put duct tape on the
input shaft to protect it from the drill chuck)
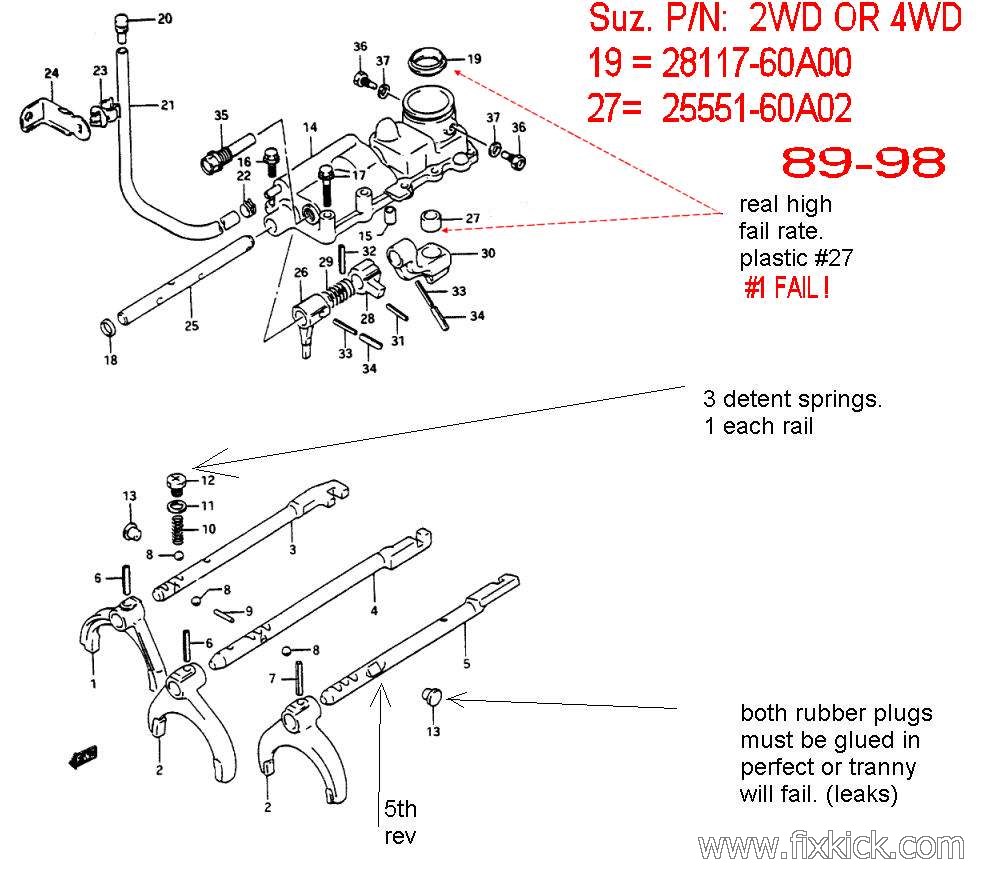
- Replace the two plastic
parts
here 19 and 27 , All Suzuki dealers sell this part. #27 is very important...
- Tranny should be ready to install now in car.
- (I found only 2 locking main shaft balls #13 ID )
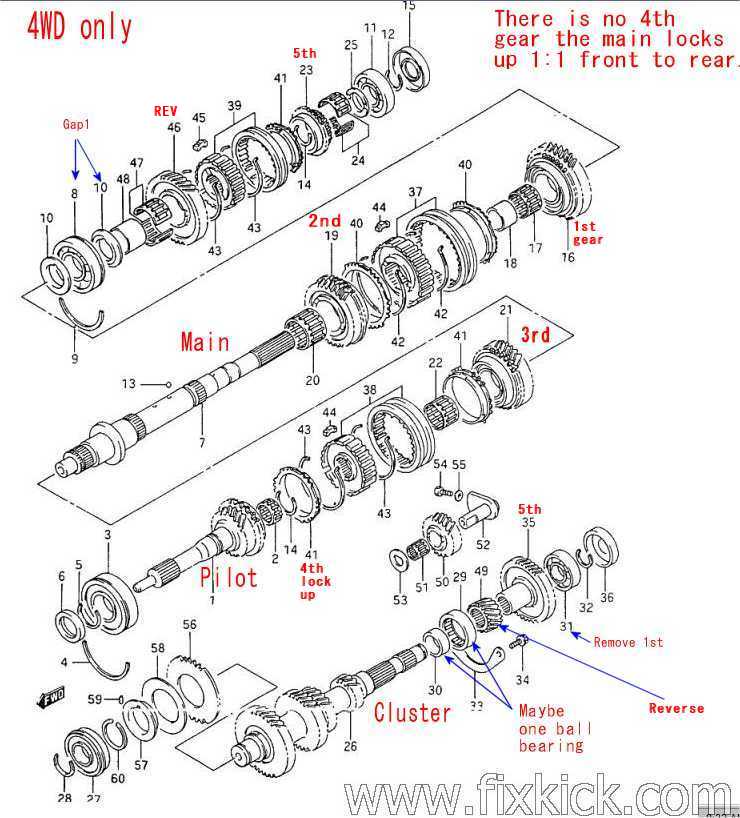
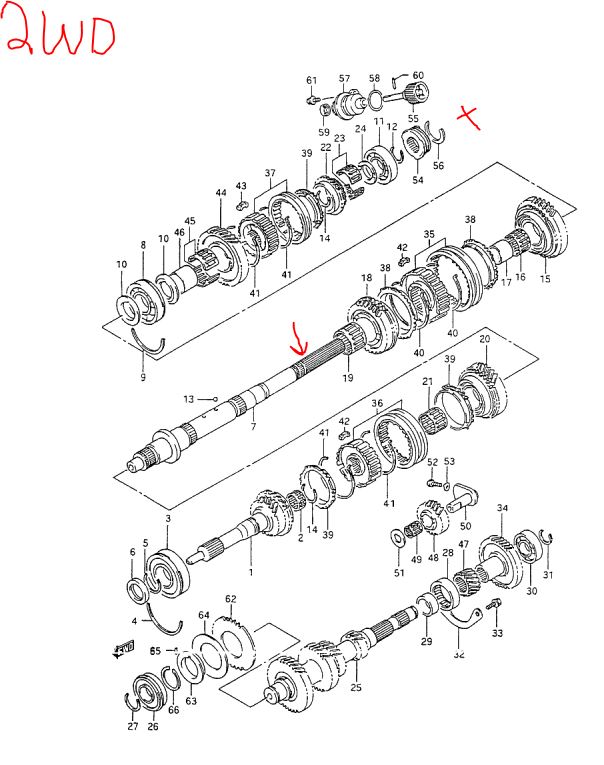
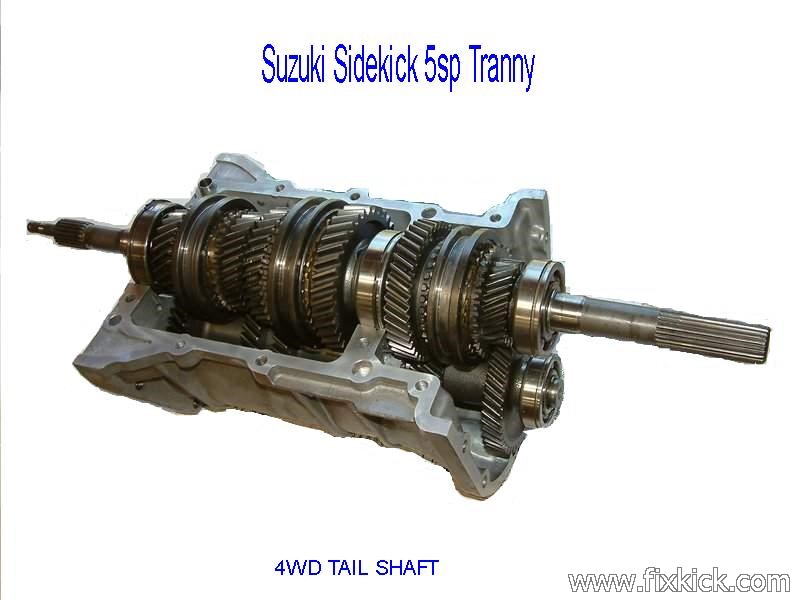
See parts below, 4wd has shorter main shaft unlike the 2wd (totally different ID 7) I have all Suzuki partnumbers for the below, ASK me.! Some are still stocked , even after 26 years....
The 16v engine has a lower 5th gear overdrive ratio.
The balls 13, you can not dismantle the main shaft willy nilly, but do remove the parts in the proper order or the part 13 (pair) will jam and do damage to the shaft #7.
If the transmission whines in neutral, bearing 3, 27,29,32 are bad, all spin with clutch pedal out, in neutral.
If tranny whine goes silent in 4th gear, suspect bad needle bearings.(on main)
Drawing #1
Parts list:
All parts in drawing 1 above. (PDF) the drawing below has 1 error, #13 is 2 balls, the front one is missing in the drawing...
Drawing 2:
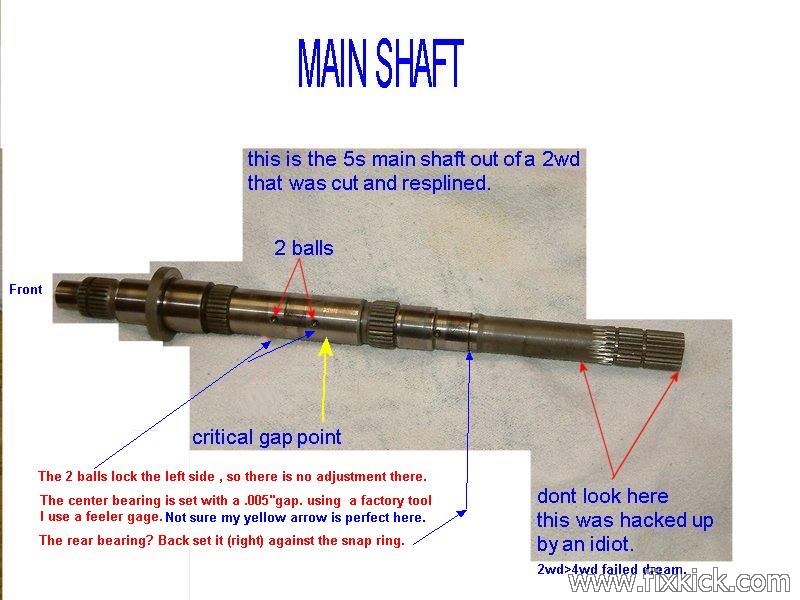
The 2WD Below, is Different in many ways, (Over drive ratio is one, in 5th gear)
No rear seal, missing #15 above. Missing at X below ! That means the seal mounts are missing too,seen in the case end here, so the Case is different too.
It has a 2 inch longer main shaft #7
Missing rear seal landing zone on the main shaft rear end. see arrow below that is the seal landing zone that is missing (omg, Niagra falls for lube, free fall)
Many parts are the same, but not these. Part 7 is totally unique here. (longer by a mile)
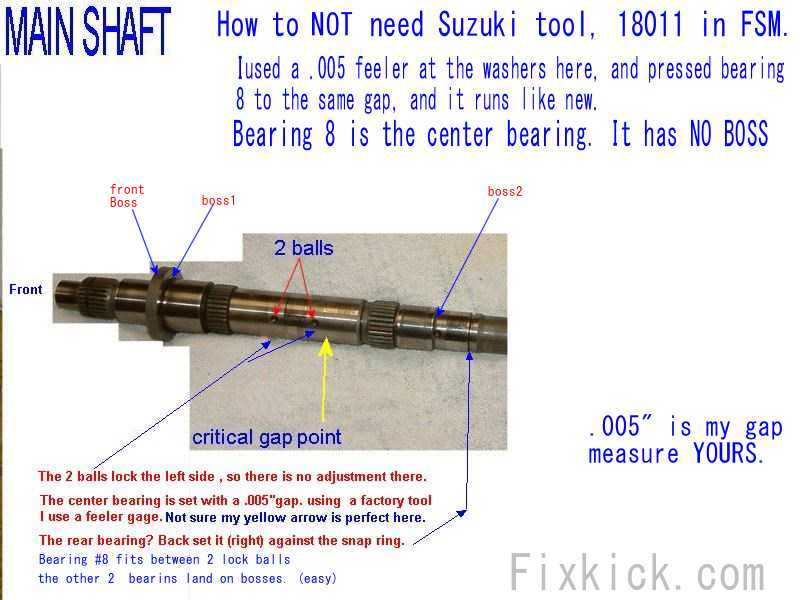
Below: (sure no factory $300 gap tool (press tool)
This is really the only tricks to doing this job right, below, the 2 balls, and the center #8 bearing calibration.
The other 2 bearing land on bosses. and are a cake walk, use pipe that fits and land them, easy as can be.
#8 must be set for the same gap you found. (if lost? use mine) (see gap1 above)
I inserted feelers here at gap1 above, (yellow arrow below) and pressed until it gets slightly tight, might take 2nd time.. but you don't have tool 18011, so need to use feelers.
Drawing 2: (this is MY gap, find yours and use only yours, but I'd not go below 0.005") Use a pry bar in the gear set to get out all slack and measure the bearing 8 gap.
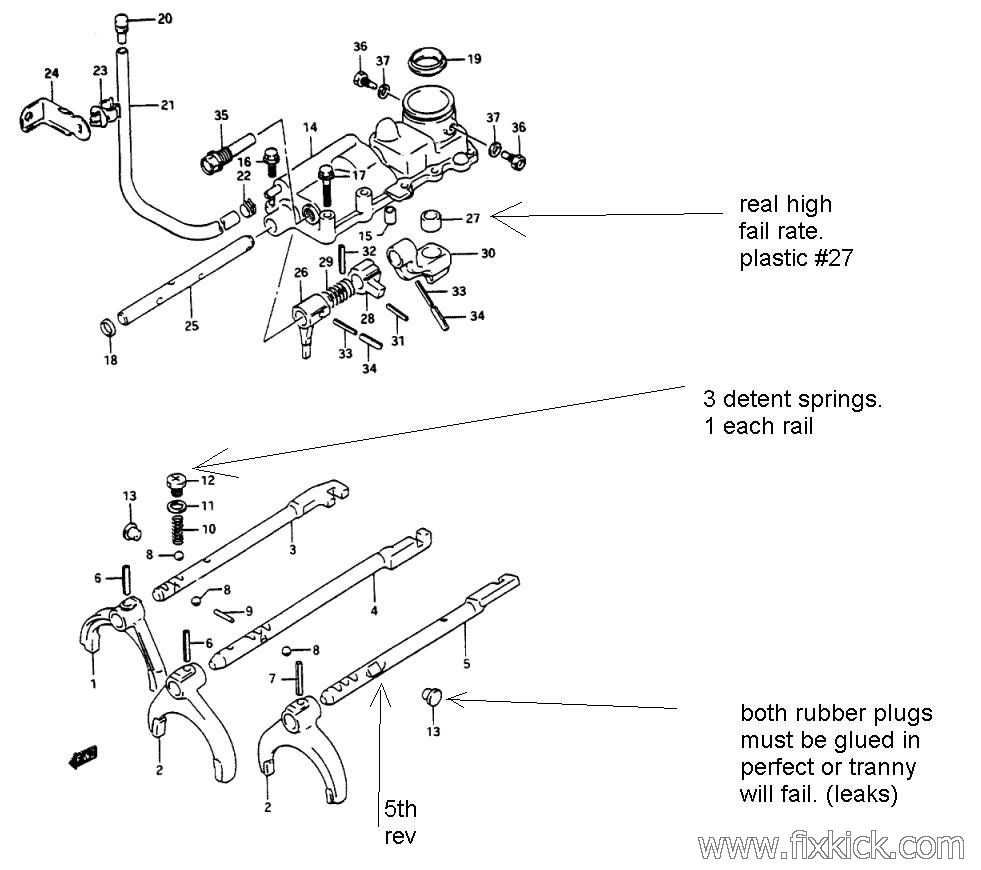
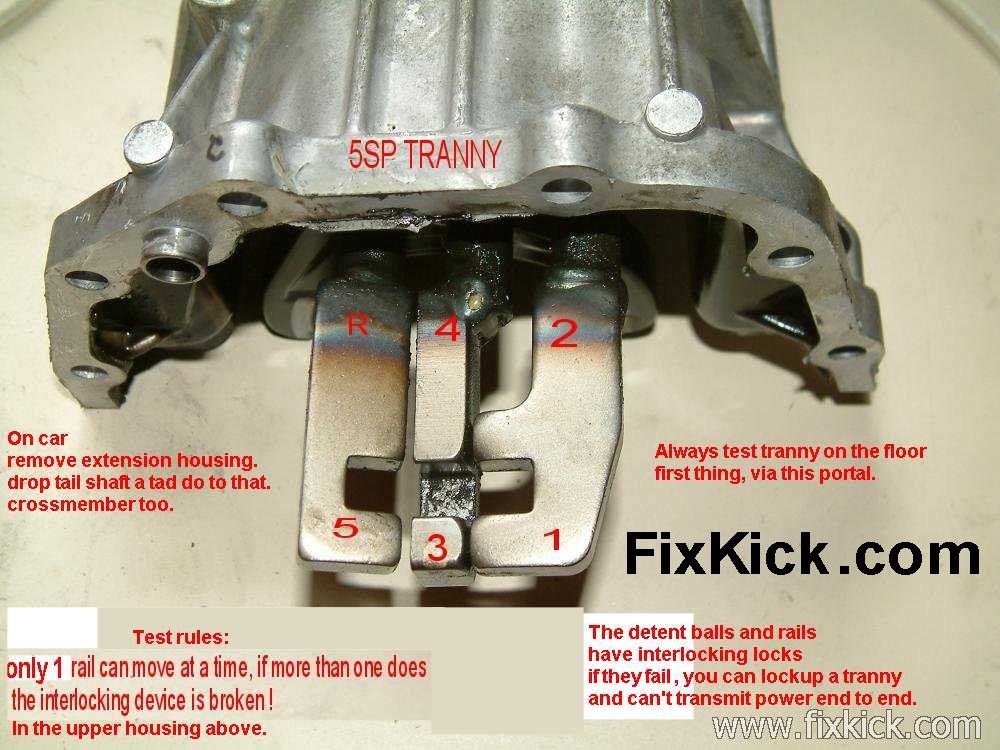
A PHOTO REVIEW or related repairs and issues: The shift rails and detent ball must all work correctly and preventing , 2 gears at once, from ever happening. (locks trans up)
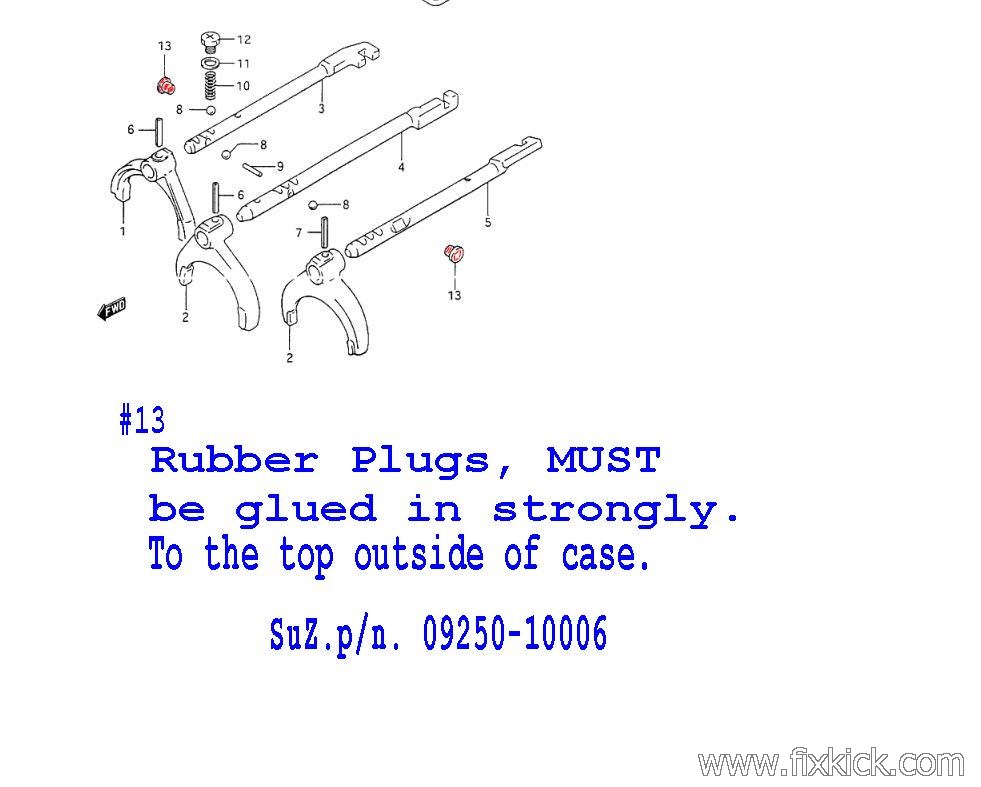
When all done, make sure to install those missing rubber plugs or you will be doing this all over again. (leaks)
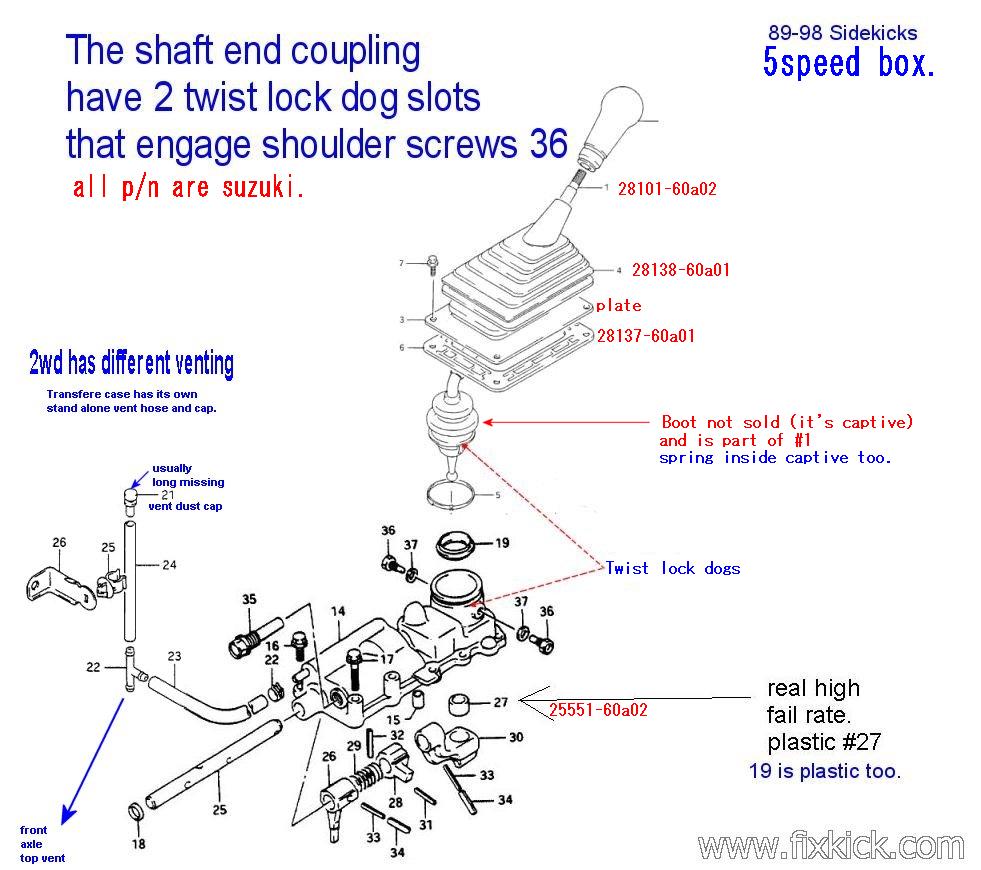
Drawing 3: The #13 Suzuki P/n is below for the rubber plugs. Part 27 is KEY to clean shifts !!!
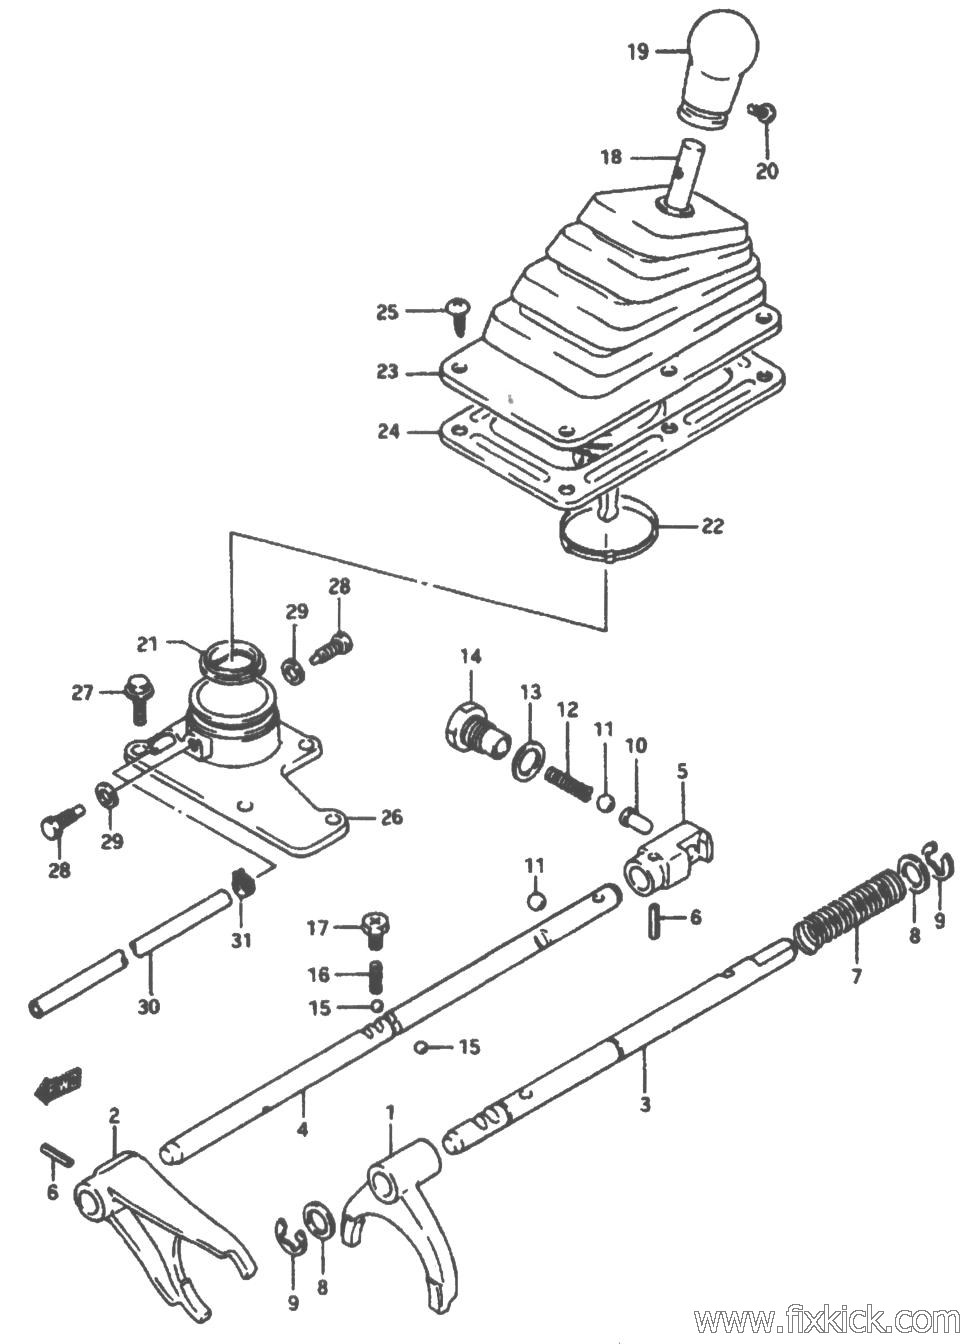
Drawing 4:
Shifter extension housing, and shift rails.
Shifter box, below, make sure only 1 can be moved at a time , or the detent locks are bad.
Below is the reverse (backup) switch #2 is on top, very hard to reach. G16. There are NO ADJUSTMENTS on the backup switch. (it's good or bad) Suzuki P/N #37610-83001 (4wd or 2wd)
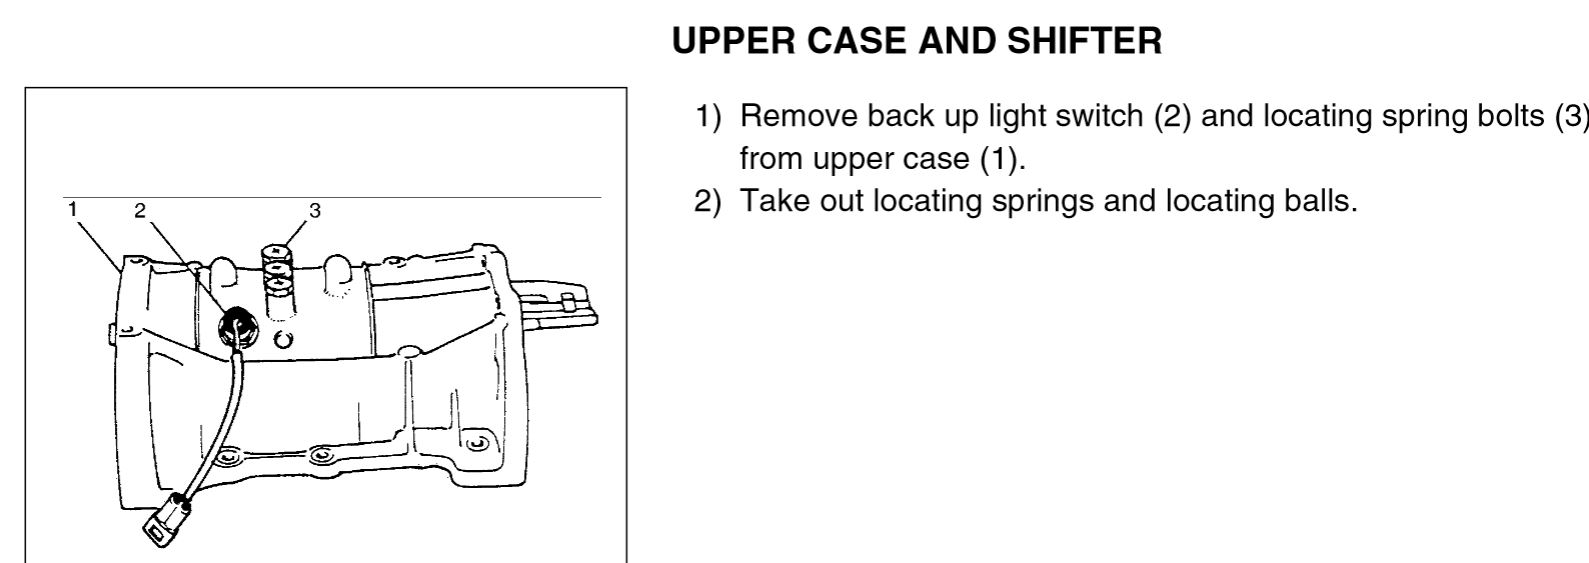
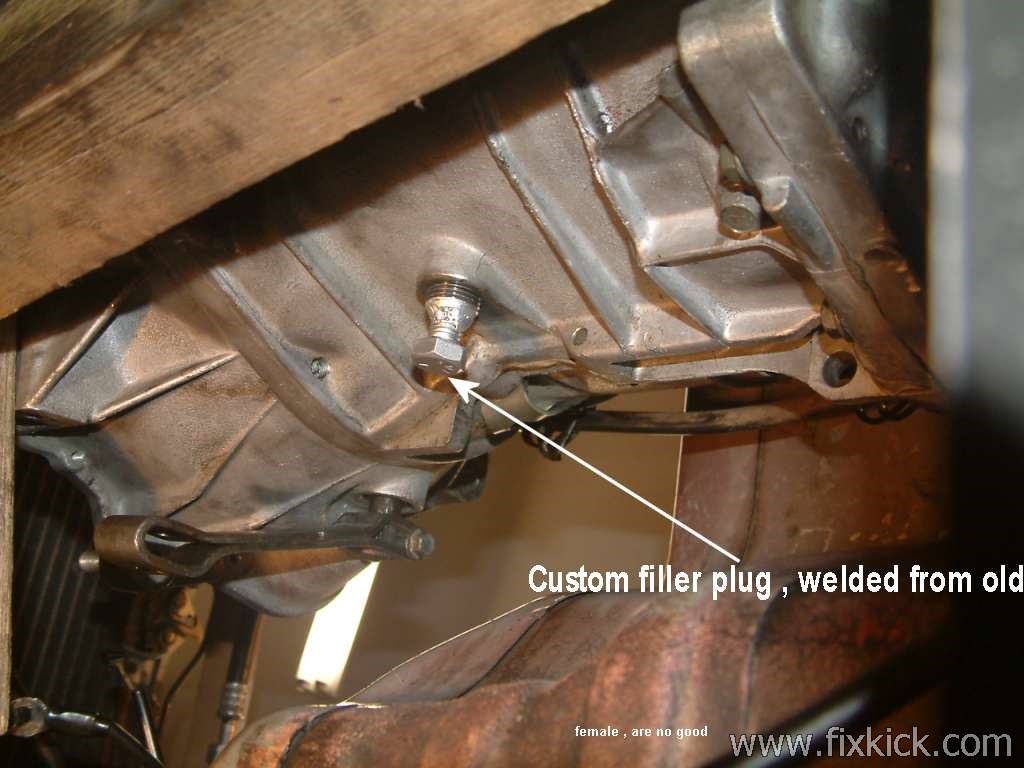
Photo 1:
My side plug was stipped out (10mm square drive) (using 3/8" drive does that strip deal)
Last step:
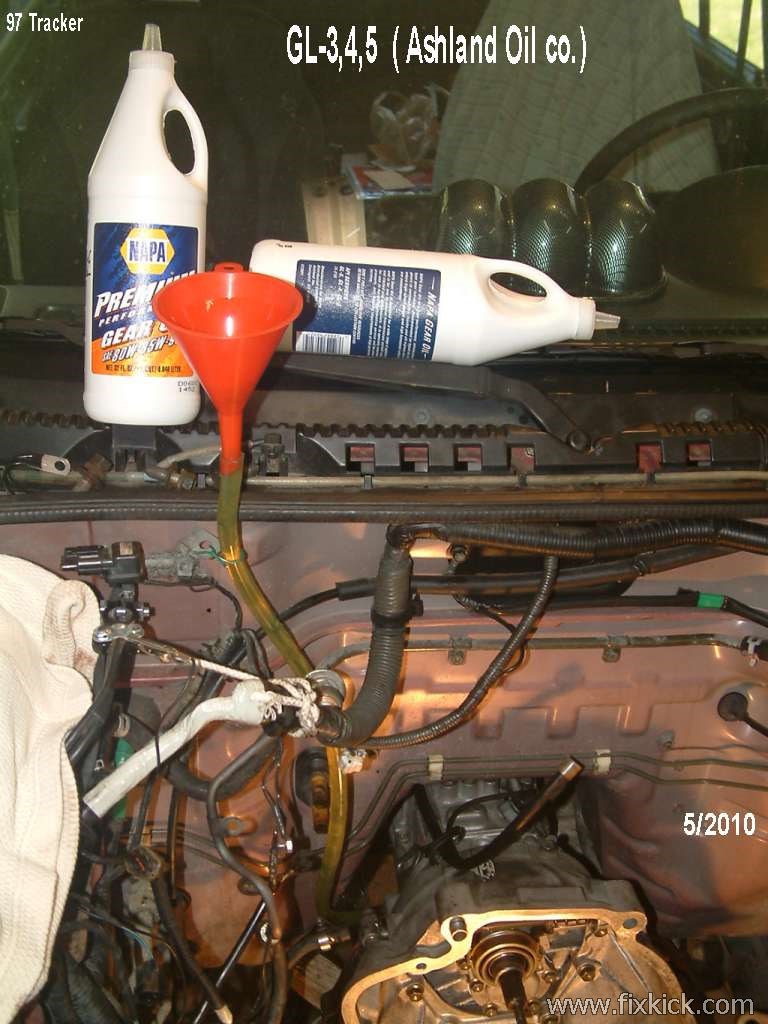
See how to fill up tranny with GL4 lube. Heat the lube in a bucket of very hot water, to make this so very easy. 15 minute soak time .
You can use a modified insect spray tank to do this too. (remove nozzle first, pump it up after placing hose) The flimsy plastic hand pumps sold with the jug stink !
I find the real GL4 shifts way better, than any synthetic sold.
The old synrho's really don't like lube that is TOO slippery. YMMV, YLMV , your lube may vary. Below is $7 a quart, not $40
Photo 2: ( hot oil trick)
 a real
time saver this, trick.
a real
time saver this, trick.Our secret tranny shifting test, in car ( 2"body lift makes it possible.) You can fill up tranny with GL4 now into that cavity.
HOW TO TEST A TRANNY: ( the Reverse gear is the canary gear, because it is a non synchro gear, square teeth that grind at the drop of a hat, and any clutch dragging at ALL)
- Got Noise?
- The clutch is first. (for noise, drag, balking, or just a bad cable)
- If the clutch is ok, releases (don't drag and does not slip or scream) next is the shift lever. (if reverse grinds, or balks, stop and fix your clutch)
- If only reverse grinds, the clutch is dragging, if
all gears grind (drag) , same. REVERSE NON SYNCHRO, so loves to grind
at the first sign of clutch drag and is 99% of the time a bad clutch
cable.(or adjusted wrong, (freeplay wrong)
- Can you shift to all gears, keys in pocket. Feel them carefully. (if not , this can most times be an easy fix. part 27)
- if all gears grind, that means the clutch is dragging. same with all gears balk, (means hard to shift, if fights you....or does that grind me a pound ; sound ?)
- Can't shift to any gears running, but key off, can shift easy to any gear, bad clutch.(dragging)
- You put car in 1st gear or Reverse, start engine, and car moves, clutch pedal depressed, that is a bad clutch dragging. If you can't start in gear, End story but cable is bad , first.. replace it now.
- If you suspect the clutch and you should first , the test is so
easy , just use the 1 inch rule
here, if the bell lever moves 1 inch from slack take up
point, the clutch cable is not the issue! If it can't move 1 inch, the clutch will want to drag.
- running....now...
- I
try all gears now parked running, can I
feel all gears now? (ratio-wise) try to start in 1,2,3,4,5 and
REV? I feel the ratio of 1st, its ok, and 2 is harder
(don't overheat clutch just bump the clutch gently) and last reverse ,
you are not driving, only seeing that each gear is selectable and
works. and does not grind, doing so. If you can't reach gears,
and it don't grind or balk, that is Rail or fork failures. (this
can be done rear end of road, in 2H mode. Test all gears, if shifts ok
but is wanting to grind, the clutch is dragging..
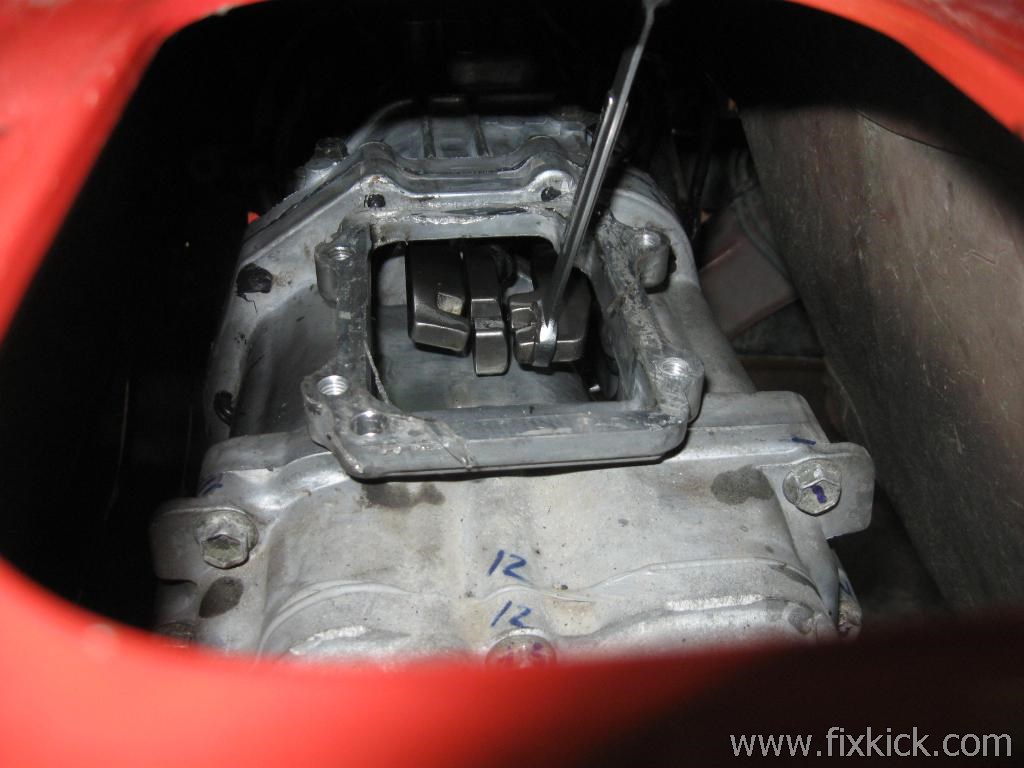
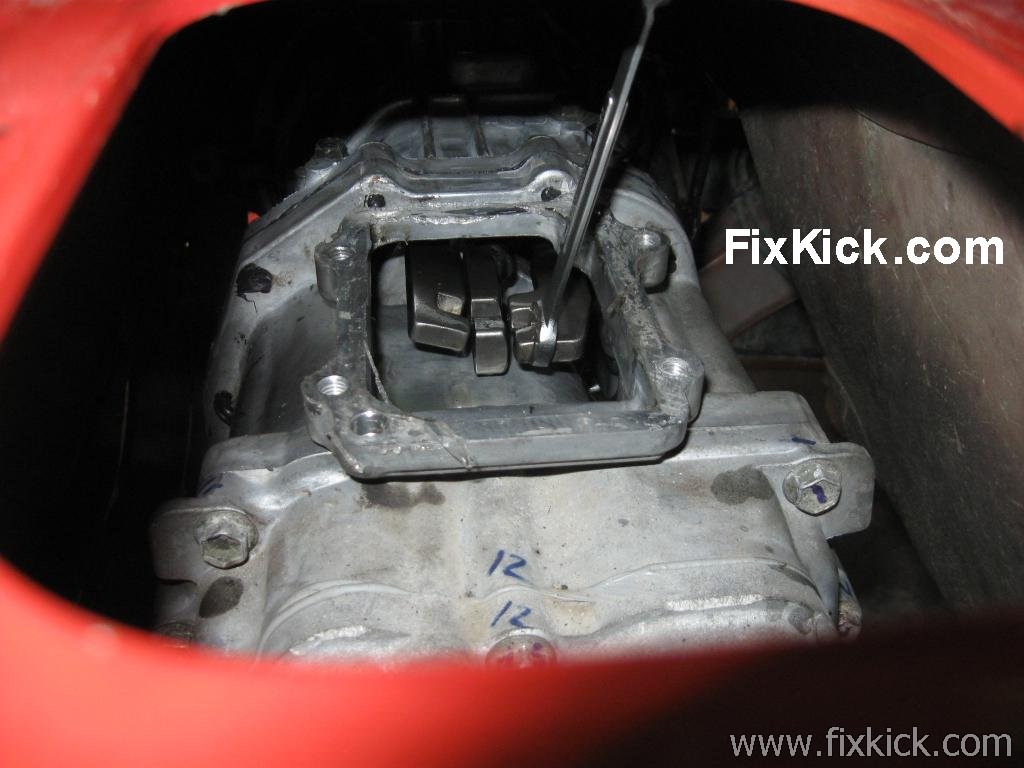
- If you suspect the shift rails?, you can shift the box,
using the wrench below, running engine or not. if it shifts ok ,
here, well, the tranny and clutch are 100% good and the extension
housing is Fubar. Proof.
- More? is to make sure you can only shift into 1 gear at a time, engine off, For example shift to 1st then try to 5th or REV, it should stop you. (so should 3/4) That is the rail logic pins (detents) blocking you.
- If it feels like you can't shift to 1st running? "BALKING" then shift
the transfer case to neutral. if that allows it to shift now,
with loud protests, the clutch is bad. (sure cable first and 1 inch rule, always)
- If
the selector in the shift housing fails to even do
the select, then it's bad, that is, the plastic #27 is END OF LIFE
(bad,etc) See the below photo for wrench shifting. (its
tricky to do , and reach but can be done just before or as you start to
pull the transmission.
- As you can see, there are many roll pins in the shift
housing that can SNAP. Doing all the tests above solves each
possible fail point in the least time and labor.
Or, in the same vien, raise both rear wheels off the ground, can you shift now ?, with no grind, most times when folks say, "I can not shift (balks) to 1st" it's because they don't push the lever hard enough. If they did, it would grind bad, (horrid)
Raise the rear wheels, this removes 99% of the load, and now it shifts and not balk?, showing you, that in fact 1st gear does engage, only with extreme effort, and bingo ,bad clutch.
If the box rail logic fails, you can in fact , lock the tranny box 100% solid. 2 gears at 1 time. The shift gate logic stops all of that (with detent locks), but that is not the only protection, the design protects you even if the gate fails.!!
The gate is the 3 notches seen below. forming the H pattern shift gate. (a double H really I-I-I)
Failures and pit falls:
- Not having glued in rubber plugs on top front of
transmissing housing. ID #13 (it will leak if not right)
- Not putting the shift gate below photo to 3 times neutral , before installing the shift shaft in to same. It must form a rectangle box , the center of the H pattern shift gate must start off, all 3 in neutral postion.
- If the plastic shift tip bushing #27
is bad, worn or missing, the above gate will fail, and you WILL be locked out of gears.
- Warning, the rail rods below can stick 1/2 way !!! Put ALL 3 in the CENTER ! Then install the shifter shaft with plastic bush.
- If the rails below , you can feel the detents, that means the detents are bad. (balls and sparings)
- Not testing the
transmission before re-install, yes, do spin the front pilot shaft and
shift all gears box sitting on the ground , yes !
Below: (the acid test, is my tranny really bad? or is my shifter messed up test)
Cheating. (beats 10 hours labor , pulling it all (tranny) and putting it back, no lie) yes, my tail shaft is dropped in the below, and the crossmember is dropped a tad, to reach bolts.
You can test the shifting of the tranny here, to prove, what is bad, clutch or shift housing or transmission. (example if this works shifting, then the shifter extension housing, must be bad.)
Do not attemp to fill tranny with GL4 here in this pit below, that don't work! Wrench below is 1 <> 2 shift side. 1st gear is to rear.(opposite of main knob actions)
These are actual box shift fork rails. (they do have interlocks, but can get stuck 1/2 way, do not let it) The interlocks stop GEAR lock up. (2 or or gears at 1 time)
If really a skeptic?, most Mech are... we attempt to do this while doing the first steps in trans removal. I have the transfer case drained, and its front prop shaft off. and drop the trans crossmember.
The tail drops, and I now see the transmission per photo below. if all tests pass, now? it's time for a new extension housing not a new bear box or clutch. or just part 27 bad.
I then attempt to shift all gears. CAN I NOW? even with engine off? Ok that works, then with rear wheels off ground can shift 5sp box, in 2H(4wd box) with engine running, can you? prove its all working if in fact it does and noise free.
One guy had bad shifting, found the previous owner left the right rail half in gear. this clause the shifter tip to not evee reach that shift pocket..... (do not put the extension housing back on ,unless it looks just like this) or it will not shift right.
Photo 3: The "H" pattern is now clearly seen. below. (a double H ) center is 2/3 rails.
Shifter Bushing Repairs: (next) Lets say my test above works, so I replace the below 2 parts for $10.
- Remove Console cover plastics (some factory side rivets can be pain to get out , and seats may need to come out)
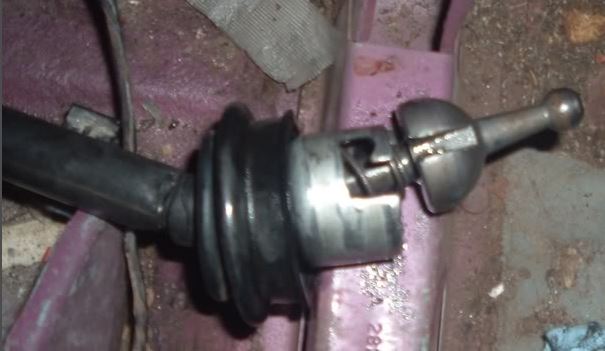
- This exposes, what I call the exhaust gas protection boot,
#4 seen in graphic BELOW.
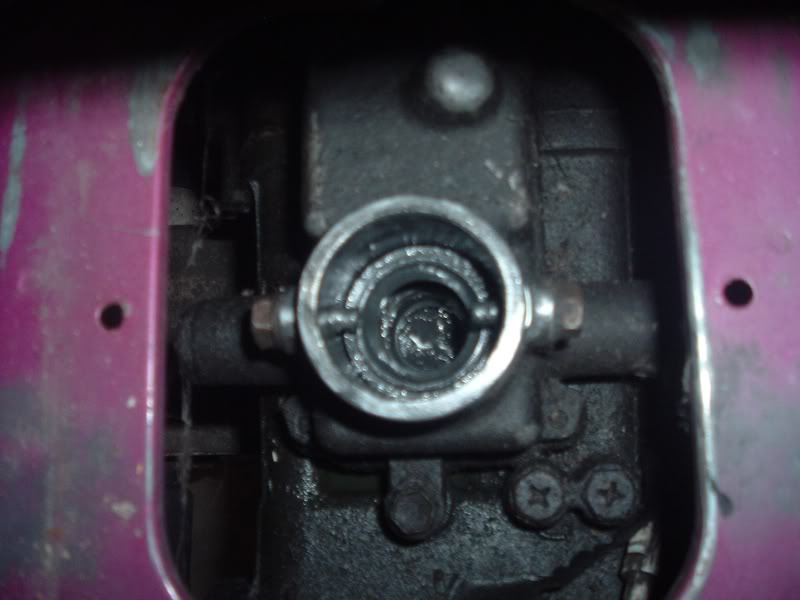
- The Shifter lever #1 bottom tip has an upside down cup on the end. Just above #5 below. (5 is a sub boot clamp band)
- Lossen both #36 screws, 1 turn. or so.
- Push down on the CUP (DOG locks) and turn CUP, CCW (they
are twist locking)
- Bam it's off. There is large spring in the cup.
- Or hold down the CUP, against that strong spring and remove both #36 screws. Bam its off. Do not lose those 2 special screws #36
New plastics. #19/27 (the top ring is ant-rattle device, the bottom #19 bushing is what make for tight shifting pattern.
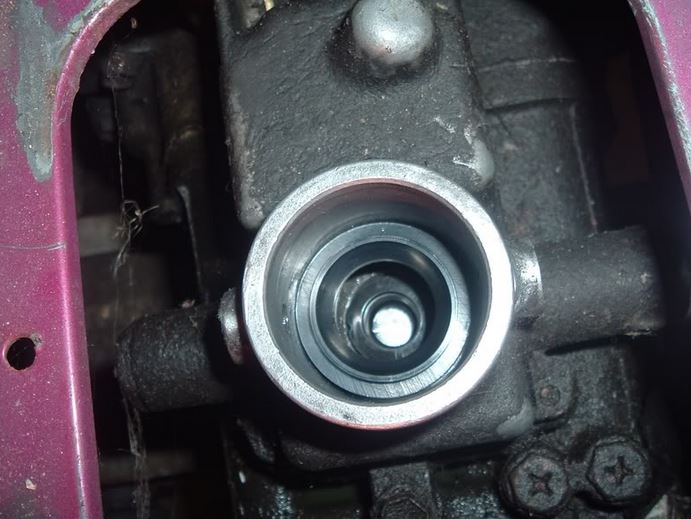
Above , there is no way to replace just the spring seen here. (baring, cutting and welding)
The cap floats on that spring, and the lever ball end, locks to the case and can not turn with screws in place.(see groove?)
Shift Lever secrets. How to install the shifter, with the end of shift lever collar.
Buy parts 27 or 19 below, via my buy page, from SUZUKI.
4WD shifter for transfer case.
Transer case below:
Ready for duty: (lid off, I hand test each gear, 1 by 1) (all 5 and reverse) I repeat this , 100% back together on the floor.
The 2wd, has a way longer main shaft and way far rear main seal. (very different !)
Tools? (not for removing tranny) just this page only, up above.
- Wrenches and socket sets, metric, all.
- A press would make
all this childs play, really. In most cases the press is not needed, unless parts are seized etc.
- The bearing spreader
tool (like used on rear axle bearings, generic)
or this.
- Snap ring tool heavy duty, both types, expand
or compessive. (they sell tools, that do both and is
convertable ) 3151
Gearwrench Pliers. (there are like 100's of tools made and is confusing)
- Lots of PCV pipe, (EMT) and the like. Can be used to pound
back bearings, lacking a press. (gently and only on the center hub of said bearings)
- A set of gear
pullers and a chuck of chain.
Lackng a press. I used the chain for long shaft bearing pulls.
- A Rubber mallet $2.
(avoid hitting metal to metal at all times) any dead blow hammer,
pure lead, lead /heather head hammer, plastic dead blow hammers. (no
steel hammers)
- Wood dowel, or broom handle. (to capture the gears
off the main shaft and its washers and bearings. to keep the proper
direction and order)
- Brass drift pin set, helps.
- Feeler gage set. (even $4 a set)
- Sealant , the correct is , ThreeBond 1211, identical to Suzuki bond ! Not RTV.
- A spare transmission, so you don't need to buy $500 + worth of parts from Suzuki, the cluster is $500 and many now, are out of stock !!! 2 box, make 1 good box easy.
At the risk of saying what not to do?:
- Hit metal against metal , steel hammer to say gears, or any
main shafts or against, bearings, ( use hard wood dowls, brass drift
pins, and a rubber headed hammer, to hit things)
- Do not hit the outer rim of any bearing (if going to be reused.)
Do not be tempted by the dark side, and use nails or ice picks to drive off any snap rings. (they may fly off to parts unknown, and is almost guaranteed, and maybe obsolete now at Suzuki parts dept.)
- Do uses gear pullers. not screwdrivers or other metal
objects, to pry things apart. (like gears off shafts) use the pullers.
They are cheap. (like $10 whole bucks at Harbor "FRIGHT" (pun)
- Do not use screwdrivers to pound off snap rings , use a
snap ring tool. If not careful , you over bend, then the ring and
now its useless. You don't what them loose and falling off driving
car....
- Do not use a Dremel tool anywhere near this box.
- Do not scrape the aluminum parts with any metal tools or metal brushes of any kind. use plastic scrapers.
- It is ok to drive (hit) on a bearing, at the center hub
ring boss only, using PVC ,EMT pipe or last a metal pipe, if you must,
but use brass pipe as your first choice in metal, and do so carefully,
no 5 pound sledge hammers here. (use only rubber hammers)
- If possible use a press for all steps, but a gear puller does work great (mostly). (if extended with chains) The press needs one more tool to work in pulling parts. THIS spreader tool
Hints on cluster.
- More hints and possible damage, if done wrong.... All parts mentioned below are in Drawing #1
- CLUSTER CLUES: (pit falls, etc)
- The main shaft just pulls out of the case, easy as apple pie. (to work it on a bench or a press easy)
- But not the cluster
26, below the main (photo below), it can be tricky at first blush (it slides to
rear first , then tipped up at front and out of center of casing.
- To get that out, you need to remove parts 31 to 35, all parts to right of photo below removed first.
- Then
get the cluster to move to the rear, leaving the front bearing stuck to
the
cluster front and any snap rings found to block that movement.
One can do this with a block off wood and rubber hammer on the front of
cluster bearing.
- See page 9 and steps 8 to 18 here to remove the cluster easy. (the cluster slides fully to the rear, and now the center bearing can be pulled off with any gear puller made.)
- I now lift up the left front end of cluster, (see overheated?gear in the below, cluster? front gear, I found a good used cluster.)
- To install the cluster.
- The cluster front bearing is installed to the cluster first, see page 26 for how to do that.. On my box, the rear bearing is one piece and is pressed on after cluster is fitted to case.
- The tip in and to the right below, the cluster. small end. first and then using a press or rubber hammer, hit the right side of cluster below, with a rubber hammer until the cluster front (left) bearing is seated to case..
- Then press on the new rear cluster bearing. The remainder
is easy... steps reversals... and pressing on bearing 31. (bottom right
in photo below) and reverse idler...
Happy Trails !
Lots of contributors here, Thanks.
Revision 6: (2007 was first revision, last was 6-1-2015.)