
This page might be used to pull ANY transfer case by self, see RED comments. (the FSM states just that)
I typed this after doing it twice (91 and 97' year) This is all mostly redundant to the FSM page 32+ steps 1 to 33 My below words, are an adjunct to these offical pages.
Do not replace the clutch, until the clutch cable is replaced and adjusted and the 1 inch rule validated and the still clutch fails fully disengage.
Bad clutches can slip, drag, chatter, jam engaged permanently, make noise, bang gears, and grind gears.
The clutch will not cause the gears to jump out of gear, nor jump to neutral. (bad tranny)
Do not change the clutch actual, until the 2 plastic parts are replaced on the end of the gear shift lever. (can't get into gear, engine running and not?)
Tools ?, special, jack stands and wrenches are required, but a tranny jack real, makes it more easy and vastly more safe. (if pulling the transfer case alone or in sequence, muscling out may work, no jack)
Some folks just pull the engine and transmission all at once. (way less on your back pain, on cold concrete , and less cussing, no need for tranny jack, only and engine lift )
For noobs (not a dig!), the clutch is located inside the bell housing in front of the engine, and the transmission must be ,detached from the engine to service any clutch parts, inside.
It takes 4 hours in, and out, first time (8 total) , or less if you have very good tools (and vehicle lifts)
(4 to 8 hours total, based on skills and tools and luck; luck means, no stubborn rusty parts, that fail to remove or are so bad they are non serviceable and now a wild goose chase, for finding rare Suzuki parts. )
Changing out (swapping in) a new clutch.
Some people have a nice engine puller (chain hoist or engine cheery picker lift) to make clutch changes easier, they just pull the engine.
How to remove the transmission varies by your shop, garage, if you have one at all? or doing it at the road side curb?
There are 4 ways to pull a clutch, depending on shop and tools. Below is the JACK stand way. ( the 4 ways are: stands, pits, lifts, pull engine)
The below will help.
Garage stands way, no pit, no whole car lift, just jackstands x4 and one trolley jack or a rented, transmission jack is best. or like I have, this adaptor. or DIY:
- Pull the battery negative terminal at the battery. then pull the positive lead last. I'd remove the battery for safety.
- Place a 2/4" board behind the distributor and fire wall gap, to protect the Distributor. (distributor casings) Take off cap and rotor and warp top of Distributor with plastic wrap.
- If original console has locking plastic rivets (sides) if still in place, pull both Front seats and those rivets and pull the center console cover. (rivets are tricky, push pin IN, then pull rivet out.)
- Remove the 5sp shift boot.
- Remove the 5sp shift lever by pushing down on gear shift lever , turning counterclockwise and then pulling up. (most times the 2 top side screws (on top of extension housing) need to come out first) (don't mix screws)
- Remove the 4wd lever( if you have one) 2WD SKIP. Stuff rags in the 2 shifter pockets, to keep out dirt.
- Jack
up body, so bottom frame is more than the diameter of the bell housing
(or you fat belly, which ever is greater, "GRIN") 20" inches might do. Get this correct now. or later cuss.
- Remove Any transfer skid plate option , remove it now. (a factory option,) { mine had 2 , one under engine huge plate, and one under xfr case.} Remove them both now.
- Remove Cat converter frame bracket. (all attachments on side or near) Remove the CAT front flange header mount, cat is now free on front so tie it to side the whole cat, let tail wag like dog.
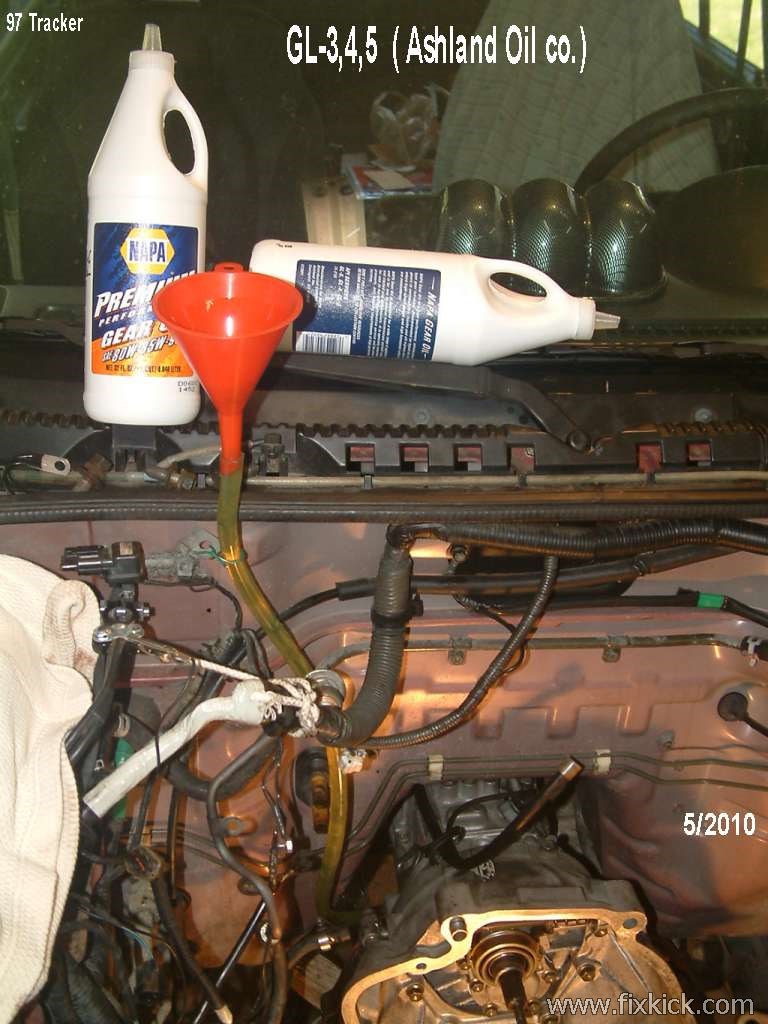
- Drain the transfer case (2wd skip) (or take a huge bath in GL4 Gear LUBE !)
- Drain
the transmission. (more GL4 keep in mind the nose
of car is
up and the tranny may leak GL4) (the tranny might roll and
leak?)
- Drop the front and rear prop (drive) shafts ( 2wd skip missing front prop) (4 nuts over 4 bolts at rear of tail prop. then front end of trail prop slides out, oops, ignored step #10, ouch)
- Drop
the front PROP shaft at its rear end , that is , remove
the 4 same
exact bolts, as the rear was done) DO not attempt to
remove UJOINT CLIPS "snap rings". Use the nuts and bolts at the flange.
- Remove the speedo cable attachment point, at transfer case or at tranny end, if 2 wd.
- Disconnect
all electric connectors at all tranny areas, that are visible and easy
to touch now. As necessary. Just look and disconnect. Or do this after step 18. (top parts are easier to reach then)
- Disconnect the clutch cable at the bracket in front of the bell housing. (remove the adjuster nut first) Do not not remove the lever from the Bell shaft end ! SKIP IF removing transfer case only (it's bad only?).
- Support
the transmission/transfer case, with a tranny jack. ( placed in the middle of whole tranmission /transfer case base area)
- On some cars, the CAT converter(TWC) is so fat it blocks, the left crossmember mount bolts. (newer skinny CAT not true) I must remove the front CAT, on some cars. bolts front and rear of cat and a rubber mount. (step 21 in the FSM page 32+)
- (The Distributor , needs a wood block protector per FSM or it will be damaged as the Dizzy hits the fire wall.) seen in the photo 1: or step 28 in FSM. If you remove the Distributor , good luck retiming it, most folks never seen one, ever.
- Remove the transmission cross member. 2 bolts found on both sides and center bolts to actual transmission here.
- The
FSM shows, loosing the fan shroud so the fan does not hit the shroud
and break it in the next step. (as engine tilts on its mounts)
- Lower
the tranny, so the whole engine and tranny system is tilted
down
at the rear tail. (MANY things can be reached more easy now, do that , all that)
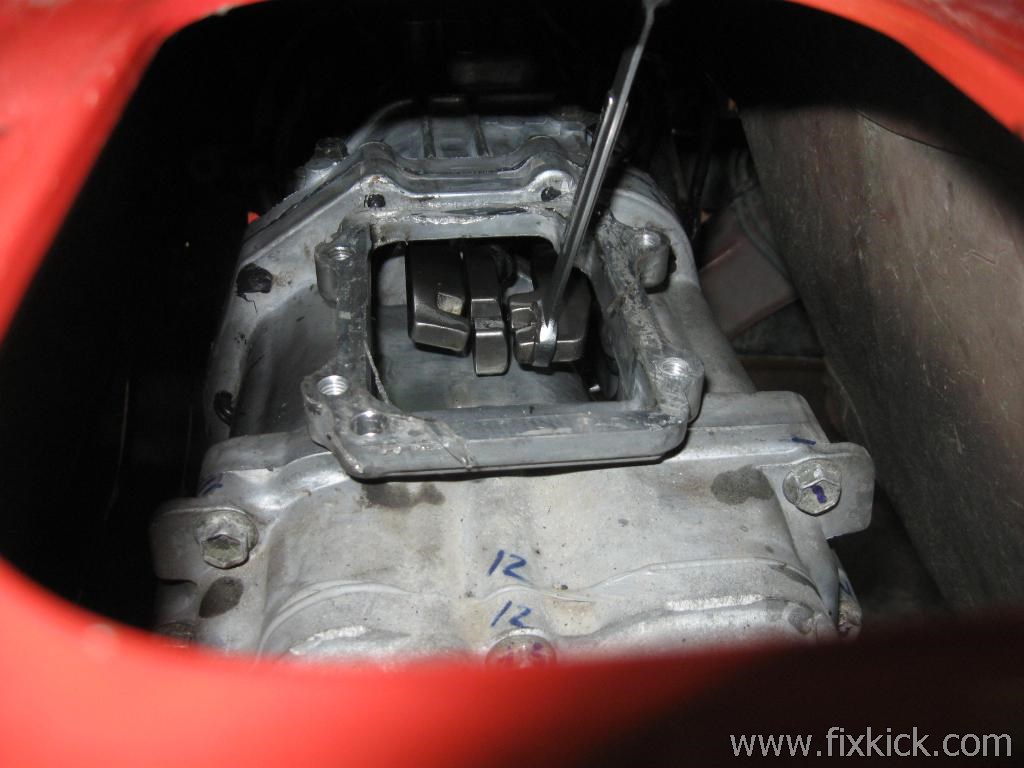
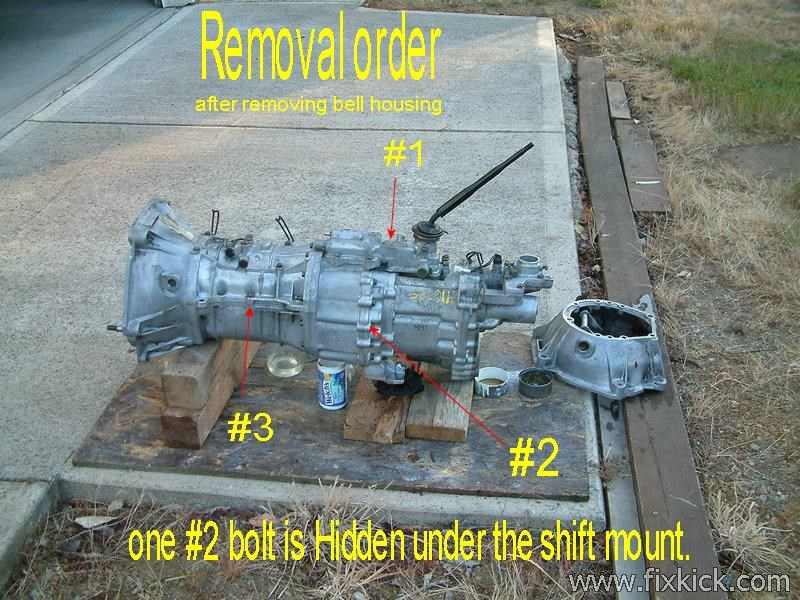
- Remove the top of 5sped box shifter extension housing {#12 mark is that hidden bolt} if removing only the transfer case, exposing secret 5speed hidden bolt, up top.
- See if you can disconnect the tranny breather vent hoses now, and other misc. items you missed like, 4wd switches, Reverse switch connectors on top.
- If removing only the transfer case, then just unbolt it slide back 2 inches, and off it falls.
- Remove clutch inspection cover behind
engine pan., at Bell housing...
- Remove all the transmission side mounts first.
(2 side irons coupling engine to trans are there on most sidekicks)
- Remove the starter. (some do this first but its easier with trans tilted.)
- Remove the bell housing bolts, from the bottom to the
top , leave the top last.
{less stress on parts this way} (some times I need long 18" socket
extensions with universal swivel joints (wrapped it tape) to reach top
bolts "On my real Jeep for sure")
- TRANNY IS NOW FREE, to slide back on its JACK. Make sure the transmission jack straps are tight, or it will roll on you and you will CUSS or get hurt.
- Wiggle
and pry the transmission to the rear 3 inches or more until the tranny pilot shaft
falls off the
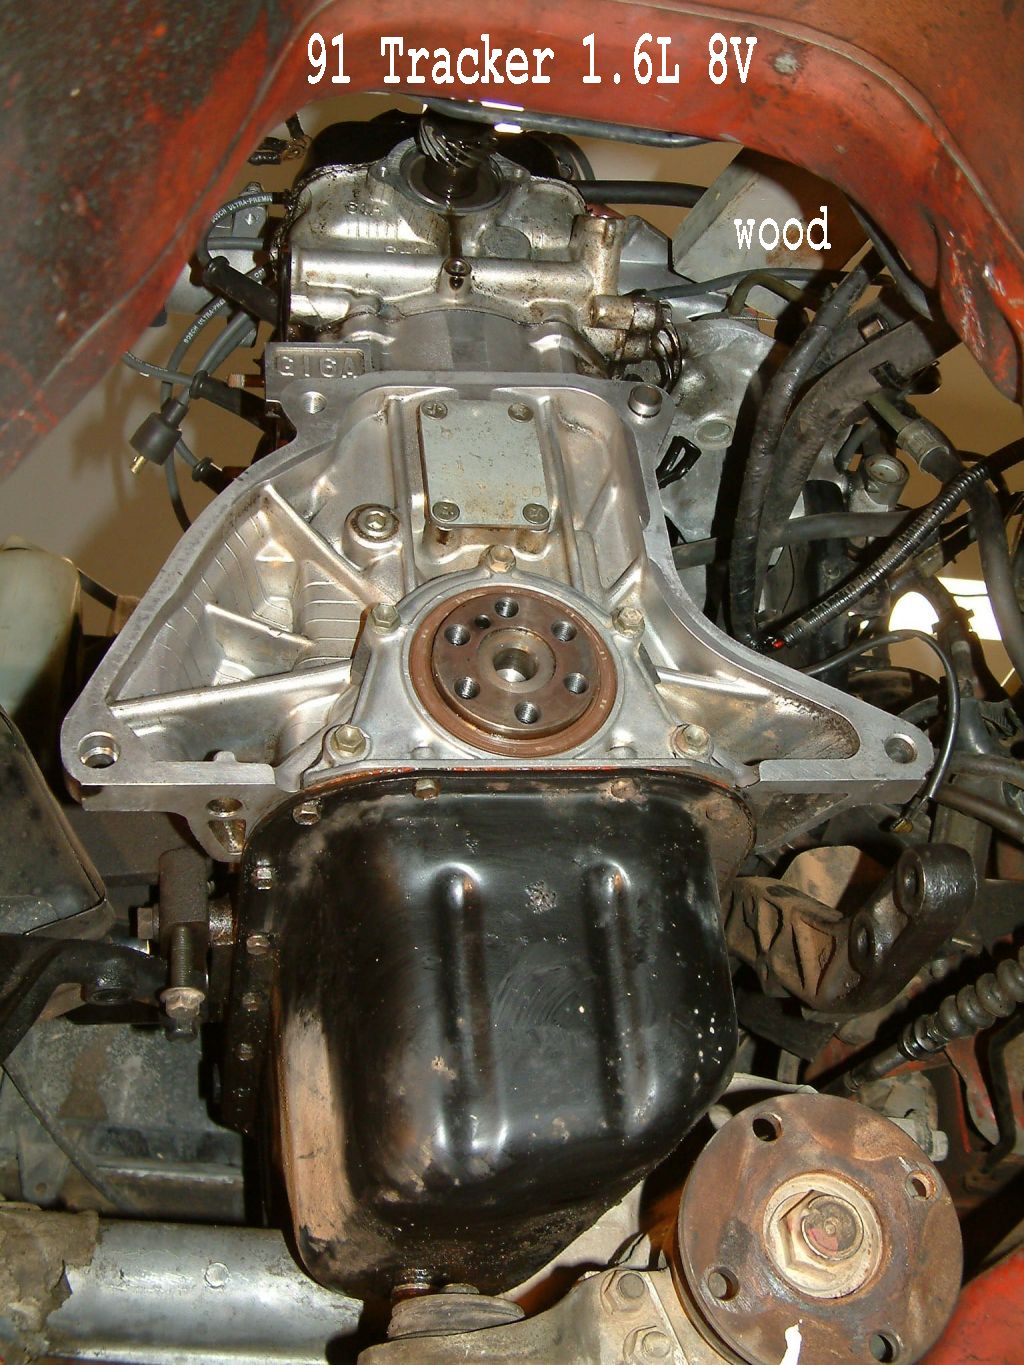
clutch hub . ( The light weight engine
will float evenly on its mounts) It is balanced there with no transmission , the photos below make that clear.
Inspect the transmission front bearing by wiggling the main input shaft up and down. No play, and no seal leaks in tranny ,right? No heavy damage to tranny input shaft splines , and pilot bearing tip !
This play, should not happen nor should signs of GL4 lube drip, from same shaft. (or you need a new bearing or seal in tranny)
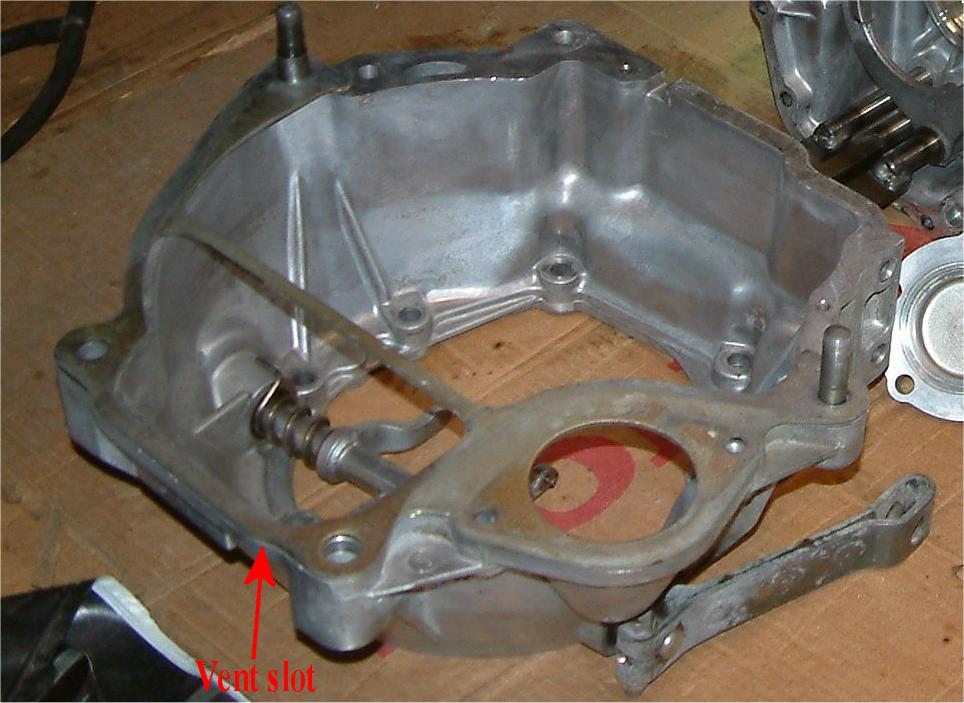
The Distributor 0-rings on casing, love to leak and fill the bell and clutch with motor oil.(and looks to all the world like engine main seal leaking and is NOT) See oil on top of Bell , "BINGO" see vent on top of bell, oops, ingress point.
BACK to the FUTURE:
Reverse the above procedures. but use the clutch guide tool seen below, to install the pressure plate. (DIY and Home made)
Trick 1:
Make a pair of guide pins, by buying long bolts, that fit the top 2 bell mount points. (yes, they are metric, take old both to store, buy them 2x longer)
Take the 2 top original bell top bolts and buy 2 new same mm size ones , 2 times longer. then cut off the heads and radius the cut. Next cut a screw driver slot in the end. with a hack saw. or file ends square, for later retrieval.
I then screw said DIY guide studs into the block at the 2 top positions of the bell mounts on the engine block.
Now the tranny has 3 POINT guides, 2 guides plus the pilot shaft !
Install the tranny to bell housing bushings and center plate. the bushings are at 1PM and 7PM via drivers view. See them?
Put it all back together, as you started and adjust the clutch free play. See the first link at top of page for those details.
Add GL4 lube to both gear casings.
Failures and pit falls:
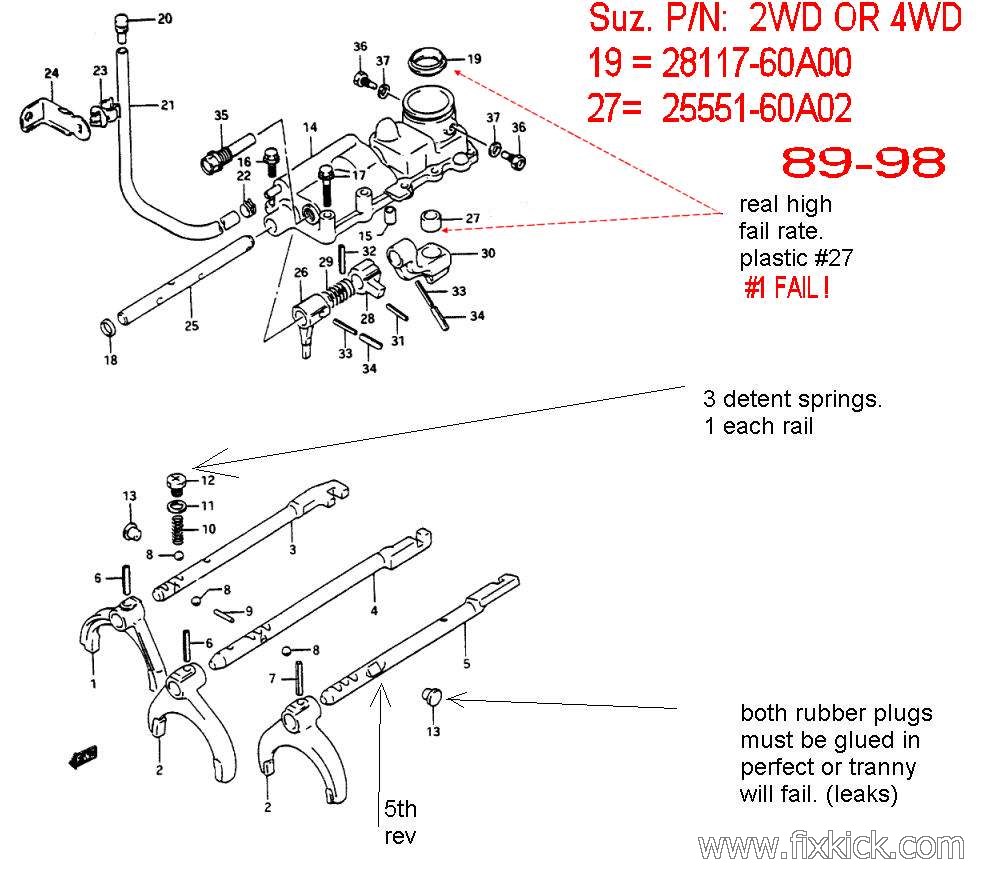
- Not having glued in rubber plugs on top front of transmission housing.
- Not putting the shift gate to 3 times neutral , before installing the shift shaft in to same. It must form a rectangle box , the center of the H pattern shift gate must start off, all 3 in neutral position.
- If the plastic shift tip bushing #27 is bad, worn or missing, the above gate will fail, and you WILL be locked out of gears.
The pilot bearing comes out , via : grease gun tool kit for pilots,(uses hydraulic force to OFF IT) , remove flywheel and it from behind it, or use a slide hammer with included bearing puller.
Adding new seals in the distributor base, and dizzy shaft o-rings.. then new "VITON" Seal in rear main from "FELPRO", that wood block is even mentioned in the Suzuki FSM.
The 5speed BELL, has a vent, that lets DIZZY oil leaks, run right where those 6 Phillips screw are dead center........ Look carefully if the main leaks, the flywheel MUST get wet. (a top clue) This main seal is not prone to leak, it's huge and robust.
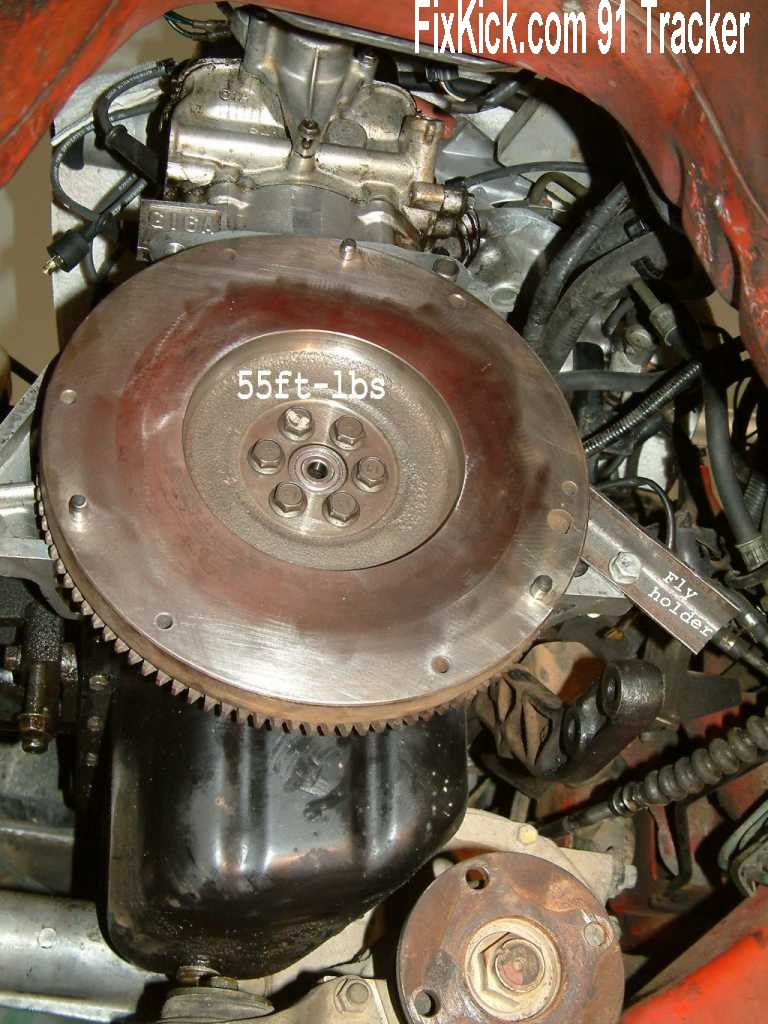
Photo1:
Next is Fly wheel, with new pilot bearing. ("Timken")
Photo 2:
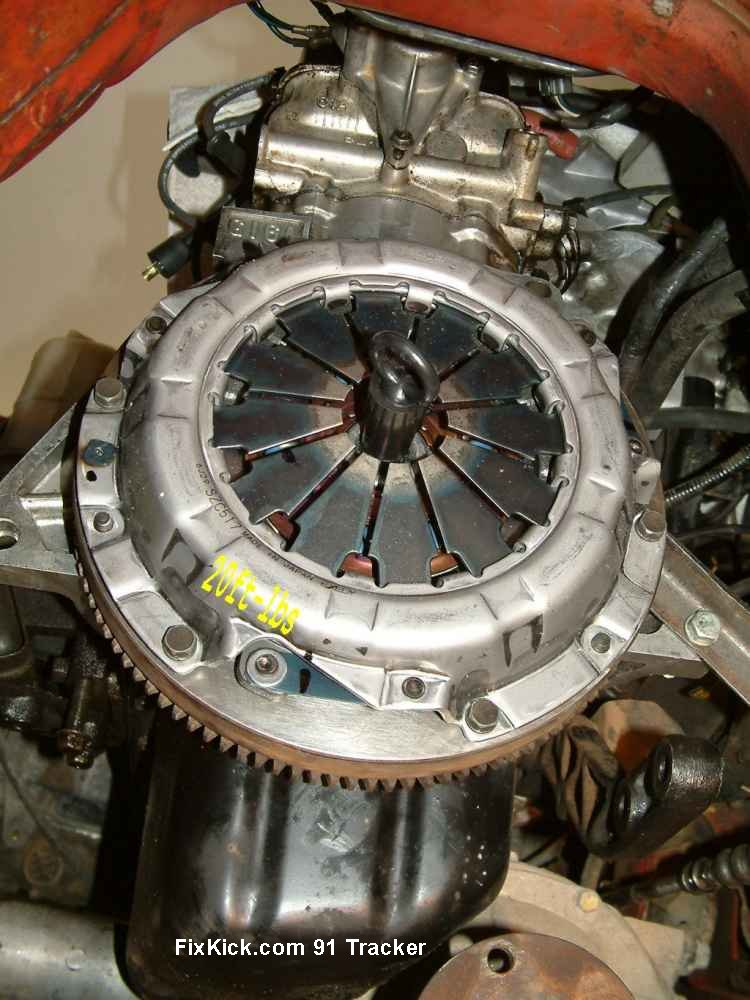
Last is PP, the pressure plate, the disc, will not go on backwards, good news.
Photo 3:
The vent below , will magically suck in all engine oil from the 2 distributor leaking 0-rings or the Dizzy housing bases seals or the 16v rocker rail seals or OMG, a bad valve cover gasket at the rear (not doing 60k tuneups caused)
My buy parts page (see index on 0-rings) shows how to get "Viton" seals that will last the life of engine.
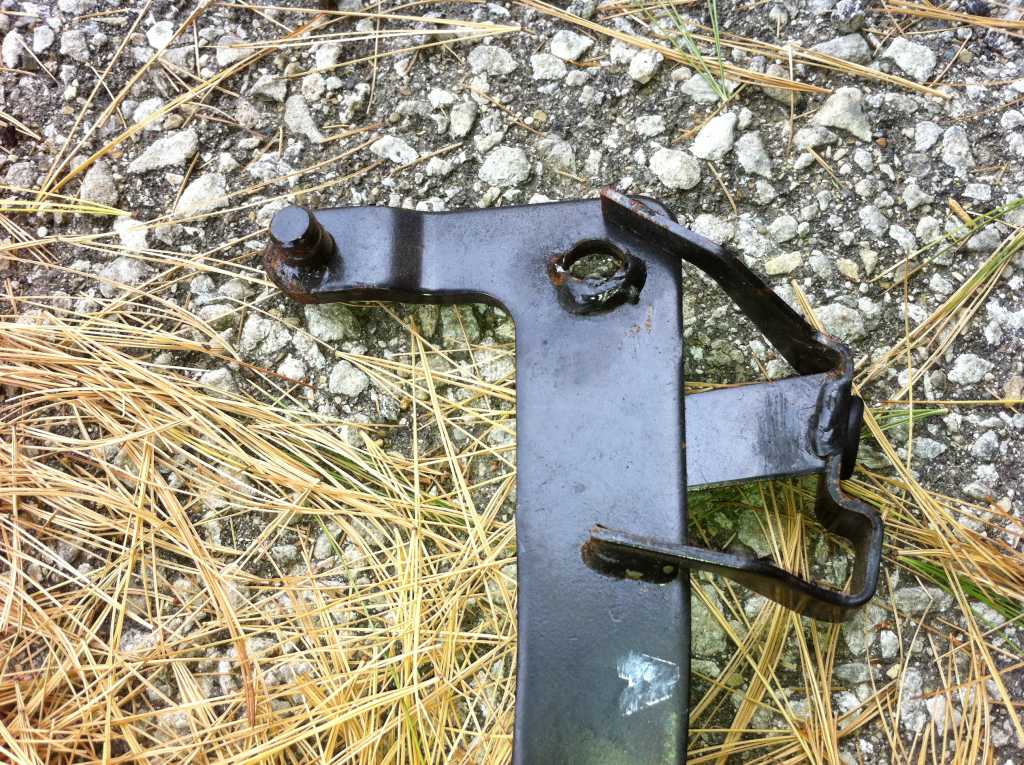
Do not remove the lever seen below on the right. (unless you see its index markes, or make your own !!!
Photo 4:
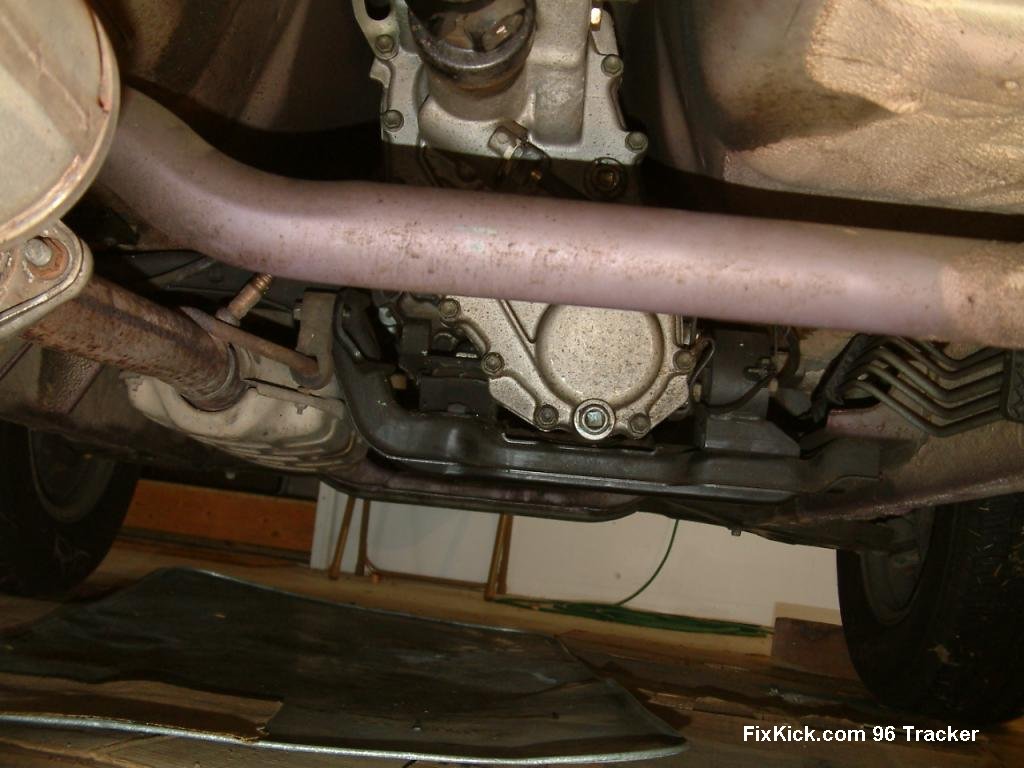
Below, rear looking to front , see transfer case and drain plug (10mm square drive) do not use 3/8" socket drive or it will strip, use heat if first pull of plug, Suzuki GLUED , it in. (spec. caulk)
The Cat below can be in the way of the left transmision, cross member mount.
Photo 5:
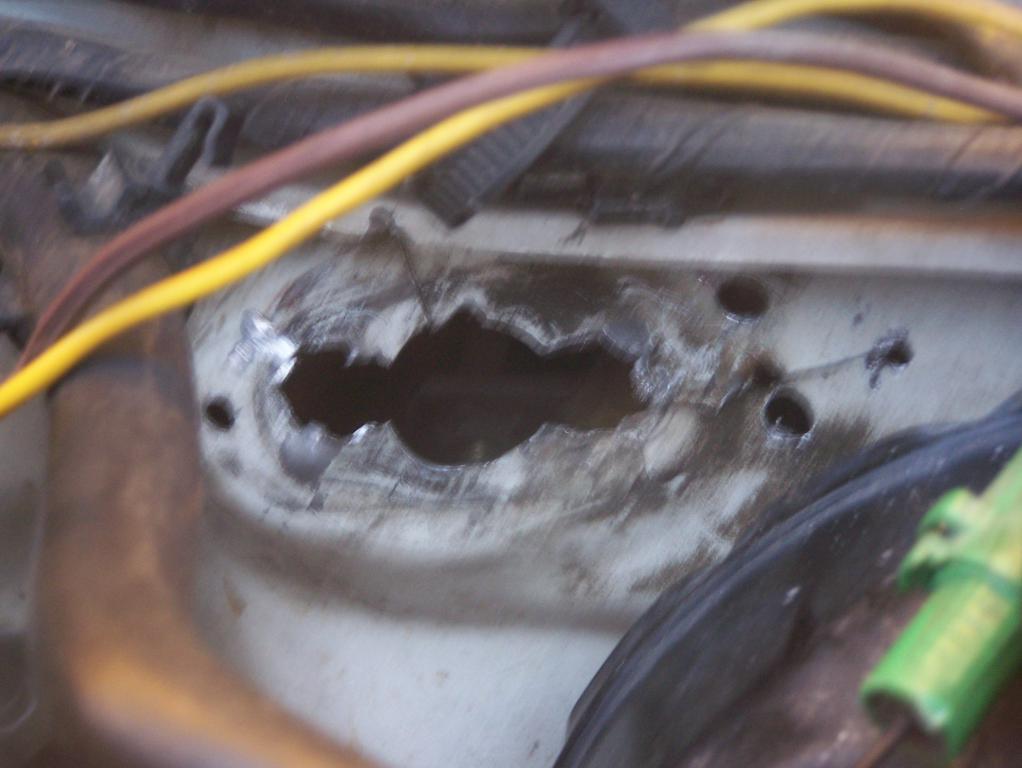
Next what happens when the clutch cable is never changed out. this is the fire wall cable port. (wrecked)
Photo 6:
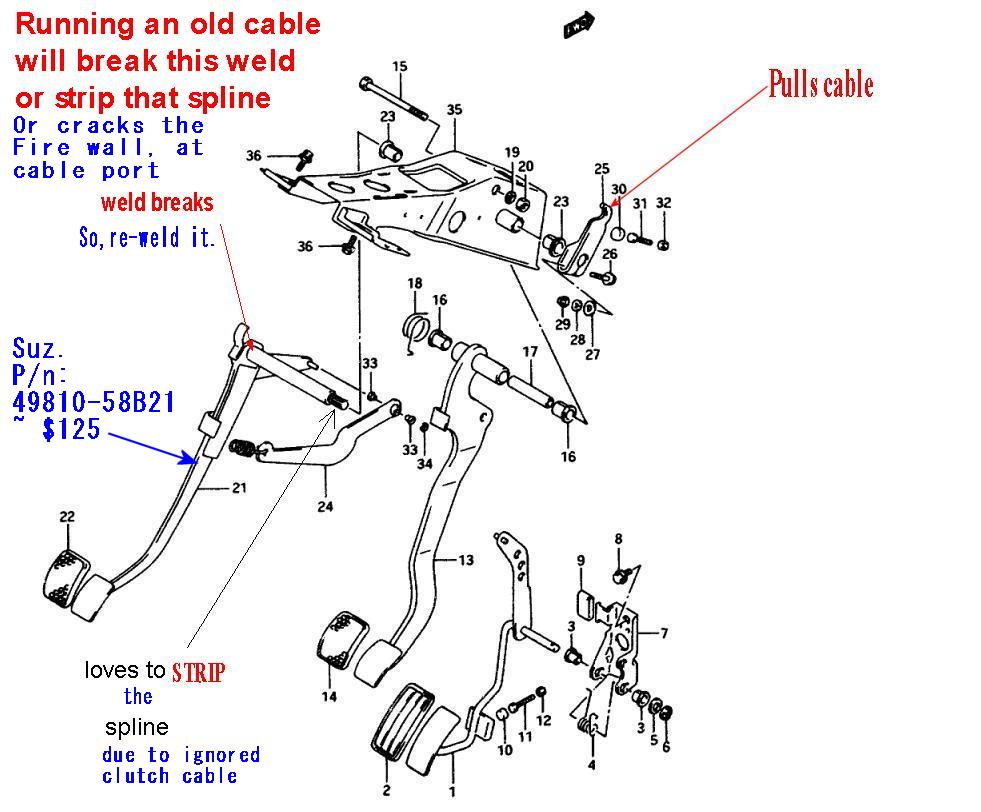
Next, is the clutch pedal damage cause by the same thing. so reweld the shaft, if the saft end is stripped, you need a new pedal assembly, Suzuki still sells them #13.
This is a contributors photo, THANKS, and is very clear.!
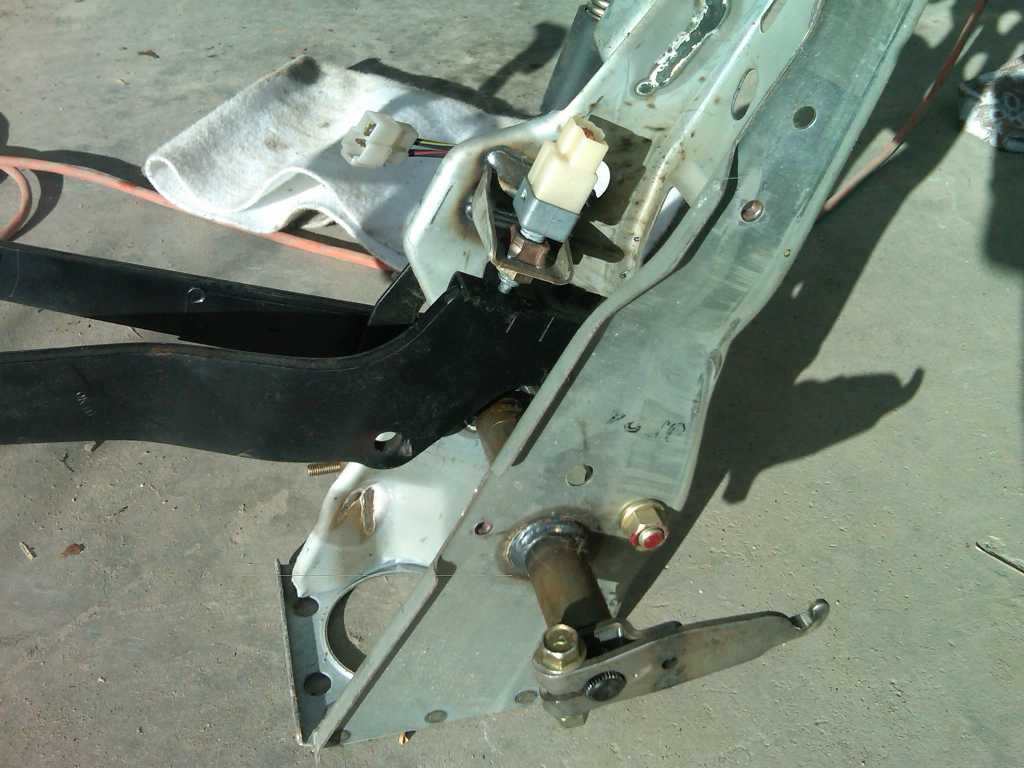
Photo 7:
Now the pedal below. see that lever and spline? it won't strip if the cable for $25 and 1hour labor, is replaced.
Photo 8: the lever below has 2 index marks, do not fail to see them or add them, before removal.
 DIY HAHA. use lag bolts not dry wall scews. If you have a welder this is super easy to make, with scrap metal.
If you need suzuki part numbers please ask on the BBS.(forum) Not email or PM mail. Please. That way others can find it. or search and find it. Please tell full spec. on car, 1995 Suzuki Sidekick 4wd 2door, 5(speed sure) with 8v or 16valve engine. G16A or B?
rev 5 ++++ 4-25-2011 ,, 11-28-11 12-8-2014 added 2 steps, The FSM covers this, I advise reading that first. page 32 plus.