| Pulling that USA SIDEKICK 96' Motor 1.6
Liter 16v. 5speed tranny (the
full FSM pages are END OF THIS PAGE) And Trackers too: See A/C compressor and condensor tricks and A/T tranny comments added. < new ! My assumption is , pulling motor and leaving tranny behind. Others pull it all at once. I'm using a 2000lb full engine hoist. What do the motor parts weigh? See my Engine short block ,rebuild here. This page works for 8v valve too, but no need to pull the top induction plenum 8 bolts. (98 year this is impossible , no bolts) On the 98 , remove the whole intake manifold, first. The only reason, is to get to the difficult to reach, fuel banjo bolt, at back of fuel RAIL. See my 16v motor pull slide show. DIY: All directions here, are from the drivers perspective, seated in drivers seat. (LEFT is drivers seated perspective , LHD(left-hand-drive) SAE stds. { I am replacing a clutch , no fighting tranny and transfer case, under car, on your back and today I am removing a cracked block 1997) , the below works and is effective, on any air conditioned car. see photo proof.> NO EVACUATION of A/C loop ! Safety step 1: Unscrew the gas cap 1 turn or expanding fuel will flood you garage , after step 16 happens. or remove the cap an put it on the dash top. Remove the dip stick, so you don't break it in half. Never pull the head until the water pump is off, so as to keep all that antifreeze out of the engine oil side. Trick one, pull motor with intake installed on 16v , you need to pull the front harness connector to fuel injectors. Located just below the front of fuel rail, see slide show. Trick two: pull the induction plenum 8 bolts, on 16v and gain access to the rear mounted rail fuel source banjo and harnesses and small hoses. Trick three: the 16 engine can be pulled with inducton fully in place, if you drop the "Y" under mount bracket. < this brace is FRAME ATTACHED ! One liners: ( you use tape and mark all small hoses before pulling the motor , standard practices) "duct tape and pen ?" Please read the fuel warning here first.
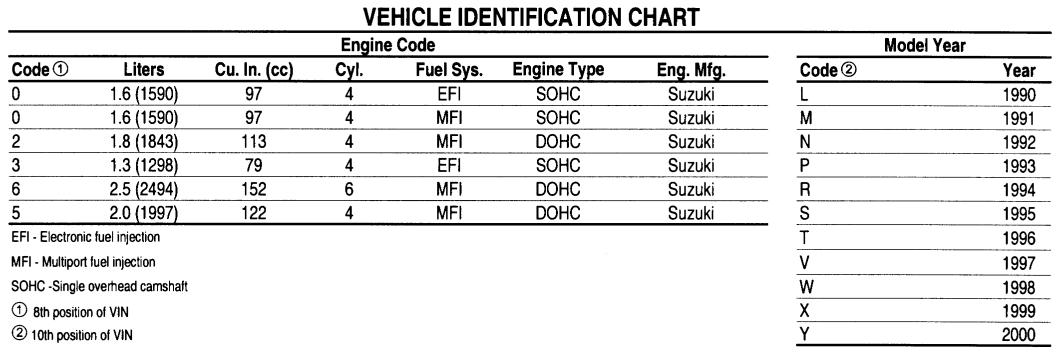
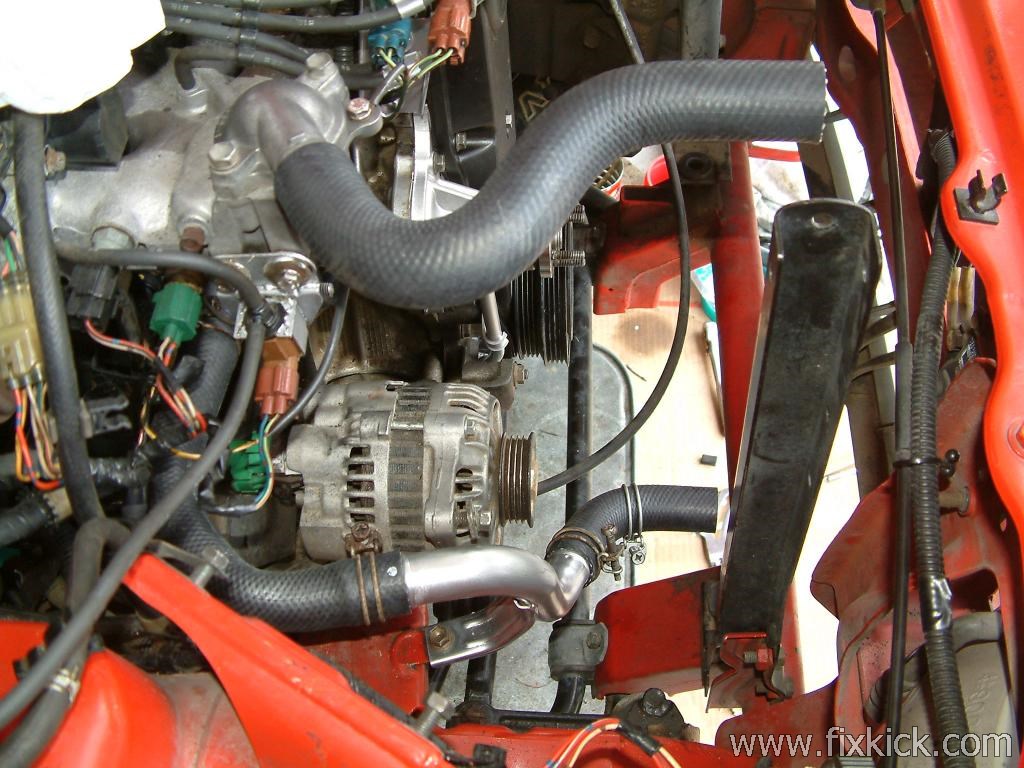
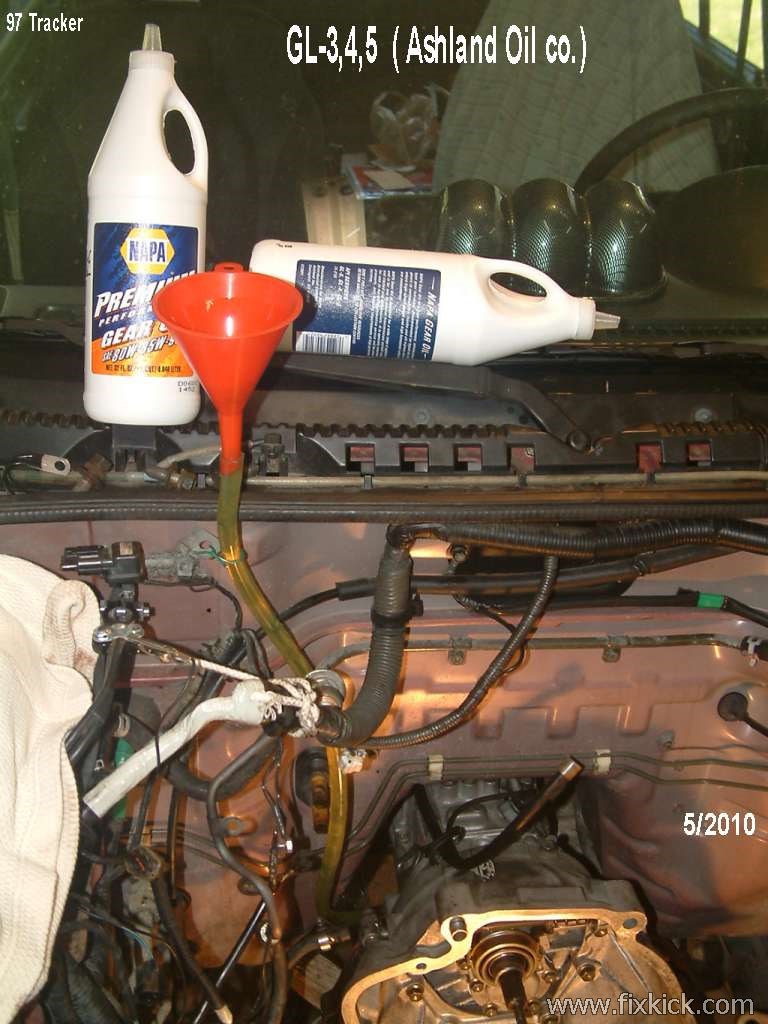
Use the FSM re-adjust all settings destroyed in the motor pull, Throttle cable, clutch cable or A/T shifter cable. Pit falls: Not removing side braces on tranny. Not removing A/T clutch flange bolts. Not gaining access to the rear FUEL rail for the main tank fuel feed banjo removal. Not disconnecting all things connected (this should be obvious) Not protecting distributor from hitting fire wall (remove it or use FSM stated wood blocker) Do not damage the harnesses, tie them all back , those connectors are not sold in stores. Not disconnecting exhaust manifold brace. to frame mount. Not tilting transmission to get at at bell housing top bolts Or if tranny stays ,not having proper tools, 1/2 drive , a universal joint driver, and a 24" extension to get the top bolts on BELL. (I use a 8" and 18" extension stacked) If you think this is hard, try a JEEP. LOL ! Crushing the TPS, or the injector connector , front right, is a real max PAIN. You are working in a pit, and the tranny falls on you , in said pit, and that be, a pit fall. LOL Comments: For transmission support , you must improvise, using the following ideas. A real tranny jack . barrow or rent them , Harbor freight has them cheap. A stack of wood. ( Key Stone Cops style?) A trolley jack holding the front of tranny up. Later: I put a board 2x4" stud, from the front cross member and to the rear cross member. See that here! so I could tow and move car around lot. I'm sure I've missed something. ( 2 motors, 3 transmissions. , sure) Important things to replace at this point. Total new clutch , and lube up the clutch fork pivot shaft bushings. Check for excessive wear on this bushings. New rear main seal. (if it was leaking at all) Must pull flywheel.) A new Pilot bearing and throw out bearing. All new hoses under intake manifold , so easy to change now, do not skip this. using factory molded hoses. Warning: Gates hoses don't fit. (fine print says, must be "cut to fit ", oops they don't and one looks like off a school bus !) Make sure fly wheel is not scored, grooved or galled. New Pan gasket if old one leaks. (drain motor oil first , ok?) if 96 and newer there must never be a pan gasket, only RTV or the CPK WILL FAIL. New Distributor o-rings (infamous common leak points) (one on housing ,other on Distributor shaft) [must be re-timed] Consider a new timing belt , just sit on an old orange crate and change it with, no back pain. Yah ! Torque front crank 17mm bolt to 94 ft/lbs ( use vise grips at fly wheel or make a simple metal locker) Get serial number off left side rear flange now, write it down, (check letter code for engine year ) This can be handy later, when buying parts. Notes: Photo 1: Make a space in front of motor like this photo shows. In my estimate, you can change a clutch 2 times faster with this procedure. 4 hrs. total, not over 8 hours under car fighting the tranny and XFR casing and prop shafts. and lube. No draining anything, cept RAD. ( that cuts 2 drain and fill steps, none of which are fun or easy , at home, hint, microwave your GL4/5 lube,so it pours in much easier..) Rad is way easier to drain and fill then any tranny or transfer case !! Transfer case is a PITA to reFILL ! In car. (and must be drained before propshaft is pulled) Fill the 5sp tranny like this. No difficult tranny alignment when you put it back in. The Engine crane does all the hard work. (with a tranny jack too) No pulling seats to get center console free and shift boots off , etc. Only the 2 heater hoses need by sacrificed. (I bet they are bad anyways!) Always: mark all hoses and wires remove if it is not obvious where they go.All USA cars have vacuum map under hood. and put all bolts and hardware fasteners in jars and cans and label them. or punch holes in cardboard and stuff screws in them and label them. Not losing and mixing parts , pays back in saved time , overall. (some parts are specially hardened parts and must not be mixed) I put bolts in sandwich bags and mark them with a Sharpie pen. With the engine out , you an put a 2x4" board from the front mount to the rear tranny mount (holds up tranny)and the car can be moved outside your property for a proper pressure washing. I just push it out side my Garage and pressure wash it all. ( with plastic sandwich bags protecting my connectors held with rubber bands..) Secrets, Secret 1: The P/S pump adjustment bolt, is invisible, see here. It is on the 6pm lower part , front and only if the pulley hole is at 6pm., facing rear. Secret 2: This same bolt on A/C cars is moved to the fixed position on the P/S pump, at 7pm. facing rear. Secret 3: fill tranny from front edge of fire-wall with a hose and funnel , . ( heat the GL4 lube in microwave 2minutes or hot water dip first) using a hose to the side fill hole. On A/C cars install motor with out water pump, or it hits A/C lines on top. Then install WATER Pump after and then Timing belt then fan pully and fan, next the shroud , and last the radiator. Tools: STD. Shop tools /spanners , and an engine hoist or crane. ( chain hoist , 2 fold pulley rigging system (sailor talk), or a chain fall.) 1/2 impact wrench helps for the the most stubborn large bolts. Both a 200 inch/lb and 200 Ft/lb torque wrench. Buy items, before you start: All Exh. manifold gaskets, on head side and collector tip side , just in case. Get the full Felpro kit, not , china junk. New hoses. ( at least do the hard ones , now that motor is out, under intake manifold) New (if M/T) clutch. (Pressure plate, disc,, new pilot bearing and throw out bearing) New head, rebuilding the head is far easier now, with motor out of car. (the Felpro head gasket says , this side up. see it, do not block the head gallery OIL hole) New rear main seal, get the fancy upgrade Viton seal. New front seals on crank and cam? New RAD fluid. RAD = Radiator for short. new belts? do the CAM belt now. "Gates Timing belt kit is best" Motor cleaner. Nitrile gloves? JARGON: YMMV , your mileage may vary. Other methods can be faster , a PIT. a Lift. or on stands, but I can pull a motor real fast. 2nd time 2times faster. My whole page tries to do better thant, the FSM , the FSM covers it here on page 56 , volume 1 , chapter 7/7A. 1996 full FSM http://www.acksfaq.com/trackerfsm.htm rev 5. 4-16-2010 ,rev6 7-25-2011 (add A/T issues and full actual fsm pages.) |