
The example is 1991 2 door. (with 96+ notes)
Be SAFE, Just say no, to bad brakes, my list of show stoppers. <<<(don't drive if you have any of these issues)
This is just my journal, it is non-authoritative but has the links to the real deal, the FSM pages and excerpted graphics and my personal photo's/
The Geo Tracker and Suzuki Sidekick run the same brakes. TracKicks? They evolved in 5 generations or more.
The 4 door and 2door cars have different brake parts. EVEN rotors, drums, pads and shoes and cylinders.
Do not mix parts years, casually.
There are many generations of parts. 1989 to 91', 92' to 95', 96' to 98, and then 1999 on up to 2012 (Vitara's). And the Suzuki 1.8L Sport wide body. 96-98.
There are 2 different RWAL antilock brakes uses, and real optional 4wheel ABS, starting in 1996 ( 3 types) or just a rear brake compensator device, for body load changes)
The drums and rotors come off best with 2 spare 8mm x 1.25 bolts. used at the extraction points
pre 92 drums just unbolt.
This is not a diagnostic page... there are vast books on topic, no lack and 100 years worth and ASE classes that cover that.... and real BOOKS.
Jump to Booster facts:
Jump to BLEEDING (all ways):
Jump to related, Rear brake lamps are dead and/or the park lockout feature , is locked up and failed. (and cruise control failure)
Installing brakes is a very common procedure , which you can look up anywhere. (Front pads are easy) Rears , not so.
Advice: take photos of the rear brakes and later see how to put them back as found, and do one side at a time, so the other side, is and example, later if stuck?.
I never trust 25 year old brakes, I kick them to the curb.
I replaced all parts, on mine (1991), except the booster and no hard lines, but one. (its in the land fill where it belongs. (calipers were recycled as cores)
My 1991, had a cracked rotor ( a real people killer, that is)
My car came used with that, and I never drove it , until I repaired this horrible condition. (Day one inspection, was brakes)
The FSM: The Factory Service manual covers all this well, as does alldata.com.
As does Suzuki pit stop. (just 4 bucks to look, at the REAL DEAL !)
My page is no substitute for the great factory FSM. or my growing MANUALS page here.
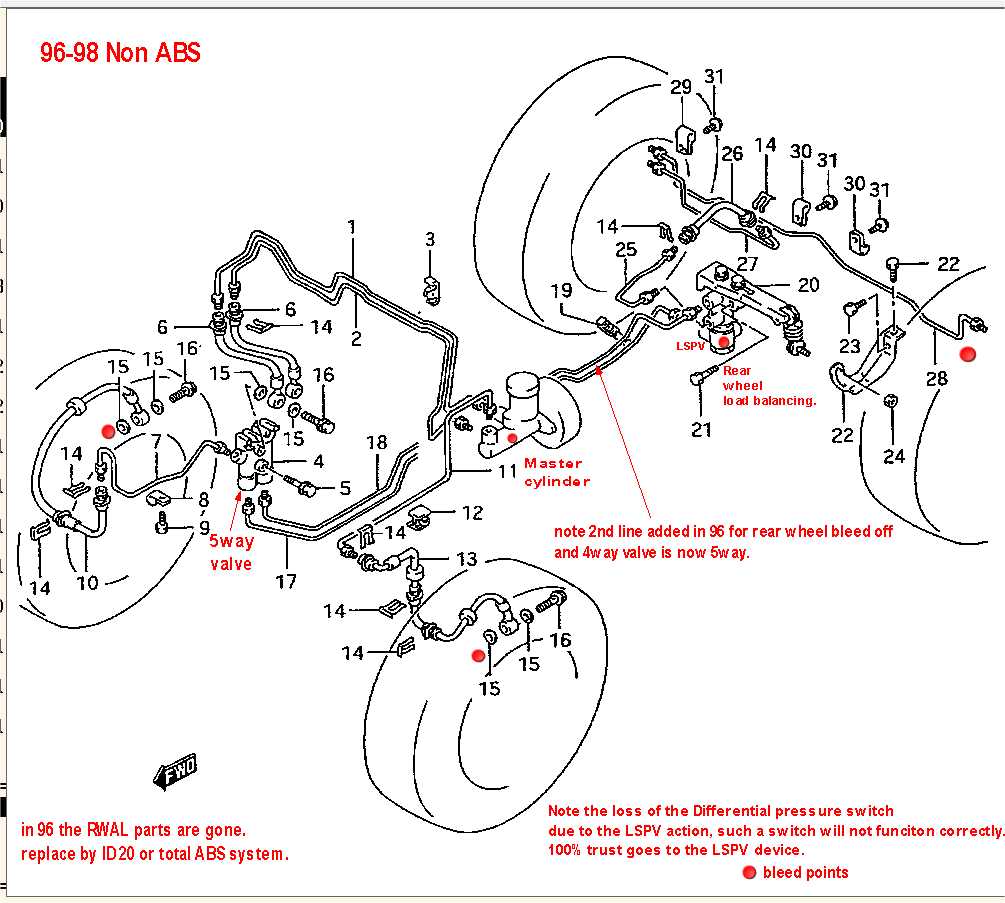
The below drawing is typical of a Generation 2 TracKick (Geo Tracker + Suz. Sidekick) RWAL opted , rear wheel Anti lock brakes.
The red dots are Bleed points. RWAL , 2 rear wheels.. Rear Wheel Anti-Lock. (for 96-98 and ABS see end of page)
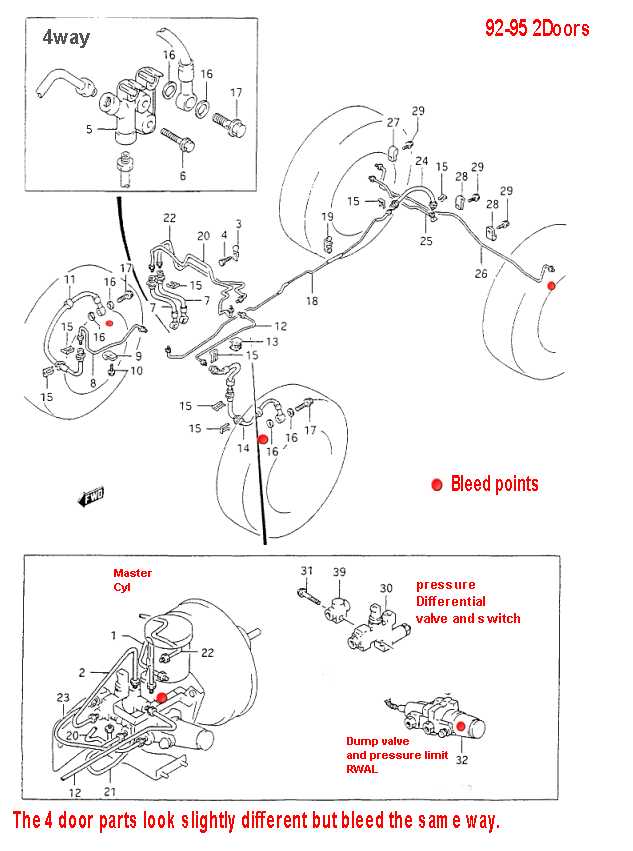 Drawing #1
The bleed map for Generation 3 TRACK-KICKS is here 96-98 , non ABS.
I will tell you that I replaced all of my brakes , except most of the brake lines. (new flex lines sure)
( I did buy 1 new Suzuki rear axle cross over line, that had signs of rust) (I have a zero tolerance for brake line rust)
I did all this, because of the high mileage (160k miles +)
If you have low mileage , just front pads might do it. (look at the pads and shoes)
I am ready with these new parts:
All New Loaded Calipers and new wheel cylinders. I like Raybestos brand. (rebuilt)
All New Brake shoes and spring kits ( From Beck Arnley) (Rockauto.com)
2 New Rotors ( one of mine was cracked , very dangerous to say the least) Can cause a wheel to lock.
Clean the rotors (brake cleaner ) before mounting ( they were factory oil preserved)
New Master cylinder ( primed in a vise on my work bench). using standard methods . "bench bled"
If you skip bench priming?, this dumps huge air in the all lines and worse the MC will harbor that is, stuck air, inside the bore.
I bled the whole system 2 ways. (vac + 2man)
The Calibers are a piece of cake. Just bolt them on and bleed them. A no-brain-er.
BLEEDING: See Methods here:
A Nut shell list:
Bleeding is an art form and a skill set, and it takes some luck too.
Air wants to float up (in the DOT3 fluid) but you are forcing it backwards, that is down hill. (luck happens)
In almost every case you will fail. We all do, but repeat it, we do and always WIN.
#4 is one of the best ways. (it's natural)
I've done #5 then #2 , 100's of times with no problems. Done gently with speed bleader for best effect. (or teflon taped in threads)
I installed it all and bleed it with a Mityvac , in fact I bled the whole system with this tool.
There are 5 ways to bleed , each has merits (pro's and con's , I use at least 2, ending in 2 man.
- Gravity way, (good luck with that? sorry bubbles do not float down hill well.) Totally useless with ABS. (but works for me, as step 1, system primer)
- 2 man way. (person 1 pumps, pedal (in a special way)
person to open the bleed valves in sync with person 1. (from 1914
racing cars and Duesenberg, to now)For 100 years this way !
- Pressure bleeding at MC end. See my POWER pressure bleeder here,, DIY
- Reverse pressure bleeding at the bleed nipples forward do MC. (a special tool this is and not expensive)
- Vacuum bleeding at the bleed nipples (gently). I use
speed bleeders to make this more easy. (I ignore the
bubbles, then when sure I've pulled in lots of fluid, (pint) go to #2
way.
I always follow up using the old fashioned way #2 of bleeding, to make sure there is no air in the system. (Pump, hold, crackvalve,close, release)
Bleeding is an art form, I am prepared to bleed in 5 different ways and tools, and use 2 or 3 ways to get it done right. Air floats as AIR WANTS !
My old 91 , bleed order is LR,RF,LF ( only 3 wheels have bleed valves, No RR bleed) . (true for 89-98)
There are extra bleeds on the Master cylinder and at the RWAL dump valve and starting in 96' the LSPV.
Do not bleed these unless they were changed (breached), and if they were, bleed them first. Always pre-bleed any MC on the bench, first. If not , you will dump huge air to the system.
If you mess up and get air into the more complex parts, MC, RWAL, or LSPV , do bleed them and then from the front to the rear first.
Then when sure all the air in the front part of car is gone, then bleed the standard and normal way. Try to get the largest air out first. (even to the point of 2 man way, cracking open every fitting, to burp out air)
Once the lions share of air is gone we can do the classic way #2, longest path to short, LR is long.
FSM spec.way is here;
LR, RF and LF. (long lines to short lines , standard on all cars , it is not the location but the length of the lines that count )
I do this every year ,just to get as much hydroscopic DOT3 out of the system, just this one step.
To Purge an air free system. first suck out 90% of the MC fluid at its reservoir. and refill with fresh D.O.T. 3/4. Newer use DOT5 (dept, of transportation. spec)
If I have time, I'll just bleed the whole system LR , forward.
Always pump off the Vacuum from the brake booster first, key off, by pumping the brake pedal 3 to 5 times, now you can feel the brakes for a hard , sponge free test.
Back to my overhaul:
The rear shoes and springs , will be easy only if you take photos and do one side at at time.
zoom in close , ok?
Front Brakes:
Tie up the calibers with a coat hanger wire, to the springs.http://www.acksfaq.com/trackerfsm.htm
Replacing everything costs a mere fraction of a shop brake job and is easier to do, because you are just replacing it all. No guessing or cussing, no surprises.
It was about $350 total.
If you need brake lines get them from Suzuki , I replaced the rear cross over line , for $15. cheap.
FRONT BRAKES on my 91, ,all new calipers and rotors. (and locking hub service) The blue grease is Marine water resistant grease.
Photo #1:
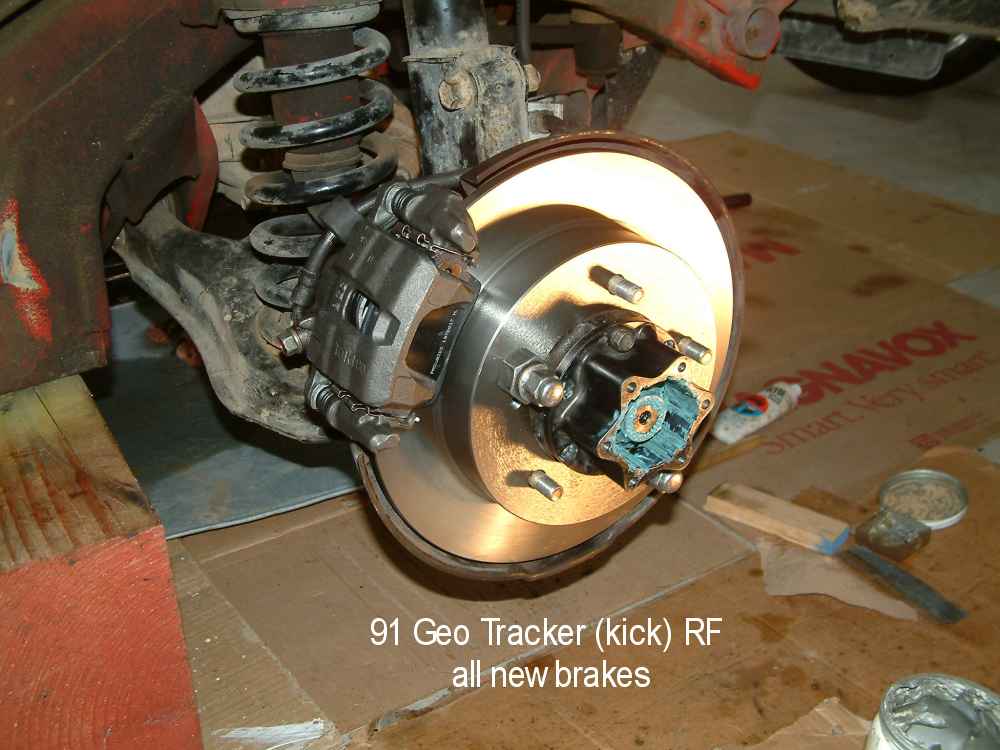 Photo #1
Wheel bearings are here.
The REAR END:
To get to this point below , rear drums off:
Use jack stands and or , wood blocking, I have huge blocks, and use them for personal safety with jacks stands, and never just JACKS.
Buy a brake spring tool, for the rear drums..
- I chocked the front wheels.
- Released hand brake , and put Drum under service side up on stands.
- Removed the 4 nuts seen below on axle shift. (pre 96 have this , not after)
- I put penetrating oil on drum to axle juncture. " I use, wally world, pen oil" LOL
- next ,installed the two ,8 mm x1.25 pitch. bolts to the drum holes, and torqued them to about 15ft/lbs.
- last, hit the drum (never use metal hammer) with a dead blow hammer, or 2'x4" .
- The drum starts to come off, and I put back my 15lbs on the 8mm bolts. and off it comes.
- The FSM says to release the STAR wheel adjuster in side, but I have never had to go to that extreme. (rubber plug in rear must come off)
- Grab you camera and take close in photo's of the springs. ( or draw diagrams, carefully) (this is the most important step)
- Removed all springs first then clips , attached, now shoes,and put on new springs. (sold a kit at most stores)
- New shoes back on.
- Adjust the STAR adjuster, so shoes are fully retracted, then adjust to new Shoe's to make a slight friction ,as you install drum. the back off just tad.
- You now have a loose (barely) drum fit. Put back the 4 BIG nuts below.
- Depress Main brake pedal 5 times to adjust, drum adjusters.
- Adjust parking brake, if too tight now.
- I replaced the shoes, springs, and cylinders.
- Look f or any axle leaks, and bearing play, when INSIDE. if Axle bearing or seals are bad see my axle page.
The other parts that are different besides shoes are, drum and backing plates, the small parts are the same as is the wheel cylinder.
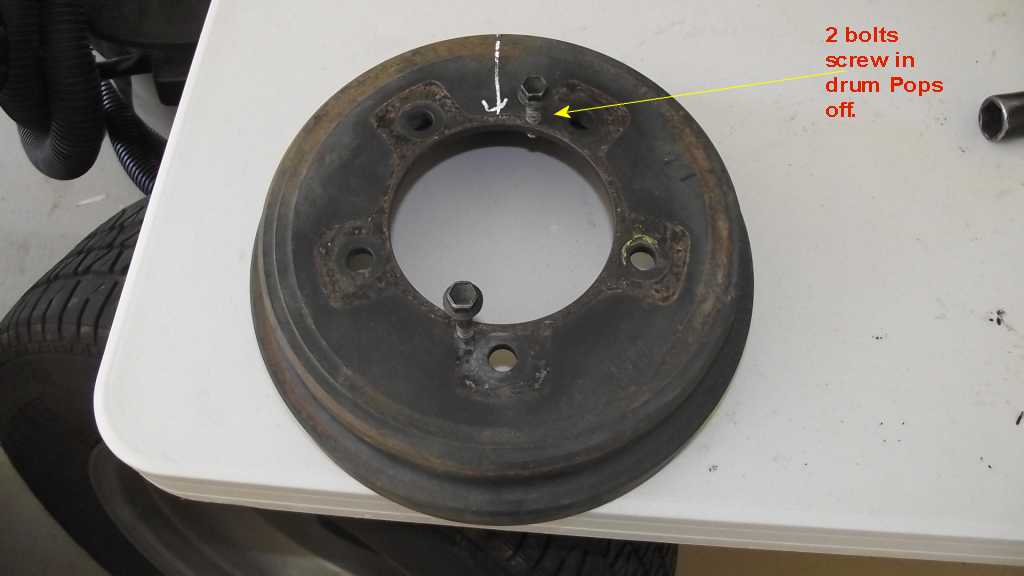
Note how 91, drums unbolt in this unique way. (center studs) That funny edge on the backing plate says, 2 Door light brakes.
Photo #2:
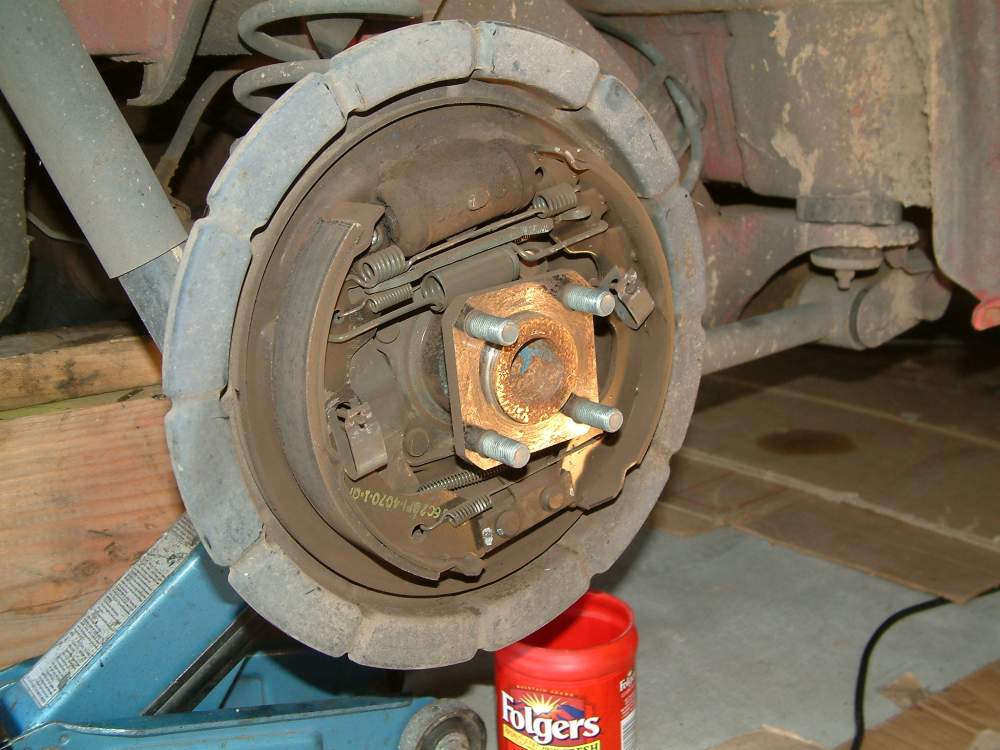 Photo #2
This is by no means a complete list but is a review of unique features of the Suzuki. For basics look here.
The first links on this page shows the actual FSM. read that FSM first.
Do not use shop air to blow that dust, it may have asbestos in it. Uses brake cleaner.
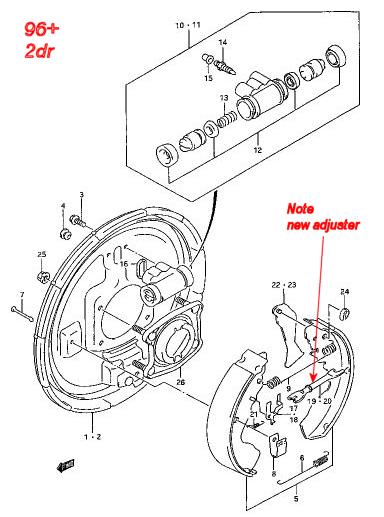
Drawing 1 , typical 2/4 door brakes rear.
Before buying parts, get the drum diameter and door count, then buy parts using the after market sellers catalog, and look up the correct year and door count for a correct fit.
I run Raybestos, on everything, they are a top maker. I trust my life to them. Here is their E-Catalog. (sold everywhere!)
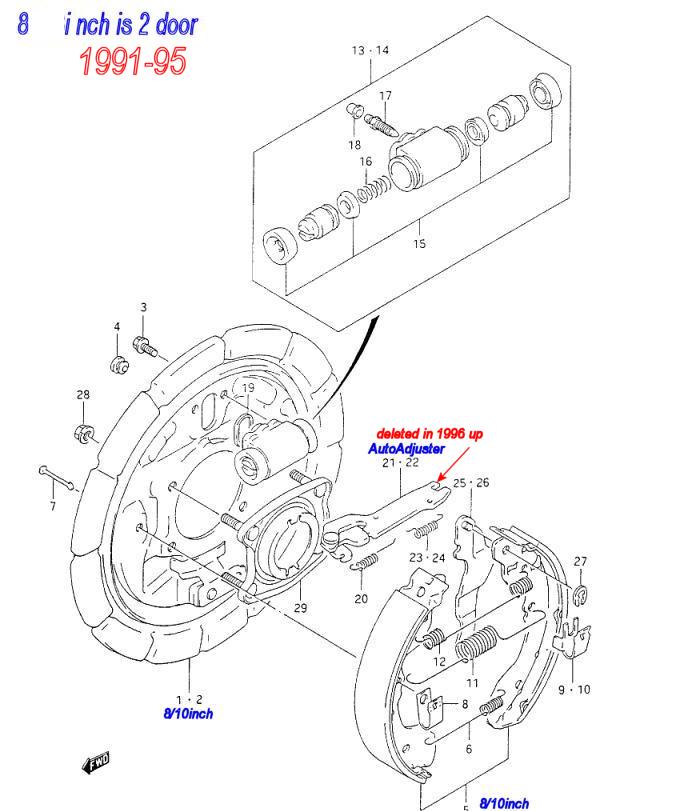 Drawing #2
1996 the brakes changed, do not mix parts between pre 96 cars, many parts are vastly different.
Here is the new rear brakes for 96+
And again, 2door parts are not same as 4door. (shoes,drums, backing plate)
 Drawing #3
THE BOOSTER
The booster , can be a pistol ! Do not just throw a new one on, it must be ADJUSTED. Read the FSM !
The Vacuum Assist booster unit.
Note the word Assist, the car has manual brakes by default and the below booster only provides ASSIST .
With no vacuum at all (pull hose and plug it ) and see manual brakes work.( on a test track, ok?)
That is, see rod #9 and 4 below, that always can operate the MC piston at all times. ( a built in safety feature)
and means, that you must troubleshoot manual brake failures first, if they fail !
The booster test (manual brakes have a hard pedal, to begin....)
1: Press brakes hard (if it don't get hard, then the manual system is bad)
2: Start engine (vacuum happens! now...)
3:The pedal should fall away slightly, and less pressure of foot"?, should be needed, to maintain the pedal in any position.
If not, the booster has issues.
A New MASTER? MC?
The NEW Master Cylinder needs to be PRE-FILLED (so called bench bleeding) before it is installed on car.
Unless you enjoy week long bleeding sessions...?
My new MC had a bench bleed kit in the box and instructions on how to do that. (it's just some plastic fittings and a cheap hose , that goes to the reservoir) Super easy to do.
You can buy a kit to do this step, like for $5.
BOOSTER SERIOUS ISSUES: (adjustments) A private little SUZUKI HELL , here.
The Brake booster, if changed out , will be set wrong at factory, and brakes will be dead or no pedal. or will LOCK UP your brakes if ADJUST "A" is adjusted too far out.
WARNING:
If you just throw in a Booster willy nilly, and it holds the MC open , not allowing the MC piston to retract , all 4 wheels WILL LOCK UP. (do not drive it)
Suzuki does not sell the Suzuki special tool, for calibrating the booster) ! and near criminal, they do not tell the OFFSET value. (a Nice way to kill customers, no?)
"The "A" pin setback is reported by many as 1.59 inches.
The SUZUKI had a gauge, and fails to state this setback AMOUNT (linear measure) then fails to sell the tool, nice going , huh?
ONE, customer, had to extend his "A" rod about a 1/4 inch for the after market master cylinder to work." ( had dead brakes or late PEDAL:)
See FSM section 5D1 The FSM ! and all steps related for this topic, are useless with out tools.
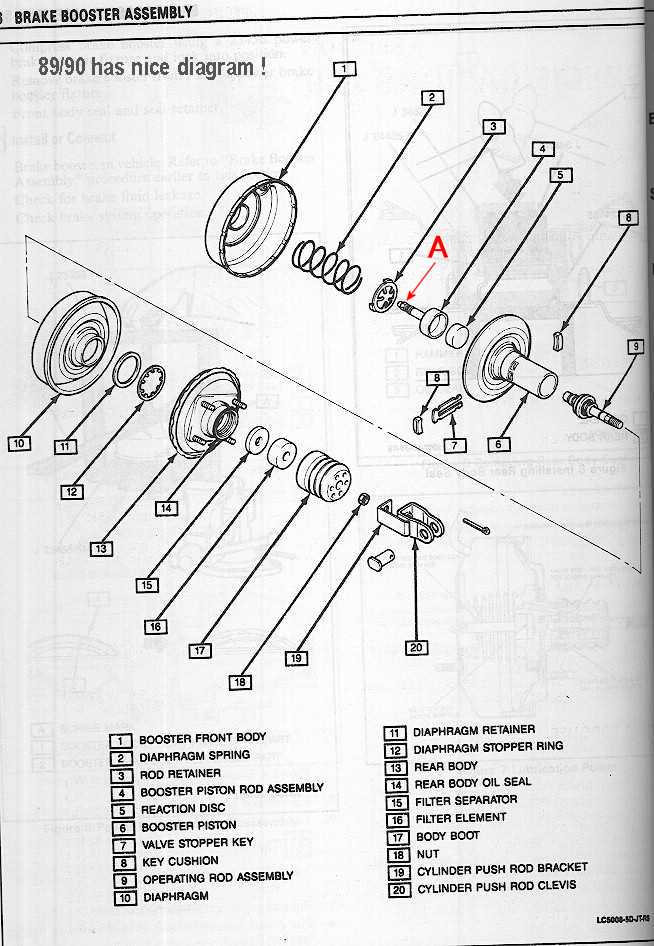
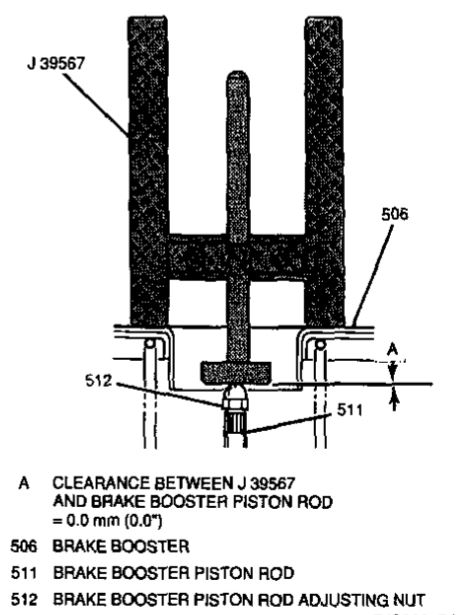
Part 1 is front of booster. MC is missing below.
Drawing 4: This year FSM shows all the tiny parts , unlike newer manuals.
 Drawing #4
The above Red "A" marks the booster off set point, (calibration)
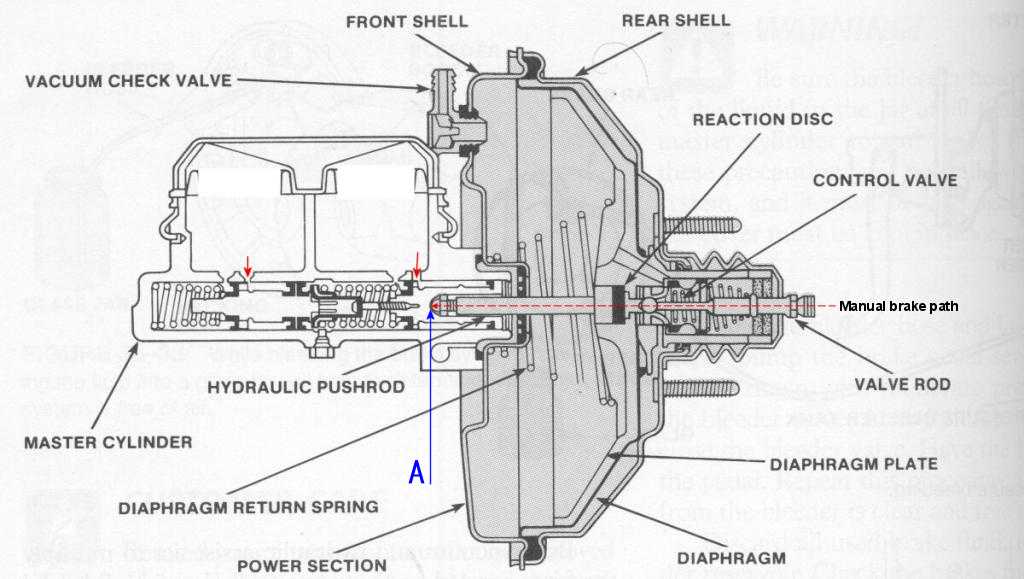
Below MC and BOOSTER.:
See the 2 red down pointing arrows?, when your foot is off the brake pedal , those 2 vents (equalizers) must not be BLOCKED. (pedal up)
The dashed red arrow shows the manual foot brake path, it is pure and direct mechanical, this path. (the pedal end must have play, TOO)
See that blue pointing arrow below? (center of drawing) that is the OFFSET ADJUSTER. (suzuki's freak'n secret and BINGO not Factory SET !)
The MC piston must not be compressed, with the brake pedal up , state. or the car is NOT SAFE to DRIVE.
One way , in my theory, no facotry special tools? , is to mount the MC on to the booster casing, many times, to feel the pushrod below as it lands in the MC piston, pocket pit "A".
If it has pressure?, the preload is wrong, it must not have any pre-load, re-Adjust until it's tad loose and no preload. about 1mm loose is GREAT.
The spec, is 0.0 inches, but 0 to 1mm is ok, I am sure. As you can well imagine, attaining zero play would be near impossible (by feel alone)
(set the nut for tiny bit play, the most small you can feel, at "A"
When sure its correct ,set the jam nut there.
All this can be done on a bench or on car.
Looking at online FSM pages (not Suzuki) states (horrid) "Adjust the booster piston rod-to-master cylinder clearance." << what a joke that is.... same words in store sold rag books.
Generic drawing #5 below: XRAY cross section view.
Factory tool 1: Now the factory tool way, and how to do it otherwise.
These tools are No longer sold. there ar 2 tools, the first tool is only for convience. (below Drawing 6)
You can manage to do this with a bent box wrench (china crap tools are top choice) and a socket driver. Home made tools are AOK.
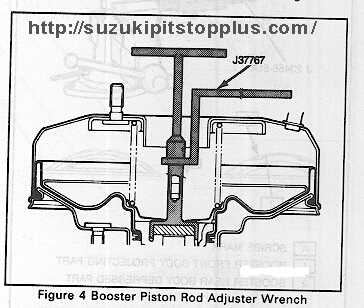 Drawing #6
As a starting point:
With no tool, you'd be well advised to measure the old booter, adjuster height first , then set the new one the same. (it's just a screw and jam nut, nothing magical or complex)
If booster and /or MC are not stock, that too, plays in to this adjustment, make sure when done, the play is not too much, or the MC piston is held held in, foot off brake, if that happens the brakes will lockup.
The correct play needs only be small, say 1mm and keep in mind the foot pedal play will be 6 times that, so if foot pedal play is huge, then you have this wrong.
See arrow 506 measure (SUZUKI freak'n Secret) from there to the top of the acorn nut below. 1.59" is reported distance by users. (bottom of pit up?)
Then mount the MC to Booster, and feel the play there, as it mounts, it must not compress, the MC pistion at ALL. repeat over and over so its about 1mm play. or less.
With the tool, below, the gap is ZERO , 0.000 "inches. 0.00 mm
Using the feel way, is for sure the best way,sans this tool below.!!!
The MC's and Master cylinders do not just fit right of a box, they all must be calibrated. (and together as one set)
The pedal must top rod must mate the clevis perfectly by adjusting the clevis and jam nut.
The spec for "A" below, is
The distance should be 4.94-4.98 in. (12.55-12.65cm) (126mm be dead nuts, right on.)
This sets pedal free play just right. #2 is a jam nut.

end booster and MC issues:
Brake problems. (and solutions)
Symptoms:
Before driving, inspect the whole system. Fully ! Do a full Inspection of the whole system with any braking symptoms of any kind or any warning lamps.
Parts that leak are bad , replace them, with the rare exception of loose fittings might only need to be tightened (bad service before)
Calipers that have stuck guide pins are bad. This causes weak brakes at this side and dragging. This I check every time tire/wheels are off, and rotors for cracks.
The Calipers must float on the pins, make sure they do. (if not SST pins in Teflon, like my Jeep has, then keep them lubed using high temp brake grease (do not use other greases !!!)
Buy some rebuilt calipers and install them, in pairs. I run Raybestos, rebuilds,they are a great quality product. (no Axe to grind, just like them "bang for the buck is tops here")
If you do not know how to inspect brakes?, then learn it , read a book on topic or get someone who does. Any ASE mechanic shop in the USA can do this very well.
What are the symptoms.? (all cars)
- leaking DOT 3/4 fluid. , at every
inch of the way, in system. At any line, hose, wheel cylinder,
caliper,fitting, master cylinder front and rear sides.
- stopping distance increased. (a.k.a. weak brakes)
Have any shop find the cause or DIY. check shoes and pads,
are the worn, or soaked in fluids of any kind?
- Pulling (steering changes as you brake?) ( bad brakes on that
side or other) the side that pulls can be grabbing brakes,
or the other side is dead brakes.
- Locked up brakes, 1 or any of all 4.) (1 bad, is bad rubber brake line or a bad caliper ( rear cylinder?) If on rear it can be very complex the cause, (levers springs. and what not, INSPECT IT)
- All 4 wheels locked up is the master cylinder has no
rear play at the brake rod. someone installed a booster and failed to
adjust it per the FSM.
- Noise can be just the pad wear waring devices, telling you,
you need a brake job. or is just squealing, is normal, but
inspect them first. (or is bad wheel bearing or bad rotor)
- ABS OR traction control (stability) lamps glowing new cars or old Suzuki ( RWAL) (brake lamp stuck on)
- ABS failure. of any kind. Warning lamps related or scan tool
says so? what? Scan the ABS system. New cars have
anti skid-traction or stability systems, and ABS must work before that
can work.
- DTC errors, from the scan tool related to brakes. If you have
real ABS most cars need a cusstom scan tool to scan it. All these
systems have warning lamps.
- No hard pedal, (bad MC or gross leaks in system. MC means master cylinder.
- Pedal drifts to the floor braking. same as above.
- Spongy brakes. (air in system , bleed the system) if you have ABS read how to do that correctly by reading the FSM for Your car, all cars have different ways.
- Pedal play is wrong , or height. (check it and set it, per the FSM ) No matter the car, you have, there is a FSM and must match your car and year. The"factory Service manual."
- Power assist part of brakes , inactive. (lost vacuum to
Booster, or a bad booster) Do not just install a booster willy nilly,
they must be calibrated first. or RISK Brake lock up.
- DOT 3/4 fluid levels keep dropping? (it's leaking somewhere find it and when found , that part is bad and needs service)
- Rusty brake lines . Suzuki sells them , all car makers do, buy
them and replace them and bleed the system. D,O,T means dep.t, of
transportation rated fluids. Never use DOT5
- Brake hoses cracking. Replace them now, and bleed the system.
- Bad ball joints or tie rods can in fact, make brakes act oddly. Again, inspections work, check for excessive play in all parts up front. ( apply force to parts, there, using a lever to find excessive play)
- Cracked rotors are a man killer, this is the first
thing I inspect every time. and caliper guide pins, not seized, every
time , at every opportunity.
- Warped rotors cause the brake pedal, to pulsate as you brake , or you have #18 loose parts. bad wheel bearings allow the rotors to wobble. check them.
- If you can feel by hand (tire off ground) any play in any of 4 wheel bearing, then bearing are bad, normal play is about 0 to 0.002" and can not be felt by any human, that small amount.. (dial indicators can)
- Road hazards can kick up road junk and hit brake
parts or lines, the lines can in fact be crushed, again, and
repeat, INSPECT every inch of the system for damage.
- On my 1996 it only has a rear axle , proportioning
valve feature (no ABS). as body height drops, the valve, sends more
brake pressure to the rear axle brakes. It too must not leak.
Testing it is very hard.
Brakes lock up?: One wheel or all 4? Do not drive, with locking brakes, ever.
- The booster adjustment screw #9 above, is set wrong at figure 4 above. not allowing the Master Cylinder to fully retract, this BLOCKS the MC drain back vent ports, see above in red arrows..
- The MC can be so packed with filth inside that the MC piston will not retract. These 2 can cause 4 wheel lockup. next is 1 wheel.
- Organic soft rubber brake lines up front , can collapse inside.
(surely not both front lines at once, a big clue that, huh?) Replace them now. (in pairs)
- Bad shoes/Pads or slave cylinders sticking , rust inside , corrosion inside , caliper pistons or bad
rear brake linkages , jamp ups there..
- The disc brake calipers can lockup, or partially with bad guide pins, that are seized. New caliper time.
- Caliper pistons can jam. (common when not doing brake flushes on time)
- You can crack open any line fittings, to release pressure, at any time a brake locks up, to find the TRUE path of the lockup. Say the left front locks, you crack it's line and its not locked now.
- If you crack the line at inboard flex line , the pressure
is relieved, then the line is bad. if only the caliper cracked fitting
or bleed device, stops the lockup, then the caliper is bad. Easy huh?,
learn to crack lines open , crack means opening any fitting by turning
it CCW a bit, it will leak fuid, let it, that is our purpose
here.
"MC" : The master cylinder.
See (below) those to right (rear) Reservoir ports ? If that left port is not clear (look inside Reservoir) the brakes WILL LOCK UP ! Lethal that is.
Notice how the piston is retracted 100% , nothing must be allowed to stop that.. (this is RULE 1) (that rod to the right to pedal has a spec.free play, this must never ever be ZERO play)
Never use DOT5 in this system, (DOT 5 is mineral oil)
Do Bleed the fluid out 100% every Spring.
The fluid is hygroscopic (sucks water) and has a very short life. I've seen brakes last 15years and more (not linings) with frequent fluid changes.
I suck the Reservoir dry with a turkey baster, with hose on end, then fill it with fresh DOT 3/4 and bleed all end points, (a fast way to purge ! the system every 6 months. for a longer life system )
Or do so, refill and bleed, I always assume my old DOT.3/4 is water soaked and suck it all out. First.
 Drawing 7: (off site hot link)
UnSafe at Any speed. (Please don't drive the car, with these symptoms, fix it) (BASICs covered in any book , in print
Do not drive with bad brakes. See all basic symtoms here, a shorter simple list..
This is just No good list a list of many bad things that can happen, even bad service to car.
- Any brake (DOT3/4) fluid leaks anywhere. (near MC , or any line,
hard or rubber or dripping from any backing plate or dust shield
or at any wheel) Inspect every inch of system.
- That includes, frame
mounted fuel lines, ABS valves , junction blocks, old car RWAL parts, and
proportioning valves. (rear wheel anti lock brake parts)
- The Brake pedal must be hard at all times in use. and never felt to drift to floor, past the hard spot. EVER.
- The Brake pedal must not be spongy , (you have air in system , bleed it now.)
- The Brakes must not pull car left or right, when you try to stop.
- They must not make noise at any time. (minor squealing
excepted, if pads are still thick ? 1/8" min.?) Some pads have a noise
maker for thin pads.. replace pads now..
- ABS lamp on , get help, use a rented ABS scan tool ($$$) the RWAL lamp (pre 96 cars see flash codes) Brake lamp glowing , with hand brake off.
- Driving with rusty brake lines.
- Driving with soft flex lines cracked. ( they look like rubber line)
- blank
- A leaking master (MC) at the front or the rear of firewall, did you look at the rear? oops.?
- The master cylinder rear operating rod set wrong, such that there is no play in the rod , pedal retracted.
- Brakes that lock up. (most will on ice , sand or
slick grass with no ABS) but no brakes should lock on hard dry
pavement.
- Driving
with a dead brake
booster is ok slowly, by design and will happen if engine stalls, and
all vacuum is lost. This is just default manual brakes. But if full
time the booster is bad.
- Driving with the MC Reservoir
low. (brake lamp glows)
- Pedal pulsations. (find
the source and correct it now) (warped rotors?)
- Thinking ,
that dropping MC fluid levels , each week, is normal . IT IS NOT.
(you have a leak , find it now and correct it)
- Anything else you notice, about your brakes, acting oddly, is an alarm bell, ask for help !
- blank
- Do not re-use any
brake seals. (service related)
- Do not ever sand/file or mill, any MC or slave
piston. Buy a new ones. The seal grooves need to be 100% perfect
with no corrosion damage allowed.
- Do buy pre-loaded , Rebuilds or use Kits , never JURY
RIG, any brake system.
- One can ream (hone) the caliper bores (or slaves) and cylinder bores and kit them. (the kits must come with pistons or they are junk, most used pistons are shot "see bad grooves?")
- Never use DOT5 mineral oil brake fluid in the car,
ever. (used mostly on Race cars)
- Check calipers for dragging, they must retract, while moving or the seals or springs are bad. The seals has a property called stiction , that abates , when old and stiff. Slight drag is ok parked.
- As you drive the caliper pistons retract to loosen by 3
actions (bearing play .002 allowing natural rotor wobble, seal stiction, and
natural rotor movement, that is, no rotor is 100% perfectly flat)
- No Brake fluid or grease are allowed on rotors, pads, shoes
or drum machined surfaces. There is special brake grease used as special points. (see FSM for details)
- No cracks in the rotor or drums allowed. Very very dangerous, this is.
- Check your stopping distances against the FSM data on
brakes, for your car .
- Any damage seen or any odd action of brakes, should be investigated.
- The Calipers run on slide pins,these pins must not be seized, rusted or sticking, my Jeep has SST pins running on Teflon bores, some cars do have better brakes. (SST is Stainless Steel)
- No rear axles seals bad (usually bad bearing caused) leaking GL5 Lube oil onto the brakes parts pads or shoes, (drums off inspections)
- Missing brake springs, or clips, in the calipers or shoe parts. Look on the manufactures web site at the parts drawings, see what is missing. For free.
- Keep in mind, if the engine stalls, the vacuum powered brake booster ,does go dead, soon, @ 2 or 3 usages, and you get normal manual brakes, they are 100% good, but take more pedal force to use.
- etc.
If the list is confusing , find a brake man, now. Or read the real BOOKS.
To isolate the noise pull of the locking hub caps. (noise gone? bingo) PO means Previous Owner.
Nor, the bad wheel bearings , never ever serviced. (causing pedal pulsations?) and noise..
The Front struts can fail inside or its mounts, and can get so bad, the brakes feel funny. Get help with suspension issues , the are hard to diagnose, some times.
1996 rotors: (note they are not vented, as some sellers claim) See them? .039 thick @ .032 min. rotor.
No cracks allowed here, look very closely, and no warpage. Turn it, if it wiggles side to side, it's bad, (bearings good)
Some never serviced brakes, have spring clips on the studs, throw them away, they are for factory building reasons, (so they can't fall off the conveyor belt)
Photo #3

The Drums on a 92+ pull like this, (this is an 04') the rotors pull the same way , if need be. Only the dirt causes this to fit tight. Some just fall off. 8mm x 1.25p
Photo #4
1996 to 1998 Non ABS:
Drawing #8 (note the #20 rear wheel proportioning valve.)
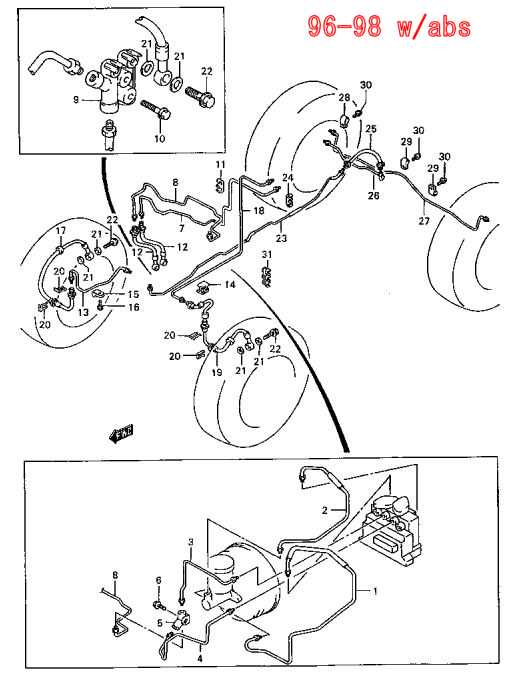
1996-98 with ABS next. The 1.8L Sport model is very much the same but the modulator bottom center looks different. (has a motor on side)
Drawing #9
CALIPER VIEWS and FACTS:
Many cars, have brake parts missing, the shims below, top my list of missing parts, from lazy mechanics, or are removed ,so that pad glue can be useds to stop brake squeal. (squealing is harmless)
The piston retracts by 3 natural forces, retracts only tiny bit ,never fully. It retracts by , natural rotor wobble and natrual bearing play, the latter is 0.002" spec.(max) and no rotors are perfect flat.
The last force that retracts, the piston , reducing drag , is the seal #6 below, the outward seal is for dust, the inboard seal there, is for pressure., and has quality called "STICTION".
The Seal when new, is very flexable and acts like a spring, this action tends to pull the piston back a hair, when pressure drops to zero. There are aftermarket retractors sold to reduce drag, but are not needed
If the seals are new, and the guide pins are not bad, seized, or rusted, at #8. then the piston will retract a tiny bit. Remove #8 and use high temperature brake grease on the pins there.
Keep in mind the retraction may only work FULLY moving, checking all this off the ground for zero drag is impossible. (drive around the block, lift the tire and see if you have drag now)
The Caliper top must float on the mount via said pins, if not, the brakes will pull or drag and not brake correctly nor evenly at all. My Jeep has SST pins riding in Teflon bushings, a quality car and brakes.
The piston groove seen below, must be rust free, and the same for the top caliper groove (in bore) or the seal will never again seal right , Caliper Rebuild factories correct this flaw.
The extra hole in the rotor below is an 8mm threaded hole for removing stuborn rotors, just put any 8mm screw there that size and turn CW. Just like the drum photo above shows. (same bolt too)
To rebuild your own calipers, buy a new piston and seal kit (pins #8/9 too) and make sure the 2 groves are rust free.
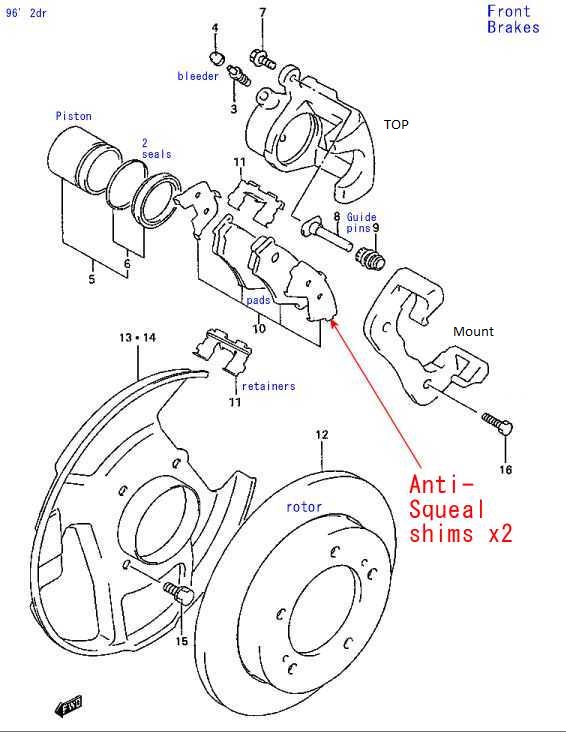 Drawing #10
PS: Suzuki sells these parts, why not ask them. ? The 2door and 4door have differnent parts, and look near the same but are not. (USA)
See Suzukicarparts.com HERE:
ver 11 . 11-21-12 (9-2-2014 revised, minor) added 96 + parts