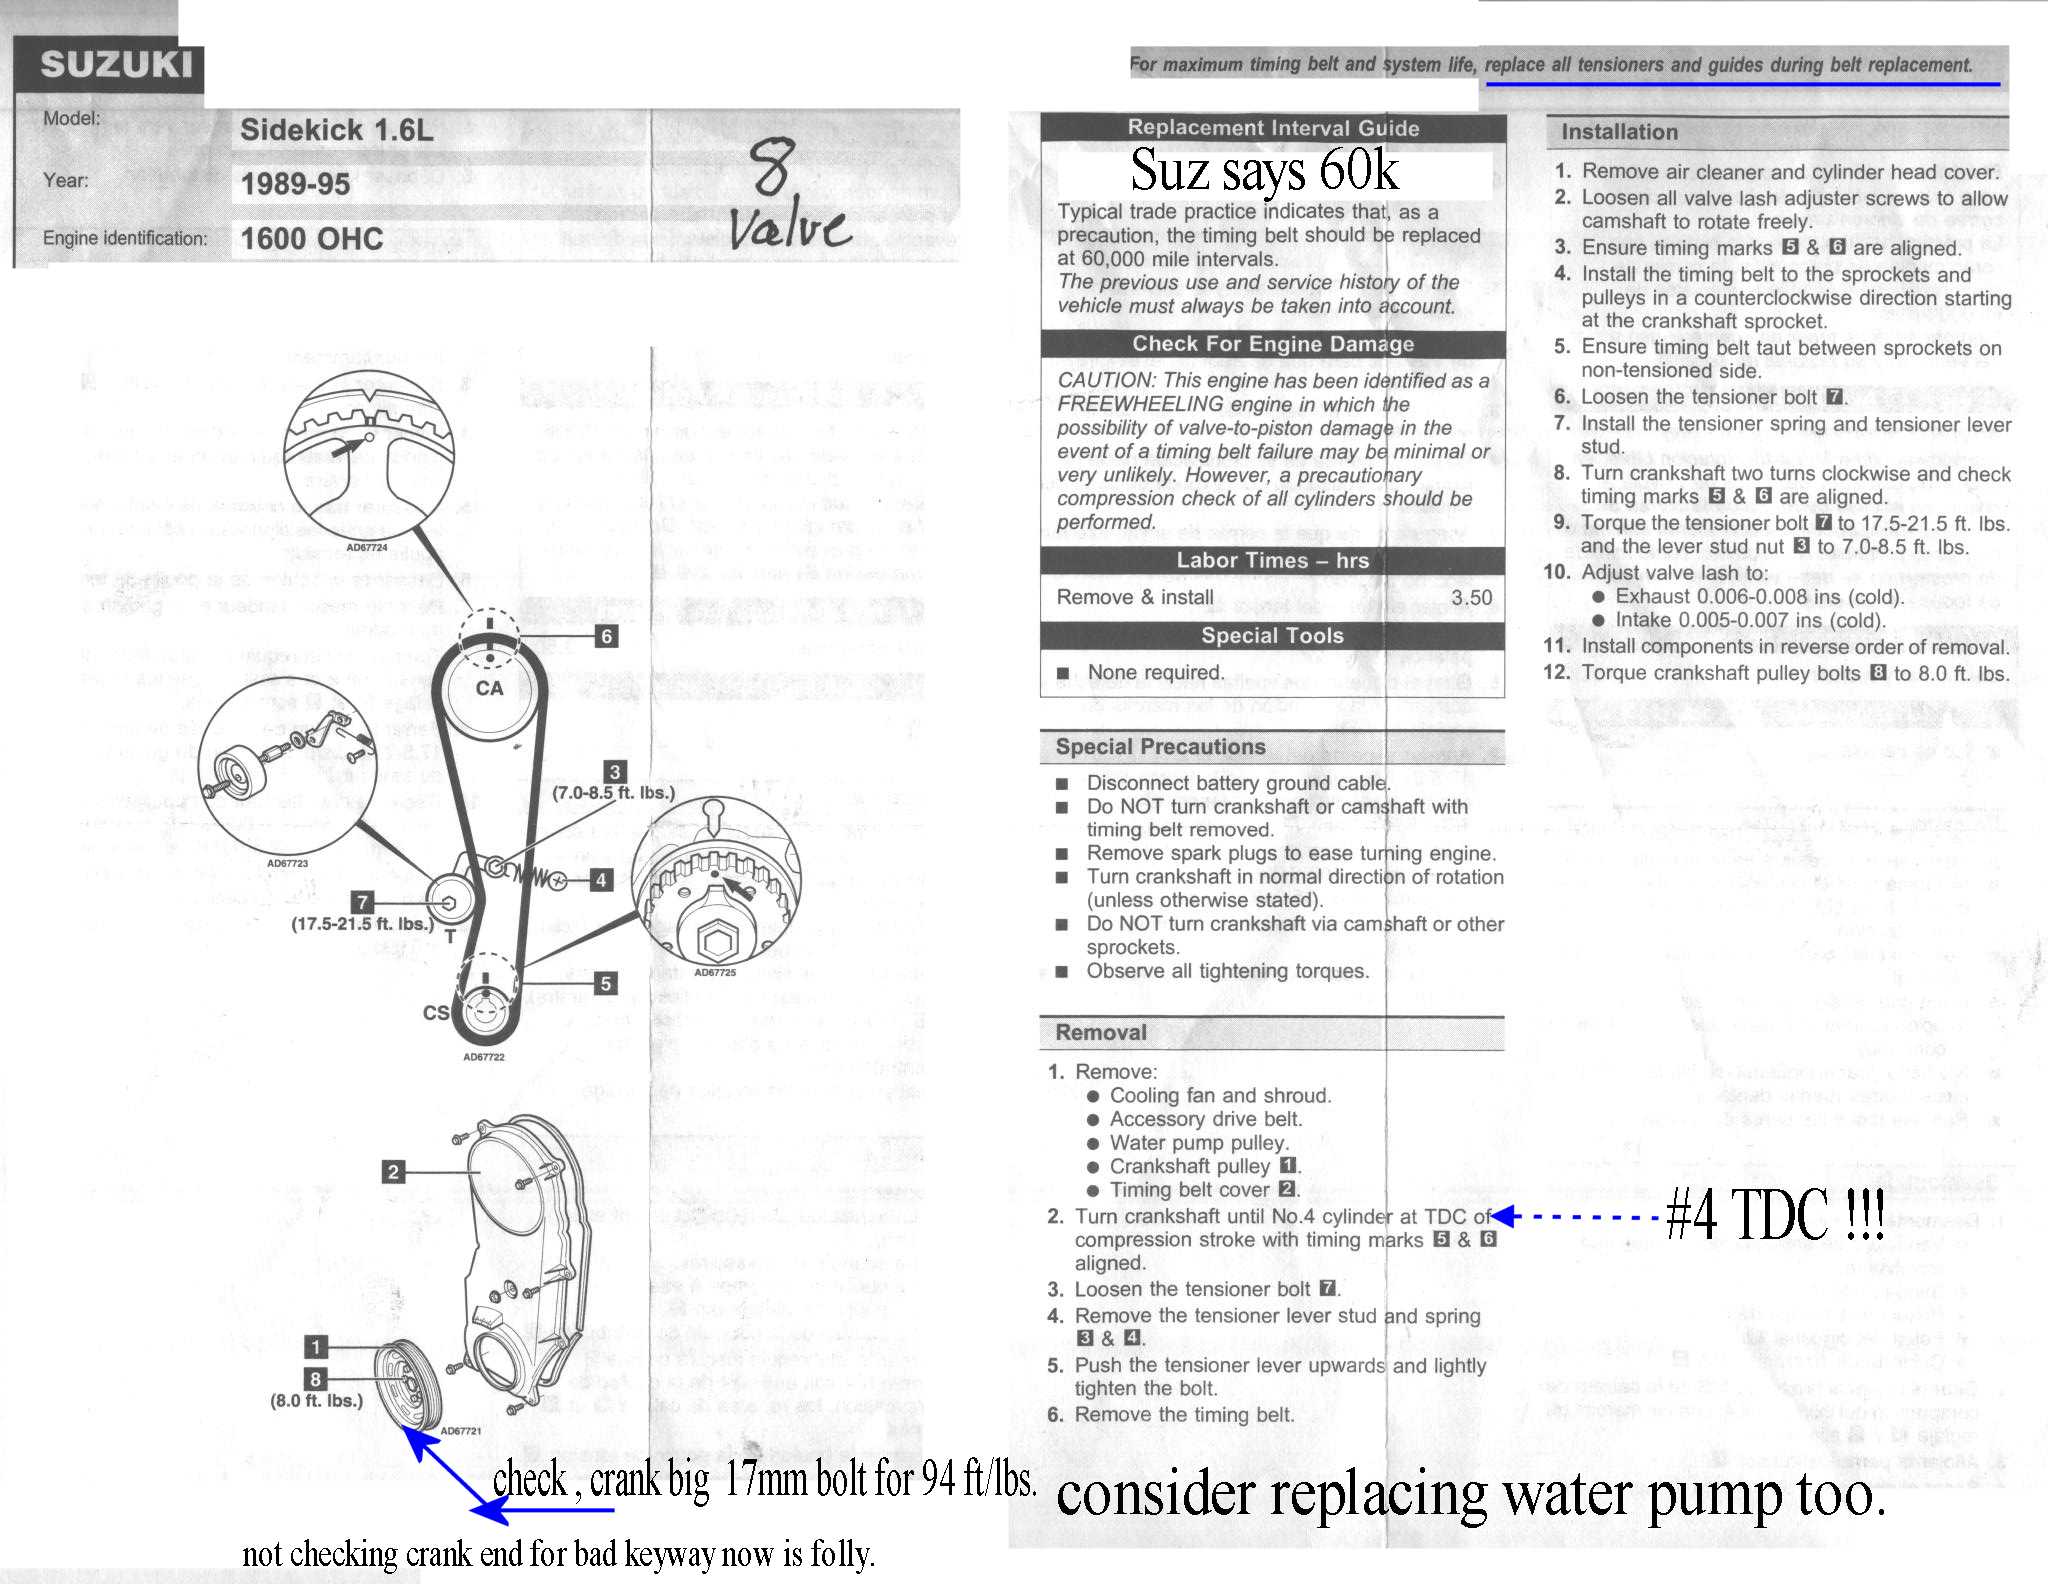
NEW
TIMING BELT and or New Water Pump.
Sidekick or Trackers

All belts fail for 1
reason, the owner did not do the 60,000 mile mandatory service.Sidekick or Trackers
The FULL FSM pages of this are on this page.
For 16v motors go back one page and look again.
The GM book has gross errors. see that here.
The torque settings are here. do not use GM settings, see errata at the end.( See 6mm warnings and non ISO Suzuki pulley bolts)
All 1.6L engines 8 VALVES ONLY , the timing belt is set with the cam at TDC #4 firing, all valves #4 closed !!!
No 1.8L , 2.0L or any chain cam driven motors !
46 steps. including pitfalls and details.
Fast checks?
THE ACID test and the sneak-a-peek checks.
Begin 8 valve T-belt Swap procedures:
The belt lasts (GATES rubber) for about 80-100k and is changed at 60k miles, to avoid a long walk home.
What you get in the box. (out of box experience? LOL )
I open my Tbelt box and see this single sheet of paper (note the TDC #4 comments)
The same #4 firing fact, is in the Alldata.com and Mitchells and Chilton's (poor IMO) online manuals. The #4 firing is stated in all books and the Real SUZUKI FSM manuals. (factory service man.)
If you install the belt using the marks, the #4 cylinder words, in not even important, but we mention, it so you can catch , errors with cams that have extra wrong marks.
Do no fail to make sure # 4 valves are fully closed (lash loose). (#4 cam heels are on their back sides) If fact, Pre-staging the cam to #4 firing is a great START !
If the Tbelt has slipped then move cam wheel to titty /60A spoke up , after removing belt.
Photo's:
See photo of Timing Belt Ready for installation.
The Sequence of Events for the 8 Valve Motor ONLY : The below assumes a new water pump is being installed (a great idea, as they last as long as a belt)
How to deal with A/C lines and A/T lines on RAD is up to you. ( see the Generation 1 89/90' Sidekick Cam Wheel cog with no extra marks)
If replacing the Crank seal, you must do #16 below. The bolt turns left, facing rear of car, CCW, to remove. (same with cam seal)
- Remove Air cleaner, Air Horn from TB and flex pipe.
(remove 8v snorkel top plastic thermal shield first, top left facing
engine)
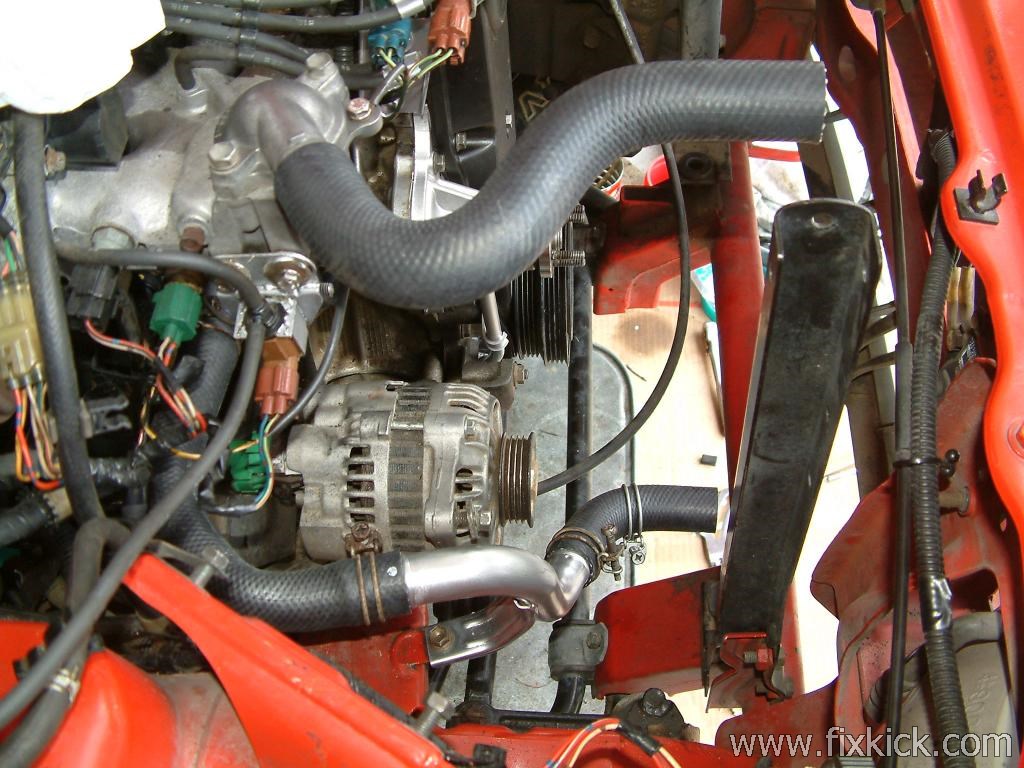
- Remove Radiator (drain it first) take the shroud with it. On Automatic, radiator can just be left installed, but slows the job.
- It is possible to tilt the radiator by losing all mounts, associated with
it. Get easy access to the front of the fan by what ever means.
- First remove the 4 nuts holding the fan and its
clutch to the water pump front flange. And remove fan assembly, This is
easier by taking the shroud with it.
- Loosen the 3 Alternator bolts/nuts, and swing it inward.
- Remove Alternator V-belt. (an any other belts, that
block the front T-belt cover) P/S , A/C?
- Remove Crank Damper pulley outer ring screws ( by unscrewing
the tiny non ISO, 8mm
headed bolts around rim) (some are Allen hex type. use
penetrating oil) ISO head screws do NOT fit.
- Remove the T-Belt cover. Bingo, behold a timing belt,
look for damage,
I check timing
marks , right now to be sure it didn't slip. You will want to
know
that.
- Remove T-Belt center stud ( to your left of
spring , facing engine ).
- Mark all the timing marks (4 ) with Liquid paper or white
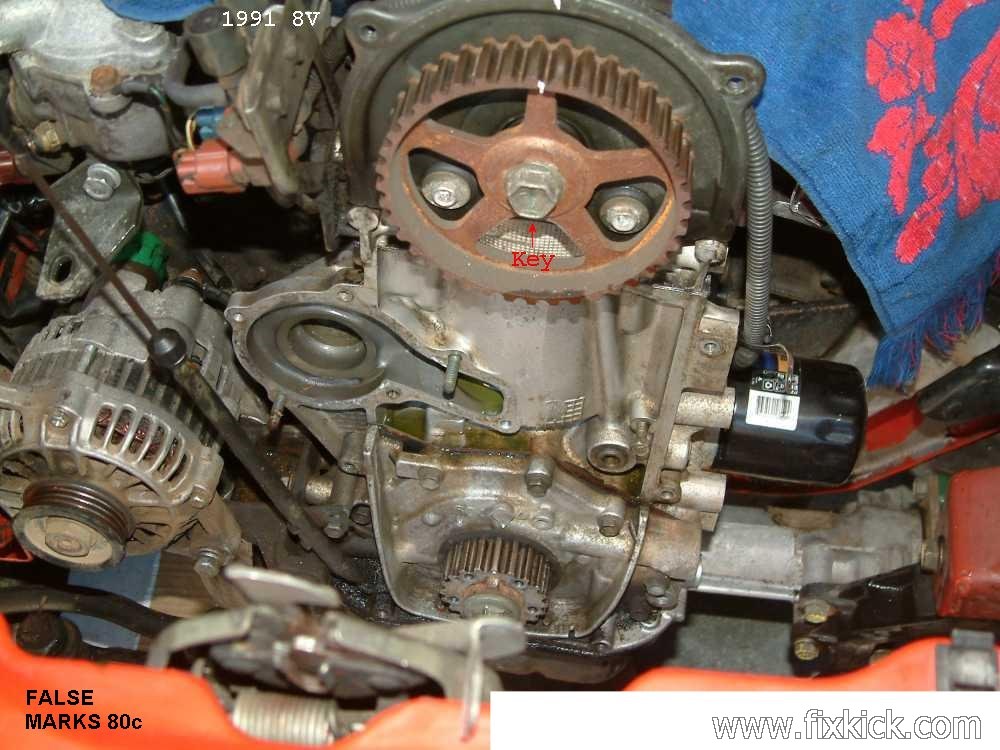
out. See photo's , there are 2 false marks 1991+ on all cam
cog wheels.
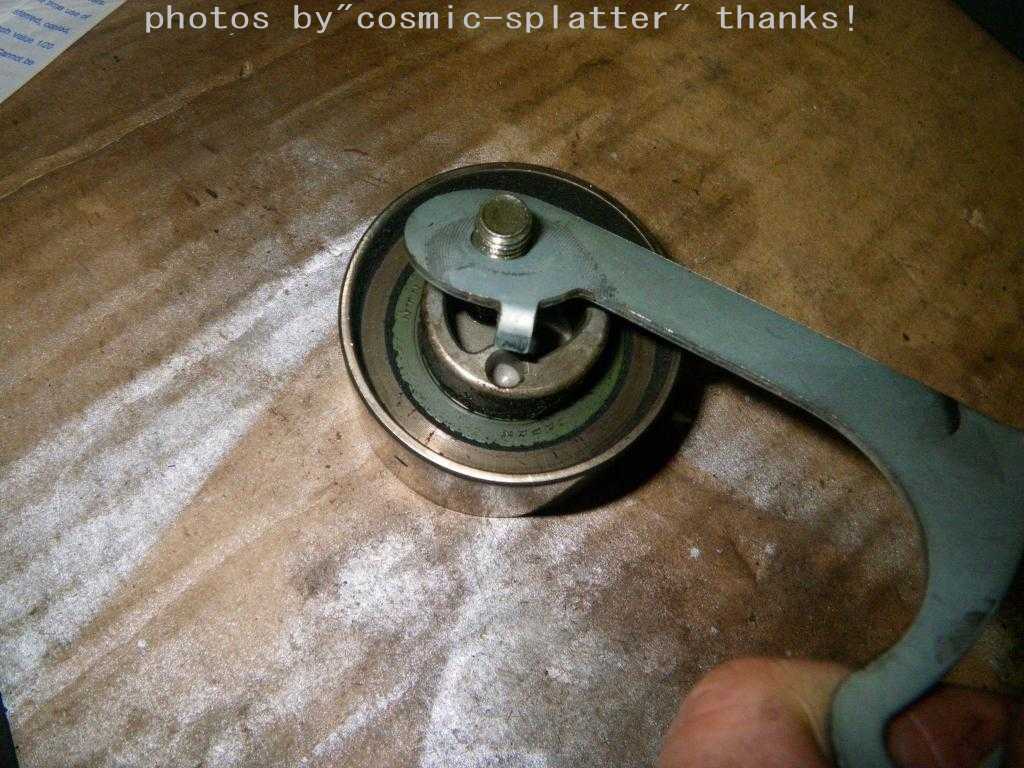
- Remove the Idler Pulley. (it has no false marks !)
- Remove the T-belt ( I never recycle them, it is a
false economy to do so.). Mark the direction first on the belt,, if you
recycle belts.
- OPTIONAL, Remove Water pump. ( dip stick must be rotated, or
removed) [ water pump replacement is easy now, I put a new
one in every 60k , OEM is best.]
- Remove valve cover.
and Spark wires (label them
1 Front,2,3,4 rear with tape ) (mark #1 wire location, on Distributor cap too)
- Optionally, remove center 17mm large
bolt and COG and inspect the key way , for damage Put car in 5th or block flywheel
with locking device,
to undo bolt , the BIG bolt, will be real tight 94 ft/lbs, if it was
loose , that is
bad news. Inspect this on any new car to the barn, or be very
sorry later. THIS IS A HIGH FAILURE POINT. A 17mm deep wall 1/2"drive socket works best.
- If the key way is damaged , you need to stop now and seek expert help. You have a serious problem.
- Loosen all the valve
adjusters. (
nuts and screws until all
Lifters are free at TDC crank 0
degree's and #4
cylinder at the compression stroke !)
- ( Why? because Cam tension will mess up the belt tensioner, see Pre-load below) The cam bias WILL foul up the Tbelt tension, relieve all tension.
- The
8 valve engine has huge cam bias and not the 16v engine, the cam on the
8v does not want to hold still, like the bigger 16v brother.
- Inspect the torque on all screws (Phillips and hex) , if any are wrong, re-torque all. The Phillips type should be staked, as done in later years.
- This inspection includes all cam caps. and head bolts that can be reached. If any head bolt is off its spec. then re-torque them all,
- Relax , drink a beer , play ball with the dog.
Or visit GF or wife , grin......
- To reassemble, just reverse the above steps using
all
new belts and pump, but I continue...
- By installing the New Pump , Now. ( The idler mounts
to pump) New gasket on pump, sealant on gasket I like
Hylomar® Gasket dressing ! Loctite/Permatex(tm).
- The first step is to make sure the crank is set like the photo below, which is at TDC mark #4 cylinder. watch the action of the rear #4 cam rockers/lobes.
- The Crank with belt off has only 1 TDC,
See TDC 4 valves closed? Beware of FALSE
MARKS & KEYS ! 60A spoke is Correct.
89/90
cam is simple
- Then Set the cam sprocket so the TDC mark on the pulley aligns 12 o clock with the notch on the top Cam backing plate. Top and center.
- WARNING THERE
maybe FALSE MARKS , SEE THEM BELOW, IN PHOTOS !! SEE 91 CAM WHEEL up close, early cogs have no false marks!
- Keep these settings and install the belt , idler and spring, do this while keep the belt tight , on the drivers side of the belt.
- Warning,
the new idler wheel must be indexed
(tab on inside edge) to the idler
ARM, so they INDEX and track TOGETHER smoothly ( NOR DAMAGED)
- This can be done by setting the Idler stud, to
loose
position, thus releasing its spring tension.
- ( you must be at TDC
#4 and all rocker lash adjusters,
backed full off the valves stem tips)
- Blank line:
- Release the Idler pulley and let the spring #6 PRE-LOAD the
belt.
- Rotate the crank shaft 2 complete rotations, Clock Wise ,
landing on the TDC 0 degree mark again (TDC #4 is firing) , check the
4 marks!
- Make sure the timing is correct
and then lock the idler bolt to
spec. See photo at end of doc. This act freezes the tension for 60k
miles. Get it right.
- Lock the spring tensioner stud last . Your Tbelt is ready to ROCK ! But do ON MORE CHECK , check the Timing on the belt. At Crank and CAM.
- Validate the timing, as in step 26-28 with TDC #4 at the
cam like this
animation,
spark plugs out .
- Set the valves to the proper LASH gaps ( solid lifters
1.6L). Do
so, at each cylinders per below lash procedures . (lash means valve clearance lash).
- All the valves , can be set in just 2 rotation positions of
the crankshaft. NEW
LASH PROCEDURE 8v only.
- At this point the engine is complete , except the
button up. (I do a validate compression
test on #1 only , in about 5min flat, if failed, repeat the above)
- Now just put everything back in the reverse order of
disassembly. Never tighten any
small bolt into aluminum without an inch pound torque wrench !
- Never
guess at torque values, see below or on my main page for all
torques. 7 ft/lbs is very tiny! In spades for cam caps and
valve cover.
- Fill the engine with TAP water, flush engine, then test for
leaks, then drain out all the water and refresh with your favorite
Glycol mix. Test the engine on pure water for 20 minutes, I
drive it around the block and then look for leaks.
- Once you are leak free , cap off with Antifreeze. ( I use 40/60Water mix). This saves time and effort if you find a leak.
- See my short cut to timing the
distributor, it can be way off if Previous owner set it wrong due to the
timing belt slippage ! See how here.
See the TANG, do put it in the that TANG hole below, or it all will fail hard.
LAST:
Don't forget to set Ignition timing, LAST (it might be off, due to a timing belt slip and someone over corrected? )
Warning that notch below, at 11pm is NOT the key-way, it is a false notch only found on 91s and for sure not found on 92 or newer 8v engines, (thanks Pete !)
Set crank at TDC , and cam as per below, and mark 5 places, so later you will not be wondering. Liquid paper® works best.
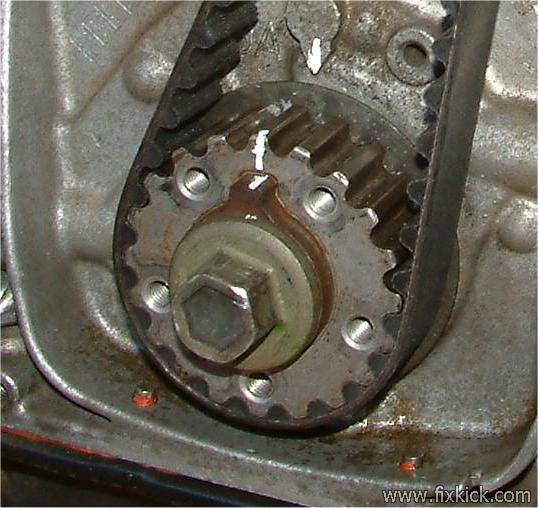
PHOTO 1 , (8v): 1991 That is the 60A Titty-nib mark there!

Look carefully, Crank cog , key is UP, crank arrow is 12pm and point to the oil pump MARK at 12pm.
Look at the CAM COG, there the Key must be DOWN, the Titty pimple must be UP and the mark on top aligned to12pm mark.
In 91 they came with 2 false marks. see them here. The 60A mark is correct for up, and the 80C mark is wrong spoke.
As you can see 8V engines are EASY ! Can be done water pump in place . (nice )
The early motors have no false marks on the cam cog wheel.
Warning some cheap "Red Star China " belts have a direction marker that must be set to Clockwise viewing engine. (crap belts have arrows, a low tech ! warning.)
My new Gates belt has no such concept or marks. ( Gates does make good belts, and many car companies USE THEM ).
Other good belts, Goodyear, Dayco, Delco, Beck ! etc.
I recommend not buying a $10 el-cheapo t-belt. Bottom fishing can be disappointing.
Photo 2 , (8v)

A fast cam timing inspection?
I think ( theory) one can remove those front top cover screws and tilt out the cover at the top and inspect the marks (TDC 0 on crank first)
This Cover is a very flexible type of plastic, like Rubbermaid(tm) food containers?.
To validate TDC 0 , all valves closed , compression , not the exhaust stroke.
This is all possible with Radiator Installed too. ( a knuckle buster)
See those RAD mounts below, loosen them on AutomaticTranys, and/or A/C equip. cars and TILT RAD !
Removing the M/T RAD is a piece of cake. no extra hoses or such things.
I pull the Radiator , to make this easy. On most cars the RAD must come out to get the fan an shroud out. and to take off the water pump.
Photo 3, (8v):
Nice side view of 8v, Not bad for 180k miles!
Note huge space in front of engine to RAD. ( no P/S , No A/C)
BELOW:
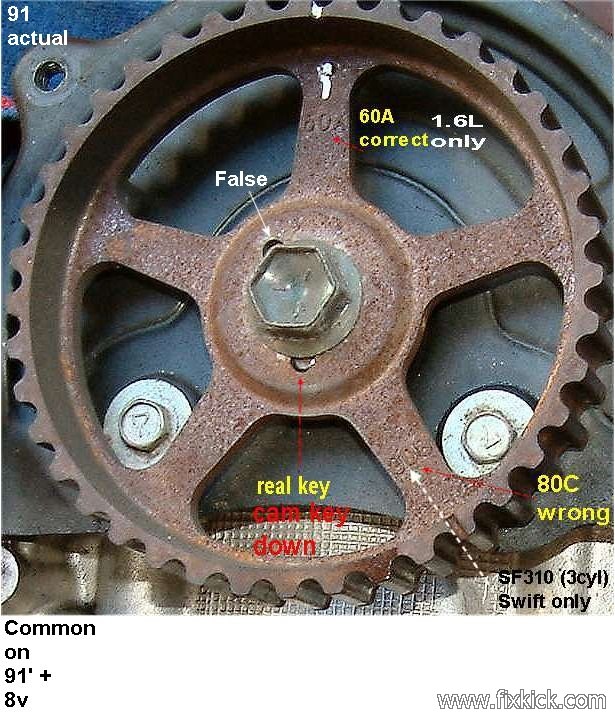
Please look for false marks, !!!! GET A POWERFUL LAMP AND LOOK. Failure to put paint marks is folly, make that cam cog before removal !!!
THAT RED KEY ,is the cam KEY location, position shown, is ready to fit belt. Common on later model 8v Kicks.
PHOTO 3 (8v) :
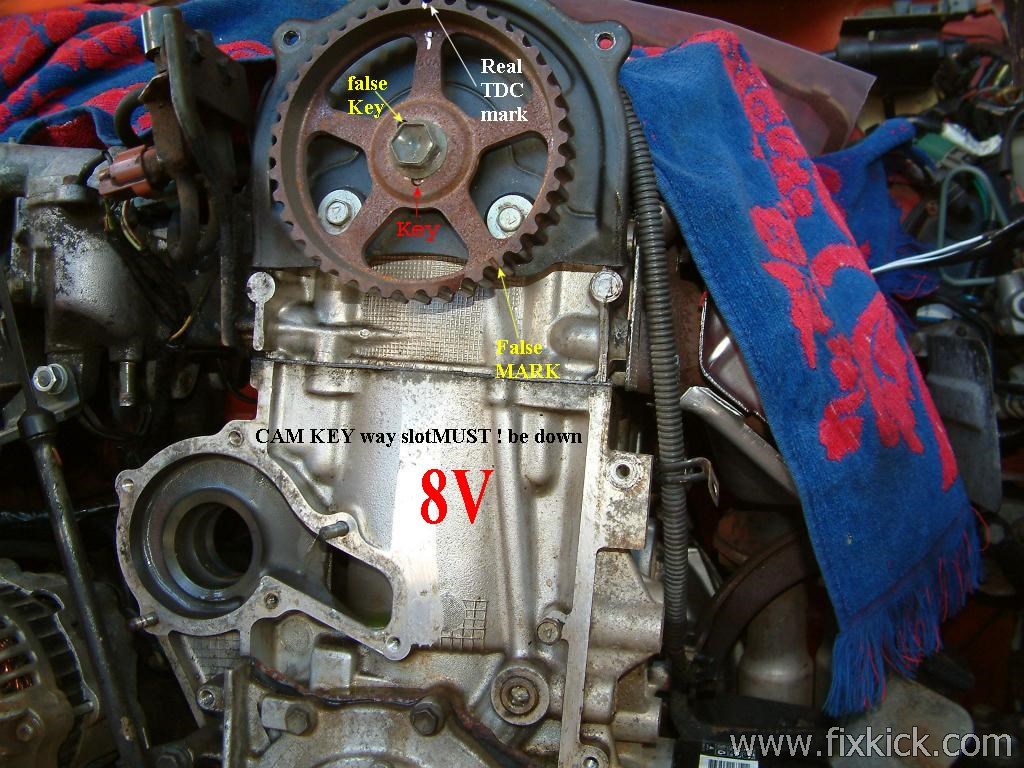
Do NOT use the FALSE MARKS shown in YELLOW above! False marks are for 3cylinder motors marked with 80C code on spoke)
The correct mark is 60A ( 60A means 1.6L)
This is my tricky photo, showing clearly where the Key really is and is not. (at proper TDC point).
Do not be fooled by extra FALSE marks, on pulley, make sure Key way is at bottom 180 degree point of cam.
Repeating AGAIN the cam is at TDC #4 (NOT 1) firing. The cam key IS DOWN. Note my #4 spoke says "50a.: embossed on it.
Some just have a Titty-nibs on the spoke (like 89s): LOOK , and record what you see before removal of the cam cog wheel.
Please Mark the KEY used on the COG wheel, before removing same, or you will be SORRY.
The crank TDC pointer is these same for #1 or #4 TDC (both #1 and #4 pistons are at TDC, look !)
The SF310 SWIFT Magyar motors shares the same cam wheel cog. ! 80C code
The Hungarian nightmare for many, who don't look close at the marks!
The SF310 looks like ? for the curious
1989 CAM COG has no false marks. See here.
The full FSM 91-95 8 valve FSM timing belt procedure is here.
All 4 pages (p13-16) zipped to 406k size. Use Unzip , XP unzip or 7zip to expand the photos and print them.
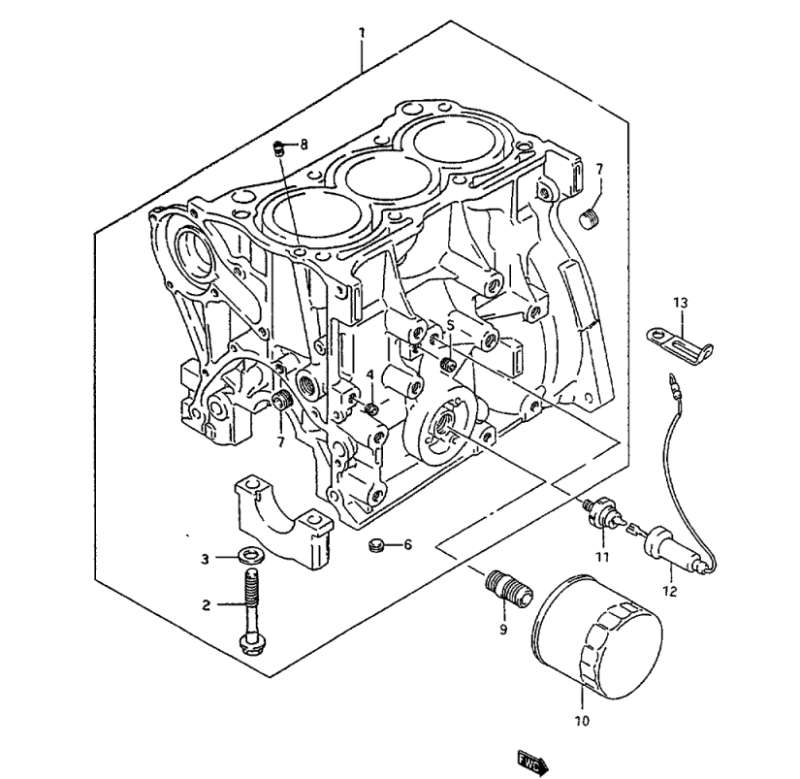
8V exploded view, ignore any timing marks on this page, this photo is for Parts ID only.
Drawing 1
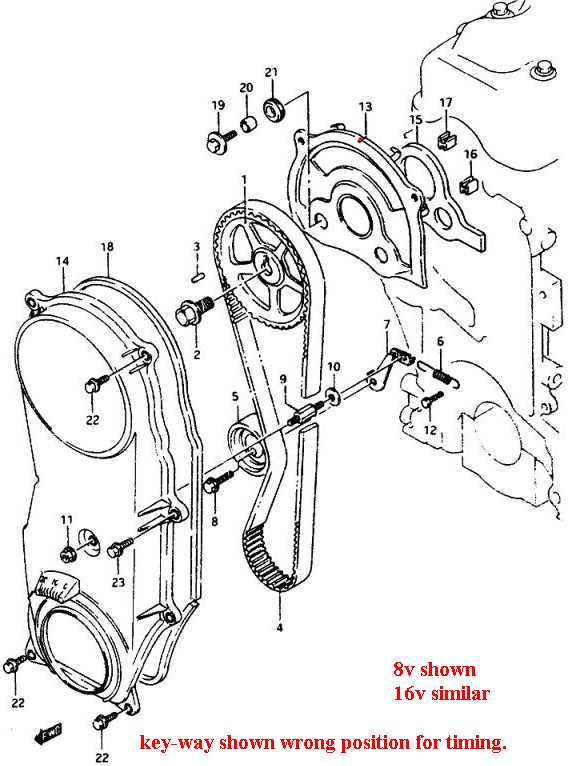
If you remove the Bolt 17mm , you will find the KEY WAY UP at 12pm , not looking to see if the key is stripped out is a travesty.
Take off the Bolt and see:
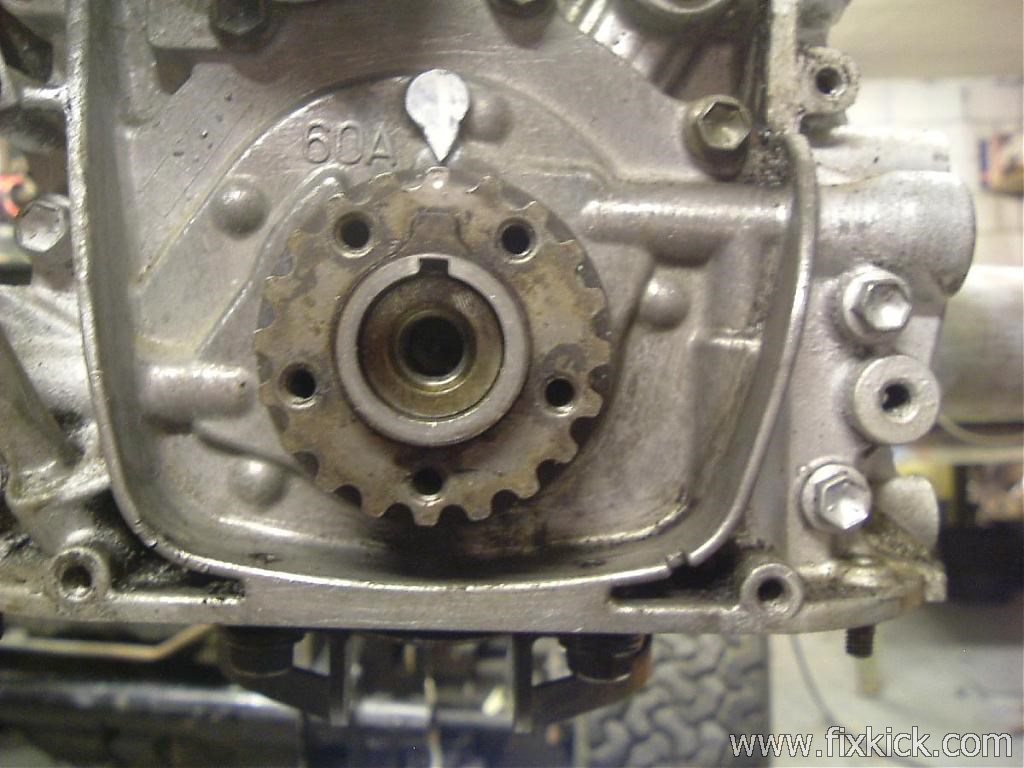
the above shows that the Cog key is not sheared or damaged. Note crank is at 12pm , and cog is at 12pm ,ALL PERFECTLY ALIGNED !
Mystery solved:
The 1991 and plus cam cog wheel is shared by the SF310 , 3 cylinder , Swift engine .. The 80C , on the spoke is for Swift motor only.
60A means , 1.6L 8v 4cylinders.
91-95 8V:
PIT-FALLS: (in order of popularity :
- Thinking? (stop that) that the cam is timed at #1 cylinder firing, NO, IT IS NOT.
- Reversing the belts, after running them or turning them inside out , (don't let kids play with the belt)
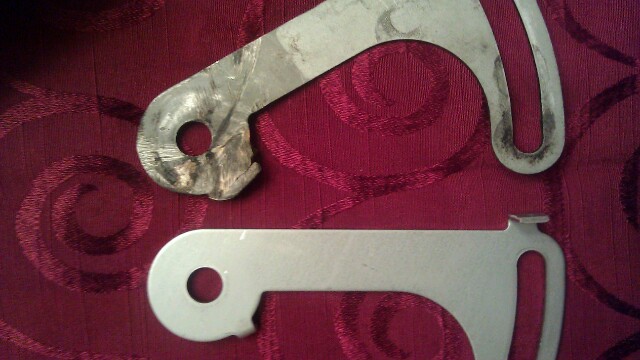
- Not indexing the Idler base lever plate TANG (tabs) as seen in warning 31 above. see parts 5 and 7 in Drawing 1 above.
- Not replacing belt every 60k miles (60,000)
read the operators guide, this is all cover there.
- Not inspecting crank key for damage or using the new
TSB new (1996) TORQUE, for the big bolt, revised in 1996 and is
(94ft/lbs) (a retroactive 89'-98' spec)
- Not torquing the big 17mm crank bolt, with flywheel locked. (yes a pain on all auto transmission cars)
- Using the false marks (80C) for KEY or Timing notch(see photo above) 91+ all have false marks in USA.
- Not replacing missing or obviously damaged parts, Suzuki still sells all these parts.
- Not
relaxing the rockers screws (lash set gross loose on 8v) for the
tensioning step, this prevents the natural 8v cam bias from causing the
tension step to fail..
- Not inspecting crank key way for damage, at least 1 time , at first day of car owner ship. (then set it up right with proper torque and Loctite(tm) and now we can forget this worry forever.)
Distributor Cheater.
Did the Previous owners, set the dizzy timing to match the wrong cam timing, now both are wrong. FAIL ! The cam MUST BE TIMED FIRST.
The cure is here.
How to get the distributor working fast. I call this FAST PLANT.
#4 Firing means:
Cam lobes at the heels of #4 Valves (the humps are lobes, he heels are the rear circular curve side)
The cog Titty (pimple mark) or 60A mark on Cam wheel spoke is at 12 O-clock. 89/90' are "simple pimple" cam wheel cogs , 91+ are 60A false mark wheels.
Last on #4 valves are both loose. at 12PM the cog mark.
Rotor very close ( with in 5 degree's of aligning with distributor #4 tower terminal and #4 wire.
Crank marker at at TDC. (pulley mark or the bottom cog mark at 12pm.)
THE ACID test and the sneak-a-peek checks.