I made this, so I could correct the huge mistakes in the FSM, like forgetting crank direction !
Assumptions:
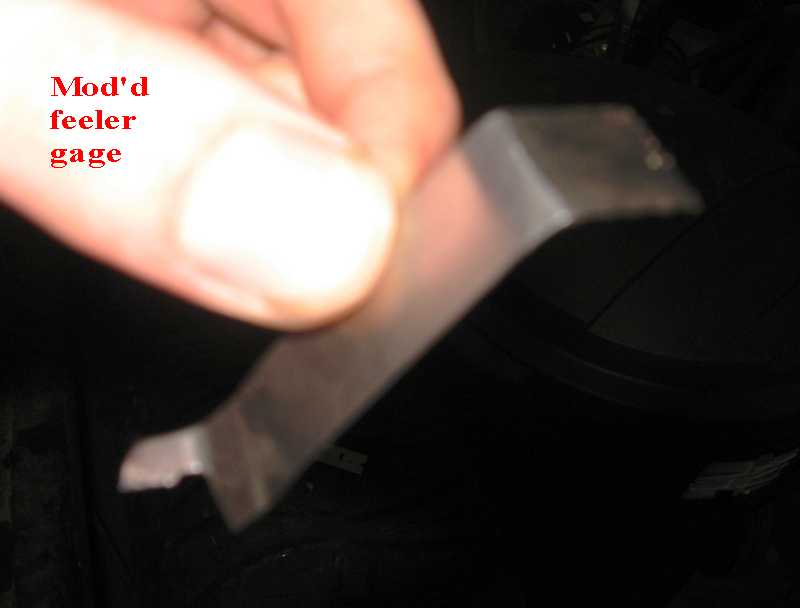
You know how to set lash with a bent feeler gauge and can remove and replace the valve cover gasket ( with a new gasket)
That the timing belt is not slipped or installed wrong. IT MUST NOT BE SO.
You checked the crank bolt , for 94 ft/lbs of torque (CW facing pulley) because they all seem to be falling off. (TSB) Horror
Always turn the crank CW, so you don't run the risk of accidental loosening this crank bolt, and subsiquent horror of above.
Tools:
You own a 17mm deep wall socket and matching wrench.
A set of bent , feeler gauges. (or bend your own)
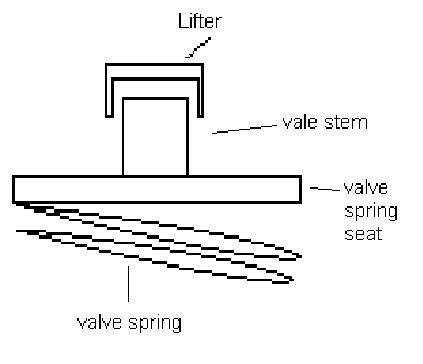
SomeValve gaps, are hard to set on this engine, keep in mind ,that you can set the gap at the valve stem or cam juncture of the rocker.
The setting of the actual stem , needs a special Suzuki too or a cut down feeler guage.
But you can set the lash by setting the lash at the cam instead of trying to reach it as below.
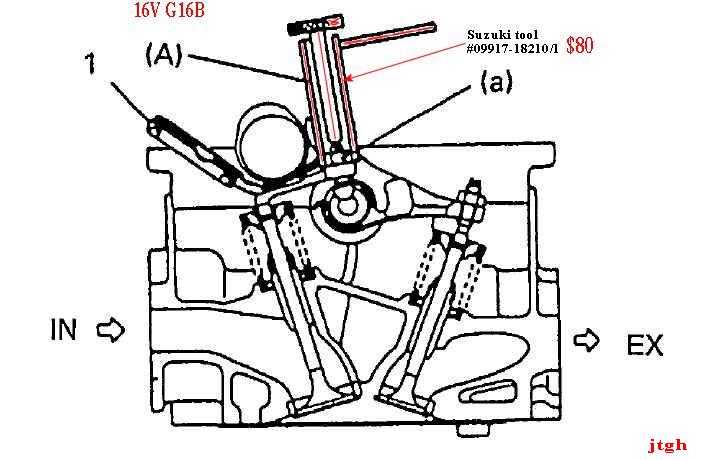
 Hard
to set gap. click to zoom.
Hard
to set gap. click to zoom.This special tool. HERE: (not really needed.) Any deep wall socket will work, some even weld on a handle.
Or buy the tool from any motor cycle shop.
- Gain access to viewing and touching, the distributor.
- Find your crank shaft timing marks and mark them with white
paint,on front cover on
newer cars.
- Get a new valve cover gasket , because we never reuse gaskets, in a 5 star shop (LOL). Trust me it will leak, if you skip this step.
- Remove the spark plug wires from the spark plug tips, mark them so you know where they go back. (can't be mixed)
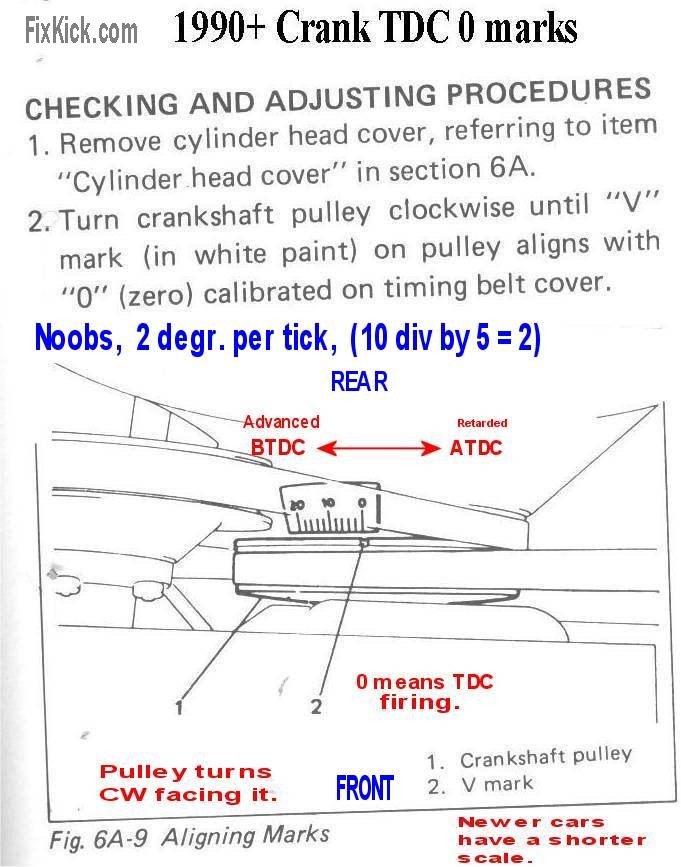
- With 17mm wrench turn the crank shaft big end (front) bolt
Clock wise , until the Timing mark on the pulley (notch) aligns
perfectly with the timing scale molded into the front timing belt
cover. 10 |||||5 |||| 0
<<< something
like this. set it to 0 degrees.
- Remove distributor cap (I call it a Dizzy), mine has 2
screws. Mark #1 spark plug wire on cap with white paint or tape.
- Look at the rotor, is the rotor at 1 pm ?
- if not at 1pm then rotate crankshaft CW ! 360 degrees ( 1 full turn on crank) and aligned again to 0 degrees.
- Is the Distributor rotor at 1 pm. NO? then someone set it
wrong. You have 2 choices now ,
time it correctly or just mark the rotor to the body with paint.
- If yes or no , you now need to check that the valves are
both closed at the front #1 cylinder pair. Intake and exhausts
valves must be on the back side of the cam lobes and loose. If
you can never get them loose, no mater what crank position, then you
must
just watch the cam action while cranking and be sure that the #1
cylinder is on the top of its compression stroke (pull spark plug on #1
and look down the hole for piston being at the very top and the crank
is at TDC 0. If you find any discrepancy here, then the TBelt is
slipped. Any !
- Yes at 1 PM ? , then all is well, and at TDC and both #1 valves are closed fully on top of compression stroke ?, then proceed.
- Note the Distributor can be timing in 4 positions, and
doing so,
is really bad practice , even though it runs, just feel sorry for the
next poor guy, trying to sort this, deviance. If you find any issues
here , then re-time the cam and then re- time the Distributor, then
last
set
the lash.
- The cam must be timed correctly before doing the Valve Lash. ( there are exceptions to this, but the technique is hard to explain.)
- Ok , you got me, one can adjust each valve by only
looking at the cam lobes, for each valve. (both lifters on the
heals , is where you do that.

- Next adjust all valves marked, valves with a feeler gauge.
(16v has pairs, no?)
- Adjust valves groups 1, 2, 5, 7 (not cylinder
numbers,but group numbers) See lash tables at end of
document.
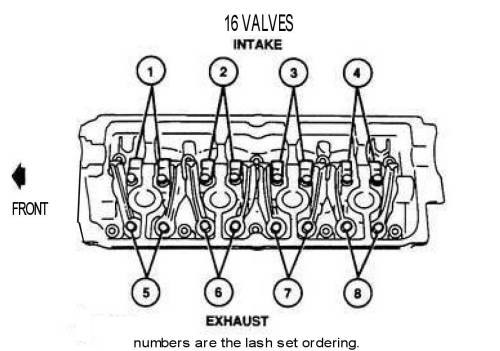
- Set the lash on each 1 at time and do not touch the others yet, just 1, 2, 5, 7
- We are done with those 4, now rotate the Crankshaft 360 degrees CW and stop at TDC 0 again.
- Adjust the valve lashes for .3, 4, 6, 8 and tighten all to 133 to 168 inch /lbs. ( each valve lock nuts is tightened as you finish each)
- do not go back can touch the other valves , unless you rotate the crank , 360 degrees again.
- This process is just 2 steps, at two TDC 0 deg. locations on the crank.
- The first step is really TDC #1 and the second is TDC #4.
now , last is the lash spec.s and the valve cover torque.
Valve cover bolt torque is , 36 inch/lbs or 3 foot/lbs ( very very tiny value)
to set the lash , many just make the below feeler gauge with the double bend , exactly like shown. Photo by: Swansen
The LASH data:
1992-95 16v: data; (Source 1995 ,Tracker 16v FSM pg. 6A2-12)
------------------------------------
When cold - Coolant 59-77 degrees F.:
Intake: .005 to .007
Exhaust: (same as intake above)
When hot - Coolant 140-154 degrees F.:
Intake: , .007 to .008)
Exhaust: (same as intake above)
------------------------------------
1996 to 1998: 16v (source, 1996 Tracker FSM)
same temp
cold
intake .005-.007
exhaust.005-.007
hot
intake .007 -.008
exhaust .007 to .008
1.8L cars have hydraulic valve lifters, and this page does not apply.
ver1